How To Create Alert Dialog Box in an Android Application using Eclipse:
In this tutorial, you will be Learning, How to display Alert Dialog Box in an activity
Here you go!!!!
Before creating an android application using Eclipse, let us see some of the key terms involved while developing this application.
Key terms involved in this project:
View: It’s a data structure whose properties store the layout and content for a specific rectangular area of the screen. A View object handles measuring, its layout, drawing, focus changes, scrolling, and key/gestures for the screen area it represents. The View class serves as a base class for all widgets. The list of widgets available includes i.e. TextView, EditText, Button, RadioButton, Checkbox, ScrollView, etc.,
** UPDATE: Android Complete tutorial now available here.
Dialog: A dialog is a small window that prompts the user to make a decision or enter additional information. A dialog does not fill the screen and is normally used for modal events that require users to take an action before they can proceed. An alert dialog can show a title, up to three buttons, a list of selectable items, or a custom layout.
The AlertDialog class takes care of automatically setting WindowManager.LayoutParams.FLAG_ALT_FOCUSABLE_IM for you based on whether any views in the dialog return true from View.onCheckIsTextEditor(). Generally you want this set for a Dialog without text editors, so that it will be placed on top of the current input method UI. You can modify this behavior by forcing the flag to your desired mode after calling onCreate(Bundle).
The tutorial is about how to display alert dialog box in the UI of the android application.
This project is developed in Eclipse 4.2 (Juno) and tested with Android 2.2
If you are new to android application project, to create a new project in Eclipse refer Creation of Android Project.
Coding:
Now let’s go to the coding section. This project requires following files.
Source Code:
- alertdialog.java – Activity (main screen)
Activity Files:
- activity_alertdialog.xml – main screen/ layout
res – Values:
- strings.xml - strings available in layout/activity
Manifest file:
- AndroidManifest.xml
Here is the coding for the above files.
Alertdialog.java
package com.example.alertdialog; // alert dialog package
import android.app.Activity;  // Required to create an activity.
import android.app.AlertDialog; // required to be imported for alert dialog box
import android.content.Context; // allows  access to application-specific resources and classes.
import android.content.DialogInterface; //Required for DialogInterface.onclicklistener()
import android.os.Bundle; // A mapping from String values to various Parcelable types.
import android.view.View; // For various views/ widgets
import android.view.View.OnClickListener;
import android.widget.Button; // Required for using button properties in activity
public class Alertdialog extends Activity {             // all classes should extend activity
	final Context context = this; // object for context class
	private Button button;  //  object for button class
	public void onCreate(Bundle savedInstanceState) {   // Create a new activity
		super.onCreate(savedInstanceState);
		setContentView(R.layout.activity_alertdialog); // display activity while starting the app (Main)
		button = (Button) findViewById(R.id.alert);  // acquiring button properties from activity.xml
		// add button listener
		button.setOnClickListener(new OnClickListener() {
 		@Override
		public void onClick(View arg0) {
 			AlertDialog.Builder alertDialogBuilder = new AlertDialog.Builder(context);
 			// set title for your alert dialog box
			alertDialogBuilder.setTitle("Are you sure to exit???");
 			// set alert dialog message
			alertDialogBuilder
				.setMessage("Click yes to exit!")  // Set the message to display.
				.setCancelable(false) //  Sets whether the dialog is cancelable or not.
// Set a listener to be invoked when the positive button of the dialog is pressed.
				.setPositiveButton("Yes",new DialogInterface.OnClickListener() {
					public void onClick(DialogInterface dialog,int id) {
						// if yes button is clicked, close current activity
						Alertdialog.this.finish();
					}
				  })
//Set a listener to be invoked when the negative button of the dialog is pressed
				.setNegativeButton("No",new DialogInterface.OnClickListener() {
					public void onClick(DialogInterface dialog,int id) {
					// if no button is clicked, just close the dialog box and do nothing
						dialog.cancel();
					}
				});
				// create alert dialog
				AlertDialog alertDialog = alertDialogBuilder.create();
 				// Display alert dialog
				alertDialog.show();
			}
		});
	}
}
Activity_alertdialog.xml:
Menu : activity_progressbar.xml
AndroidManifest.xml:
strings.xml:
    Alertdialog

    Settings
Styles.xml:
Run the android application:
Android applications can be run on the android devices. You can either connect a hardware to the system to test the application or you can use the android virtual devices (AVD) Manager to create/manage the virtual devices running on emulator to run the application.
If you are new to create a Android Virtual Device (AVD), refer Creating Android Virtual Device.
To run the application/ project, Build your project using Project -> Build Project.
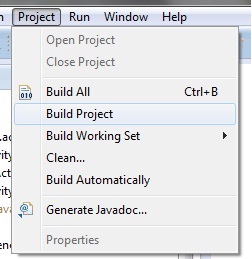
This will show errors in Console window at the bottom of the working area in case your project contains.
If your build is successful, Run your application using Run -> Run or Press Ctrl +F11.
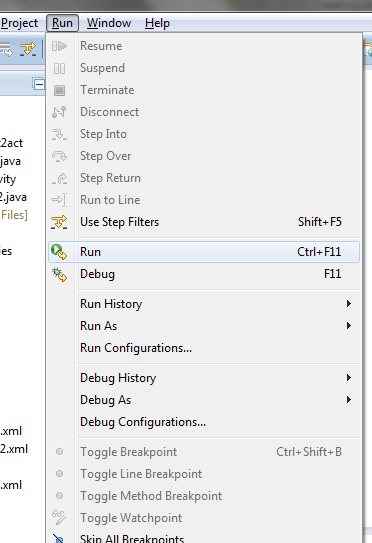
Upon running the application, the emulator will be launched which displays the AVD on your screen.

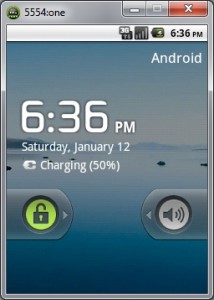
To test your application, unlock the screen and double click on your app.
You can see your app with the image set during the android project creation in AVD.
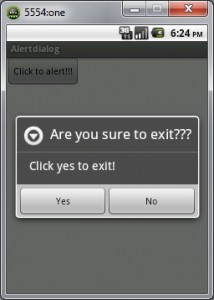
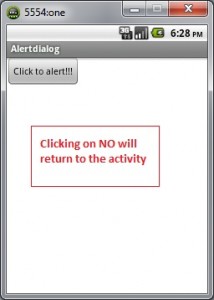
Now the application runs and the activity alert dialog appears as shown below.
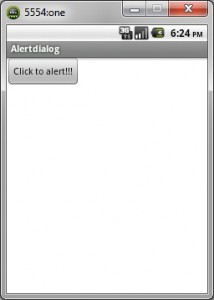
Clicking on Alert button displays the alert dialog box.
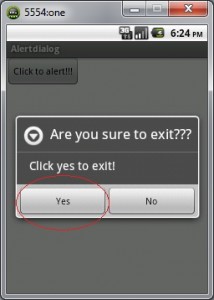
Click on Yes.
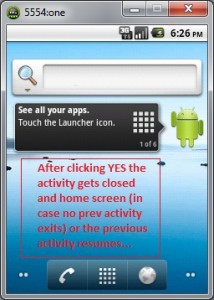
Now the activity is closed and you can see the home screen or a previous activity (If any activity was started before).
Click on No.
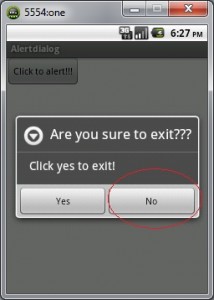
Clicking on No will do nothing and returns to the activity itself.
Thus the android application project is developed successfully.
![]()
Click Here To Share This..!!
Share