How To Create Frame Layout in an Android Application
In this Tutorial, you will Learn How to create Frame Layout
Here you go!!!!
Before creating an android application using Eclipse, let us see some of the key terms involved while developing this application.
Key terms involved in this project:
Frame Layout: The FrameLayout is a placeholder on screen that you can use to display a single view. FrameLayout is designed to display a single item at a time. You can have multiple elements within a FrameLayout but each element will be positioned based on the top left of the screen. Elements that overlap will be displayed overlapping. Views that you add to a FrameLayout is always anchored to the top left of the layout. FrameLayout can become more useful when elements are hidden and displayed programmatically. You can use the attribute android:visibility in the XML to hide specific elements. You can call setVisibility from the code to accomplish the same thing.
** UPDATE: Android Complete tutorial now available here.
The three available visibility values are visible, invisible (does not display, but still takes up space in the layout), and gone (does not display, and does not take space in the layout).
The tutorial is about how to display an activity in frame layout.
This project is developed in Eclipse 4.2 (Juno) and tested with Android 2.2
If you are new to android application project, to create a new project in Eclipse refer Creation of Android Project.
Coding:
Now let’s go to the coding section. This project requires following files.
Source Code:
- Framelayout.java (Activity in framelayout)
Activity Files:
- activity_framelayout.xml - framelayout activity
res – Values:
- strings. xml - strings available in frame layout
Manifest file:
- AndroidManifest.xml
Here is the coding for the above files.
Framelayout.java:
package com.simplecodestuffs.framelayout; //Package framelayout
import android.os.Bundle; // A mapping from String values to various Parcelable types.
import android.app.Activity; // Required to create an activity
import android.view.Menu; // Interface for managing the items in a menu
public class Framelayout extends Activity { // all classes extends activity
	@Override
	protected void onCreate(Bundle savedInstanceState) { // Create an activity/ screen
		super.onCreate(savedInstanceState);
// displays activity framelayout in frame layout when app starts
		setContentView(R.layout.activity_framelayout);
	}
	@Override
	public boolean onCreateOptionsMenu(Menu menu) {
		// Inflate the menu; this adds items to the action bar if it is present.
		getMenuInflater().inflate(R.menu.activity_framelayout, menu);
		return true;
	}
}
activity_framelayout.xml:
Menu : activity_framelayout.xml
AndroidManifest.xml:
strings.xml:
    Framelayout

    Settings
Styles. xml:
Run the android application:
Android applications can be run on the android devices. You can either connect hardware to the system to test the application or you can use the android virtual devices (AVD) Manager to create/manage the virtual devices running on emulator to run the application.
If you are new to create a Android Virtual Device (AVD), refer Creating Android Virtual Device.
To run the application/ project, Build your project using Project -> Build Project.
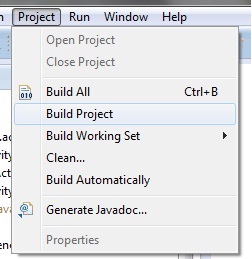
This will show errors in Console window at the bottom of the working area in case your project contains.
If your build is successful, Run your application using Run -> Run or Press Ctrl +F11.
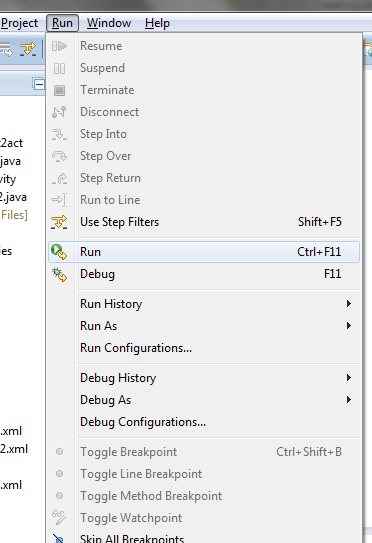
Upon running the application, the emulator will be launched which displays the AVD on your screen.
You can see your app with the image set during the android project creation in AVD. Upon running the application, the emulator will be launched with the selected/ available AVD created on your screen.

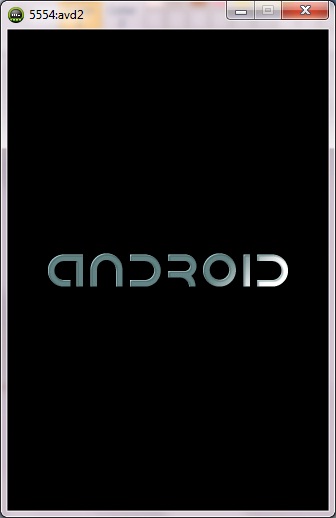
To test your application, unlock the screen and double click on your app.
AVD Home screen
Frame Layout
Thus the android application project is executed successfully.
![]()
Click Here To Share This..!!
Share