How To Create Image View in an Android Application using Eclipse:
In this tutorial, you will be Learning, How to display Image View in an activity
Here you go!!!!
Before creating an android application using Eclipse, let us see some of the key terms involved while developing this application.
Key terms involved in this project:
Imageview: Displays an arbitrary image, such as an icon. The ImageView class can load images from various sources (such as resources or content providers), takes care of computing its measurement from the image so that it can be used in any layout manager, and provides various display options such as scaling and tinting.
Drawable: A drawable resource is a general concept for a graphic that can be drawn to the screen and which you can retrieve with APIs such as getDrawable(int) or apply to another XML resource with attributes such as android:drawable and android:icon. There are several different types of drawables: Bitmap File, Nine-Patch File, Layer list, State List, Level list, Transition Drawable, Inset Drawable, Clip Drawable, Scale Drawable, Shape Drawable. This project requires bitmap file/image file to fill the activity.
Bitmap File: A bitmap image. Android supports bitmap files in a three formats: .png (preferred) .jpg (acceptable), .gif (discouraged). You can reference a bitmap file directly, using the filename as the resource ID, or create an alias resource ID in XML.
The tutorial is about how to display an image file.
This project is developed in Eclipse 4.2 (Juno) and tested with Android 2.2
If you are new to new to android application project, to create a new project in Eclipse refer Creation of Android Project.
Coding:
Now let’s go to the coding section. This project requires following files.
Source Code:
- Image.java – Activity (main screen)
Activity Files:
- activity_image.xml – main screen/ layout
res – Values:
- strings.xml - strings available in layout/activity
Manifest file:
- AndroidManifest.xml
Here are the coding for the above files.
Image.java:
package com.example.imageview; // Package Image View
import android.os.Bundle; // A mapping from String values to various Parcelable types.
import android.app.Activity; // Required to create an activity
import android.view.Menu; //Interface for managing the items in a menu.
public class Image extends Activity { // all class extends Activity
	@Override
	protected void onCreate(Bundle savedInstanceState) { // Create a new activity
		super.onCreate(savedInstanceState);
		setContentView(R.layout.activity_image); // display activity image  when app starts
	}
}
activity_image.xml:
Menu : activity_image.xml
AndroidManifest.xml:
strings.xml:
    Imageview


    Image successfully loaded
Styles. xml:
Run the android application:
Android applications can be run on the android devices. You can either connect a hardware to the system to test the application or you can use the android virtual devices (AVD) Manager to create/manage the virtual devices running on emulator to run the application.
If you are new to create a Android Virtual Device (AVD), refer Creating Android Virtual Device.
To run the application/ project, Build your project using Project -> Build Project.
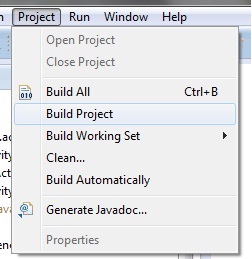
This will show errors in Console window at the bottom of the working area in case your project contains.
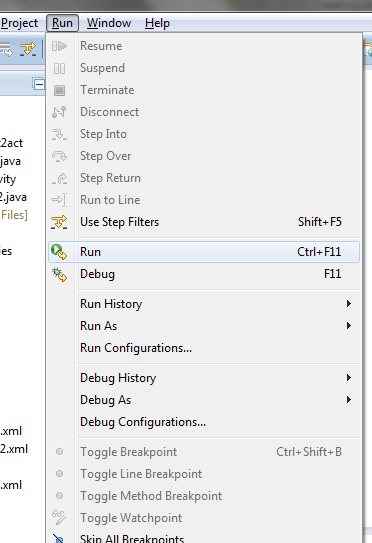
If your build is successful, Run your application using Run -> Run or Press Ctrl +F11.
Upon running the application, the emulator will be launched which displays the AVD on your screen.

You can see your app with the image set during the android project creation in AVD.
AVD_Home screen_7
Now the activity created for image view is shown as in the figure below with the image file available in drawable folder.
Image view
Thus the android application project is executed successfully.
Click Here To Share This..!!
Share