How To Create List View in an Android Application
In this Tutorial, you will Learn How to view the activity using scroll view?
Here you go!!!!
Before creating an android application using Eclipse, let us see some of the key terms involved while developing this application.
Key terms involved in this project:
Listview: ListView is a view group that displays a list of scrollable items. The list items are automatically inserted to the list using an Adapter that pulls content from a source such as an array or database query and converts each item result into a view that’s placed into the list.
Adapter: An Adapter object acts as a bridge between an AdapterView and the underlying data for that view. The Adapter provides access to the data items. The Adapter is also responsible for making a View for each item in the data set.
Array- Adapter: A concrete BaseAdapter that is backed by an array of arbitrary objects. By default this class expects that the provided resource id references a single TextView. If you want to use a more complex layout, use the constructors that also take a field id. That field id should reference a TextView in the larger layout resource. However the TextView is referenced, it will be filled with the toString() of each object in the array. You can add lists or arrays of custom objects. Override the toString() method of your objects to determine what text will be displayed for the item in the list.
To use something other than TextViews for the array display, for instance, ImageViews, or to have some of data besides toString() results fill the views, override getView(int, View, ViewGroup) to return the type of view you want.
The tutorial is about how to display contents in activity in the list view.
This project is developed in Eclipse 4.2 (Juno) and tested with Android 2.2
If you are new to android application project, to create a new project in Eclipse refer Creation of Android Project.
Coding:
Now let’s go to the coding section. This project requires following files.
Source Code:
- Listview.java
Activity Files:
- activity_listview.xml- listview activity (Main activity)
- activity_rows.xml – activity for viewing text in rows
res – Values:
- strings.xml - strings available in list view activity
Manifest file:
- AndroidManifest.xml
Here is the coding for the above files.
Listview.java:
package com.simplecodestuffs.listview; // Package listview
import java.util.ArrayList; // For array list
import java.util.Arrays; // for arrays
import android.app.Activity; // Required to create an activity
import android.os.Bundle; // A mapping from String values to various Parcelable types
import android.widget.ArrayAdapter; // expects provided resource id references a single TextView
import android.widget.ListView; // shows items in a vertically scrolling list
public class Listview extends Activity { // all classes extends activity
  private ListView mainListView ; // object for Listview class
  private ArrayAdapter listAdapter ;// object for ArrayAdapter
  /** Called when the activity is first created. */
  @Override
  public void onCreate(Bundle savedInstanceState) { // Creates a new activity
    super.onCreate(savedInstanceState);
    setContentView(R.layout.activity_listview); // displays main activity (listview) when app starts
        // Find the ListView resource.
    mainListView = (ListView) findViewById( R.id.ListView );

    // Create and populate a List of continents
    String[] continents = new String[] { "Asia", "Australia", "Europe", "North America" };
    ArrayList continentlist = new ArrayList();
    continentlist.addAll( Arrays.asList(continents) );
        // Create ArrayAdapter using the continent list.
    listAdapter = new ArrayAdapter(this, R.layout.activity_rows, continentlist);
        // Add more continents. If you passed a String[] instead of a List
    // into the ArrayAdapter constructor, you must not add more items.
    // Otherwise an exception will occur.
        listAdapter.add("Antartica");
    listAdapter.add( "South America" );
    listAdapter.add( "Africa" );
    // Set the ArrayAdapter as the ListView's adapter.
    mainListView.setAdapter( listAdapter );
  }
}
activity_listview.xml:
activity_rows.xml:
Menu : activity_listview.xml
AndroidManifest.xml:
strings.xml:
    Listview

    List view....
    Settings
Styles. xml:
Run the android application:
Android applications can be run on the android devices. You can either connect hardware to the system to test the application or you can use the android virtual devices (AVD) Manager to create/manage the virtual devices running on emulator to run the application.
If you are new to create a Android Virtual Device (AVD), refer Creating Android Virtual Device.
To run the application/ project, Build your project using Project –> Build Project.
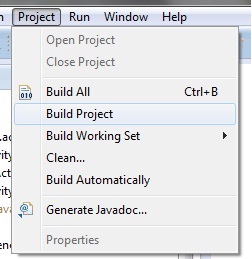
This will show errors in Console window at the bottom of the working area in case your project contains.
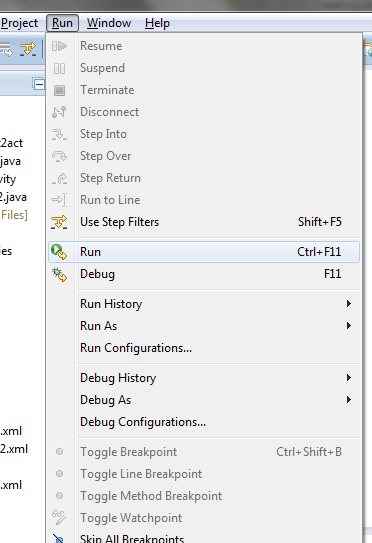
If your build is successful, Run your application using Run –> Run or Press Ctrl +F11.
Upon running the application, the emulator will be launched which displays the AVD on your screen.
You can see your app with the image set during the android project creation in AVD. Upon running the application, the emulator will be launched with the selected/ available AVD created on your screen.

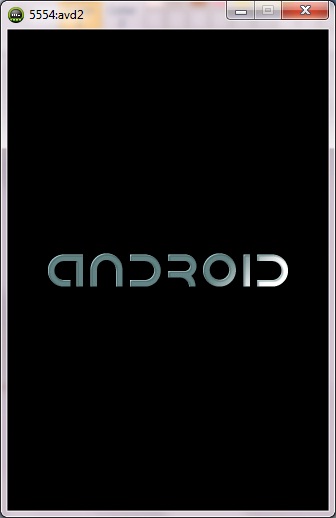
To test your application, unlock the screen and double click on your app.
AVD Home screen
list view
Thus the android application project is executed successfully.
![]()
Click Here To Share This..!!
Share