
Struts 2 Push Tag Example
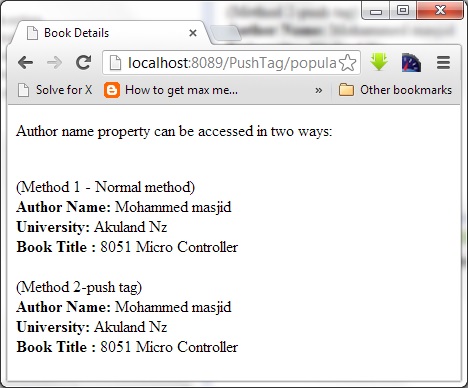
Struts 2 “push” tag is used to push a value into the ValueStack. The value we pushed using push tag will be on top of the ValueStack, so it can be easily referenced using the first-level OGNL expression instead of a deeper reference. The following code show how to do this.
 |
|
1. Action
package com.simplecode.action;

import com.simplecode.util.AuthorBean;

//PushTag Action class
public class BookInfoAction {

	private AuthorBean authorBean;

	public String populate() {
	  authorBean = new AuthorBean
             ("Mohammed masjid", "Akuland Nz","8051 Micro Controller");
		return "populate";
	}

	public String execute() {
		return "success";
	}

	public AuthorBean getAuthorBean() {
		return authorBean;
	}

	public void setAuthorBean(AuthorBean authorBean) {
		this.authorBean = authorBean;
	}

}
2. Bean
A simple AuthorBean class, later will push it into the stack for easy access.
package com.simplecode.util;

public class AuthorBean {

	private String name;
	private String university;
	private String book;

	public AuthorBean(String name, String university, String book) {
		this.name = name;
		this.university = university;
		this.book = book;
	}

	public String getName() {
		return name;
	}

	public void setName(String name) {
		this.name = name;
	}

	public String getUniversity() {
		return university;
	}

	public void setUniversity(String university) {
		this.university = university;
	}

	public String getBook() {
		return book;
	}

	public void setBook(String book) {
		this.book = book;
	}

}
3. Push tag example
It shows the use of “push” tag.
<%@taglib uri="/struts-tags" prefix="s"%>
<html>
<head>
<title>Book Details</title>
</head>
<body>
	<p>Author name property can be accessed in two ways:</p>

	<br /> (Method 1 - Normal method)
	<br /> <b>Author Name:</b>
	<s:property value="authorBean.name" />
	<br /> <b> University: </b>
	<s:property value="authorBean.university" />
	<br/><b>Book Title :</b>
	<s:property value="authorBean.book" />


	<br /> <br /> (Method 2-push tag)

	<s:push value="authorBean">
	   <b>Author Name:</b>
	   <s:property value="name" />
	   <b> University: </b>
	   <s:property value="university" />
	   <b>Book Title :</b>
	   <s:property value="book" />
	</s:push>

</body>
</html>
How it work?
Normally, if you want to get the bean’s property, you may reference it like
<s:property value="authorBean.name" />
With “push” tag, you can push the “authorBean” to the top of the stack, and access the property directly
<s:property value="name" />
Both are returned the same result, but with different access mechanism only.
4. Struts.xml
Link it
<?xml version="1.0" encoding="UTF-8" ?>
<!DOCTYPE struts PUBLIC
"-//Apache Software Foundation//DTD Struts Configuration 2.0//EN"
"http://struts.apache.org/dtds/struts-2.0.dtd">
<struts>
	<package name="default" extends="struts-default">
		<action name="*BookAction" method="{1}"
			class="com.simplecode.action.BookInfoAction">
			<result name="populate">/bookDetails.jsp</result>
		</action>
	</package>
</struts>
5. Demo
http://localhost:8089/PushTag/populateBookAction.action
Run it

Struts 2 + Spring Integration Example
In this following example we shall see how to integrate Spring and Struts 2 using the struts2-spring-plugin. We integrate Spring with Struts2 to utilize the Spring’s Dependency Injection feature.
First add the org.springframework.web.context.ContextLoaderListener to the web.xml file.
File : web.xml
<?xml version="1.0" encoding="UTF-8"?>
<web-app xmlns:xsi="http://www.w3.org/2001/XMLSchema-instance"
xmlns="http://java.sun.com/xml/ns/javaee"
xmlns:web="http://java.sun.com/xml/ns/javaee/web-app_2_5.xsd"
xsi:schemaLocation="http://java.sun.com/xml/ns/javaee
http://java.sun.com/xml/ns/javaee/web-app_2_5.xsd" id="WebApp_ID" version="2.5">
  <display-name>Struts2</display-name>
  	<filter>
<filter-name>struts2</filter-name>
<filter-class>org.apache.struts2.dispatcher.ng.filter. StrutsPrepareAndExecuteFilter
        </filter-class>
	</filter>
	<listener>
<listener-class>org.springframework.web.context. ContextLoaderListener</listener-class>
	</listener>
	<filter-mapping>
		<filter-name>struts2</filter-name>
		<url-pattern>/*</url-pattern>
	</filter-mapping>
	<welcome-file-list>
		<welcome-file>index.jsp</welcome-file>
	</welcome-file-list>
</web-app>
By default the applicationContext.xml file will be used for doing the Spring bean configuration.
File : applicationContext.xml
<?xml version="1.0" encoding="UTF-8"?>
<!DOCTYPE beans PUBLIC "-//SPRING//DTD BEAN//EN"
"http://www.springframework.org/dtd/spring-beans.dtd">
<beans>
    <bean id="helloWorldClass" class="com.simplecode.HelloWorld" >
    	<property name="msg" value="Struts 2 + Spring Integration Example!" />
    </bean>
</beans>
As you can see we have registered the HelloWorld class and injected the “Hello World!” message to the message attribute using the setter injection method.
All the Struts 2 action configuration goes in the struts.xml file.
File : struts.xml
<!DOCTYPE struts PUBLIC "-//Apache Software Foundation//DTD Struts Configuration 2.0//EN"
"http://struts.apache.org/dtds/struts-2.0.dtd">

<struts>
    <package name="default" extends="struts-default">
        <action name="helloWorld" class="helloWorldClass">
        <result name="SUCCESS">/success.jsp</result>
        </action>
    </package>
</struts>
The only change here is instead of referring the com.simplecode.HelloWorld class directly, we relate it using the bean name given in the spring bean configuration file.
The HelloWorld class is shown below. In the execute() method we simply return “SUCCESS” and themessage attribute is set using setter injection.
File : HelloWorld.java
package com.simplecode;

public class HelloWorld
{
	private String msg;

	public String getMsg()
        {
		return msg;
	}

	public void setMsg(String msg)
        {
		this.msg = msg;
	}

	public String execute()
        {
        return "SUCCESS";
        }
}
In the index.jsp page we forward the request to the helloWorld action.
<META HTTP-EQUIV="Refresh" CONTENT="0;URL=helloWorld.action">
After invoking the execute() method the user will be directed to the success.jsp page. In this page we dispaly the message value.
You need to have the following jar files in the WEB-INF/lib directory.
commons-fileupload-1.2.1
commons-io-1.3.2
commons-logging-1.1
freemarker-2.3.13
junit-3.8.1
ognl-2.6.11
struts2-convention-plugin-2.1.6
struts2-core-2.1.6
xwork-2.1.2
struts2-spring-plugin-2.1.6
antlr-runtime-3.0
org.springframework.asm-3.0.0.M3
org.springframework.beans-3.0.0.M3
org.springframework.context-3.0.0.M3
org.springframework.core-3.0.0.M3
org.springframework.expression-3.0.0.M3
org.springframework.web-3.0.0.M3
org.springframework.web.servlet-3.0.0.M3
Read More

Struts 2 + Log4j integration example
In this tutorial we will learn about integrate Log4j with Struts 2 framework.
|
|
Log4j Appender
Create a text file named “log4j.properties“, put it at the root of the project classpath. The log4j.properties or appender file is the Log4j configuration file, it defines how the Log4j logging mechanism work.
In this example, it will log all the logging detail and outputs it to an external file “C:\\loggerfile.txt“.
log4j.properties
# Direct log messages to a log file
log4j.appender.file=org.apache.log4j.RollingFileAppender
log4j.appender.file.File=C:\\loggerfile.txt
log4j.appender.file.MaxFileSize=10MB

log4j.appender.file.layout=org.apache.log4j.PatternLayout
log4j.appender.file.layout.ConversionPattern=%d{ABSOLUTE} %5p %c{1}:%L - %m%n

# Direct log messages to stdout
log4j.appender.stdout=org.apache.log4j.ConsoleAppender
log4j.appender.stdout.Target=System.out
log4j.appender.stdout.layout=org.apache.log4j.PatternLayout
log4j.appender.stdout.layout.ConversionPattern=%d{ABSOLUTE} %5p %c{1}:%L - %m%n

# Root logger option
log4j.rootLogger=warn, file, stdout
Action Class
To use Log4j in Struts 2 framework, you can get the Log4j logger via Logger.getLogger() and log it directly.
package com.simplecode.action;

import org.apache.log4j.Logger;
import com.opensymphony.xwork2.ActionSupport;

public class LoggerAction extends ActionSupport {

	private static final long serialVersionUID = 1L;
	private static final Logger logger = Logger.getLogger(LoggerAction.class);

	public String execute() throws Exception {
		logger.warn("Warning .......");
		logger.error("Error .......");
		return SUCCESS;
	}
}
Demo
Now, all the logging details will be logged into the file, named “C:\\loggerfile.txt“. See sample :
23:37:38,166 ERROR LoggerAction:15 – Error …….
|
|
Reference
Read More

How to exclude action methods from validation in struts2
My Action class have the following methods,
1.execute
2.populate
3.fetchElement
4.addElement
5.deleteElement
Suppose if we want to apply validation for addElement and deleteElement method alone and not for other method , then Simply list all the methods you don’t want to be run through the validation framework in the excludeMethods parameter. Since we only want addElement and deleteElement validated, list the other 3 as follows:
<interceptor-ref name="validation">
    <param name="excludeMethods">execute,populate,fetchElement</param>
</interceptor-ref>
Read More
Struts 2 ModelDriven Example
In our last article we have learned how to use a JavaBean class as a property in struts 2 action.
In this tutorial we gonna talk a bit about Struts support for model objects. The Model object is a package of information that needs to be sent between different layers of the application. For example from your view to business layer or from business layer to data layer. To create a ModelDriven Action our Action class should implement the ModelDriven interface and should include the modelDriven interceptor. The modelDriven interceptor is already included in the default stack.
The next step is to implement the getModel() method in such a way that it returns the application domain object, in our example we return the User object.
Let see this through an example
Bean Class(Model Class)
File : User.java
package com.simplecode.bo;

public class User
{
	private String userName;

	public String getUserName()
	{
		return userName;
	}

	public void setUserName(String userName)
	{
		this.userName = userName;
	}
}
Action Class
Action class implements the ModelDriven interface, declared the getModel() method to return the user’??s object. When the form data is submitted to this action, it will transfers the form data into the user properties automatically.
File : HelloAction.java
package com.simplecode.action;

import com.opensymphony.xwork2.Action;
import com.opensymphony.xwork2.ModelDriven;
import com.simplecode.bo.User;

public class HelloAction implements Action,ModelDriven<User>
{
	// Need to initialize model object
	private User user = new User();

	public String execute()
	{
		if (user.getUserName().isEmpty())
			return ERROR;
		else
			return SUCCESS;
	}

	public User getModel() {
		return user;
	}
}
Note:
When using the ModelDriven method we need to initialize the Model object((user)) ourselves, so the framework will automatically transfers the form data into the User class.
And can use only one model object per action class
JSP page
JSP pages for the ModelDriven demonstration.
login.jsp
<%@taglib uri="/struts-tags" prefix="s"%>
<html>
<head>
<title>Login</title>
</head>
<body>
	<h3>Struts 2 ModelDriven Example</h3>

	<s:form action="hello">
		<s:textfield name="userName"  label="User name"/>
		<s:submit name="submit" />
	</s:form>
</body>
</html>
success.jsp
<%@ taglib prefix="s" uri="/struts-tags"%>
<html>
<head>
<title>Welcome Page</title>
</head>

<body>
	Welcome, <s:property value="userName" />
</body>
</html>
error.jsp
<%@ taglib prefix="s" uri="/struts-tags"%>
<html>
<head>
<title>Error Page</title>
</head>
<body>
Login failed! Please enter a valid user name
</body>
</html>
struts.xml
<?xml version="1.0" encoding="UTF-8" ?>
<!DOCTYPE struts PUBLIC
"-//Apache Software Foundation//DTD Struts Configuration 2.0//EN"
"http://struts.apache.org/dtds/struts-2.0.dtd">
<struts>
	<package name="default" extends="struts-default">
		<action name="hello" class="com.simplecode.action.HelloAction">
			<result name="success">/jsp/success.jsp</result>
			<result name="error">/jsp/error.jsp</result>
		</action>
	</package>
</struts>
Demo
http://localhost:8089/ModelDriven/
When userName entered is non empty, application will be redirected to success page, else it will be redirected to error page
|
|
Read More
Different ways to write struts 2 action class
The functionality of the action class is to retrieve resource bundle, hold the data, provide validation, perform business logic and select the view result page that should be sent back to the user.
There are four different ways to write struts 2 action class , which are as follows
1. Action
For Struts 2 actions, it is not mandatory to implement any interface or extend any class. It is only required to implement execute() method that returns a string which is to be used in struts.xml, to indicate the result page that has to be rendered(return)
package com.simplecode.action;
public class LoginAction
{
     public String execute()
     {
     return "success";
     }
}
In the struts.xml, configure the action class with action tag and class attribute. Define which result page should be returned to the user with result tag and the name of the action you can use to access this action class with name attribute.
<package name="default" namespace="/jsp" extends="struts-default">
  <action name="Login" class="com.simplecode.LoginAction">
      <result name="success">jsp/welcome.jsp</result>
  </action>
<package>
Now you can access the action via
http://localhost:8089/StrutsLogin/jsp/Login
2. Action interface
The second way of creating Action class on Struts 2 is to implement an optional action interface (com.opensymphony.xwork2.Action).
This interface , comes with 5 common used constant values : success, error, none, input and logic. By implements this interface, the action class can use the constant value directly.
The Source code for Action interface :
package com.opensymphony.xwork2;
public interface Action
{
    public static final String SUCCESS = "success";
    public static final String NONE = "none";
    public static final String ERROR = "error";
    public static final String INPUT = "input";
    public static final String LOGIN = "login";
    public String execute() throws Exception;
}
Example: Struts 2 Action class implementing Action interface
package com.simplecode.user.action;
import com.opensymphony.xwork2.Action;
public class LoginAction implements Action
{
    public String execute()
    {
	return SUCCESS;
    }
}
3. ActionSupport
The third way of creating Action class on Struts 2 is to extend the ActionSupport class (com.opensymphony.xwork2.ActionSupport). The ActionSupport class is a very powerful and convenient class that provides default implementation of few of the important interfaces :
public class ActionSupport implements Action, Validateable,
   ValidationAware, TextProvider, LocaleProvider, Serializable
{
 ...
}
Instead of implementing Action interface, it is better to extend the ActionSupport, Since the ActionSupport class implements Action interface along with other useful interfaces.
The ActionSupport class give you the ability to do :
1. Validation Declare a validate() method and put the validation code inside.
2. Text localization Use GetText() method to get the message from resource bundle.
LoginAction.properties, (The resource bundle name must be same as Action class name with the extension .properties), and should be in the same folder where the action class lies
We will get to know about what is property file and the use of addFiendError , and use of other functionality like addActionError and addActionMessage in our upcoming tutorials.
Example: Struts 2 Action class extending ActionSupport class
package com.simplecode.action;
import com.opensymphony.xwork2.ActionSupport;

public class LoginAction extends ActionSupport
{
private static final long serialVersionUID = 6677091252031583948L;
private String userName;
private String password;

public String execute()
{
	if (userName.equalsIgnoreCase("simplecode")&& password.equals("java"))
        {
	return SUCCESS;
	}
        else
	return ERROR;
	}

	public String getUserName()
        {
		return userName;
	}

	public void setUserName(String userName)
        {
		this.userName = userName;
	}

	public String getPassword()
        {
		return password;
	}

	public void setPassword(String password)
        {
		this.password = password;
	}

	public void validate()
        {
	   if("".equals(getUserName()))
           {
	   addFieldError("userName", getText("username.required"));
	   }
           if("".equals(getPassword()))
           {
	   addFieldError("password", getText("password.required"));
	   }
	}
}
4. Action annotation
Struts 2 has very good support for annotations, you can get rid of the XML file and replace with @action in your action class.
package com.simplecode.action;
import org.apache.struts2.convention.annotation.Action;
import org.apache.struts2.convention.annotation.Namespace;
import org.apache.struts2.convention.annotation.Result;
import org.apache.struts2.convention.annotation.ResultPath;
import com.opensymphony.xwork2.ActionSupport;
@Namespace("/jsp")
@ResultPath(value="/")
public class LoginAction extends ActionSupport
{
@Action(value="Login", results={@Result(name="success", location="jsp/welcome.jsp")})
	public String execute()
        {
 	return SUCCESS;
 	}
}
Read More