Android – SQLite Database

In this tutorial we will be seeing,
- How to use the SQLite database in Android applications?
- Create an android application (Simple Notes) using the above concept
Before creating an android application using Eclipse, let us see some of the key terms involved while developing this application.
Key terms/concepts involved in this project:
SQLite: SQLite is an Open Source Database which is embedded into Android. SQLite supports standard relational database features like SQL syntax, transactions and prepared statements. In addition it requires only little memory at runtime (approx. 250 KByte).
SQLite supports the data types TEXT (similar to String in Java), INTEGER (similar to long in Java) and REAL (similar to double in Java). All other types must be converted into one of these fields before saving them in the database. SQLite itself does not validate if the types written to the columns are actually of the defined type, e.g. you can write an integer into a string column and vice versa. SQLite is available on every Android device. Using an SQLite database in Android does not require any database setup or administration. You only have to define the SQL statements for creating and updating the database. Afterwards the database is automatically managed for you by the Android platform. Access to an SQLite database involves accessing the filesystem.
If your application creates a database, this database is by default saved in the directory DATA/data/APP_NAME/databases/FILENAME. The parts of the above directory are constructed based on the following rules. DATA is the path which the Environment.getDataDirectory() method returns. APP_NAME is your application name. FILENAME is the name you specify in your application code for the database.
Cursor: A query returns a Cursor object. A Cursor represents the result of a query and basically points to one row of the query result. This way Android can buffer the query results efficiently; as it does not have to load all data into memory.
- To get the number of elements of the resulting query use the getCount() method.
- To move between individual data rows, you can use the moveToFirst() and moveToNext() methods. The isAfterLast() method allows to check if the end of the query result has been reached.
- Cursor provides typed get*() methods, e.g. getLong(columnIndex), getString(columnIndex) to access the column data for the current position of the result. The “columnIndex” is the number of the column you are accessing.
- Cursor also provides the getColumnIndexOrThrow(String) method which allows to get the column index for a column name of the table.
- A Cursor needs to be closed with the close() method call.
Cursor Adapter: The Android SDK includes a special adapter to easily get a Cursor working with a ListView called CursorAdapter. Youâll be able to instantiate a CursorAdapter, passing in a Cursor. The CursorAdapter then acts as a facilitator between the ListView and the Cursor to render the contents of the Cursor. Like BaseAdapter, CursorAdapter is an Abstract class with a few methods you need to override to integrate it with your list. But unlike the BaseAdapter subclass overriding getView, CursorAdapter implementations override two separate method. One method, newView, inflates the view. The other method, bindView, is responsible for populating the view with the selected data. The tutorial is about how to display an activity in linear layout(both horizontal and vertical).
With the little knowledge about the key terms letâs go to the development section. This project is developed in Eclipse 4.2 (Juno) and tested with Android 3.2
If you are new to android application project, to create a new project in Eclipse refer Creation of Android Project.
Coding:
Now let’s go to the coding section. This project requires following files.
Source Code:
- Add_Note.java
- DatabaseHelper.java
- TimeAndNote.java
- TimeCurserAdapter.java
- TimeNoteDBHelper.java
- TimeNoteLdo.java
Res:
Activity Files: (Layout)
- activity_time_and_note.xml
- add_note.xml
- time_item_list.xml
Menu:
- activity_time_and_note.xml
- add_menu.xml
- add.xml
Values:
- strings.xml
- styles.xml
Manifest file:
- AndroidManifest.xml common to both horizontal and vertical layouts
Here is the coding for the above files.
Add_Note.java:
package com.simplecodestuffs.simplenote;
import android.os.Bundle;
import android.app.Activity;
import android.content.Intent;
import android.view.Menu;
import android.view.View;
import android.widget.EditText;
public class Add_Note extends Activity {
	@Override
	protected void onCreate(Bundle savedInstanceState) {
		super.onCreate(savedInstanceState);
		setContentView(R.layout.add_note);
	}
	@Override
	public boolean onCreateOptionsMenu(Menu menu) {
		// Inflate the menu; this adds items to the action bar if it is present.
		getMenuInflater().inflate(R.menu.add, menu);
		return true;
	}
	public void onCancel(View view) {
		finish();
	}
	public void onSave(View view) {
		Intent intent = getIntent();
		EditText timeView = (EditText)findViewById(R.id.time_view);
		intent.putExtra("time", timeView.getText().toString());
		EditText notesView = (EditText)findViewById(R.id.notes_view);
		intent.putExtra("notes", notesView.getText().toString());
		this.setResult(RESULT_OK, intent);
		finish();
	}
}
DatabaseHelper.java:
package com.simplecodestuffs.simplenote;
import android.content.ContentValues;
import android.content.Context;
import android.database.Cursor;
import android.database.sqlite.SQLiteDatabase;
public class DatabaseHelper {
	public static final String TIMETRACKER_COLUMN_ID = "_id";
	public static final String TIMETRACKER_COLUMN_TIME = "time";
	public static final String TIMETRACKER_COLUMN_NOTES = "notes";
	private TimeNoteDBHelper openHelper;
	private SQLiteDatabase database;
	public DatabaseHelper(Context context) {
		openHelper = new TimeNoteDBHelper(context);
		database = openHelper.getWritableDatabase();
	}
	public void saveTimeRecord(String time, String notes) {
			ContentValues contentValues = new ContentValues();
			contentValues.put(TIMETRACKER_COLUMN_TIME, time);
			contentValues.put(TIMETRACKER_COLUMN_NOTES, notes);
			database.insert("timerecords", null, contentValues);

		}
	public Cursor getAllTimeRecords() {
		return database.rawQuery(
				"select * from " + "timerecords",
				null
				);
	}
}
TimeAndNote.java:
package com.simplecodestuffs.simplenote;
import android.app.Activity;
import android.content.Intent;
import android.os.Bundle;
import android.view.Menu;
import android.view.MenuInflater;
import android.view.MenuItem;
import android.widget.ListView;
public class TimeAndNote extends Activity {
	TimeCurserAdapter timeCurserAdapter;
	private DatabaseHelper databaseHelper;
	public static final int TIME_ENTRY_REQUEST_CODE = 1;
	@Override
	protected void onCreate(Bundle savedInstanceState) {
		super.onCreate(savedInstanceState);
		setContentView(R.layout.activity_time_and_note);
		ListView listView = (ListView)
				findViewById(R.id.time_list);
		databaseHelper = new DatabaseHelper(this);
		timeCurserAdapter = new TimeCurserAdapter(this,databaseHelper.getAllTimeRecords());
		listView.setAdapter(timeCurserAdapter);

	}

	@Override
	public boolean onCreateOptionsMenu(Menu menu) {
		super.onCreateOptionsMenu(menu);
		MenuInflater menuInflater = getMenuInflater();
		menuInflater.inflate(R.menu.add_menu, menu);
		return true;
	}
	public boolean onMenuItemSelected(int featureId, MenuItem item)
	{
	if (item.getItemId() == R.id.add_time_note) {
			Intent intent = new Intent(this, Add_Note.class);
			startActivityForResult(intent, TIME_ENTRY_REQUEST_CODE);
			return true;
		}
		return super.onOptionsItemSelected(item);
	}
	protected void onActivityResult(int requestCode, int resultCode, Intent data) {
		if (requestCode == TIME_ENTRY_REQUEST_CODE) {
		if (resultCode == RESULT_OK) {
			String time = data.getStringExtra("time");
			String notes = data.getStringExtra("notes");
			databaseHelper.saveTimeRecord(time,notes);
			timeCurserAdapter.changeCursor(
			databaseHelper.getAllTimeRecords());
		}
		}
	}
}
TimeCursorAdapter.java:
package com.simplecodestuffs.simplenote;
import android.content.Context;
import android.database.Cursor;
import android.support.v4.widget.CursorAdapter;
import android.util.Log;
import android.view.LayoutInflater;
import android.view.View;
import android.view.ViewGroup;
import android.widget.TextView;
public class TimeCurserAdapter extends CursorAdapter {
	public TimeCurserAdapter(Context context, Cursor cursor) {
		super(context, cursor);
	}
	@Override
	public void bindView(View view, Context context, Cursor cursor) {
		TextView nameTextView = (TextView) view.findViewById(R.id.time_view);
		String time =cursor.getString(cursor.getColumnIndex("time"));
		Log.i("adaptor", "time=" + time);
		Log.i("debug", "time: " + (nameTextView != null));
		{
		nameTextView.setText(time);
		}
		TextView valueTextView = (TextView) view.findViewById(R.id.note_view);
		String note = cursor.getString(cursor.getColumnIndex("notes"));
		Log.i("adaptor", "note=" + note);
		Log.i("debug", "note: " + (valueTextView != null));
		valueTextView.setText(note);
	}
	@Override
	public View newView(Context context, Cursor cursor, ViewGroup parent) {
		LayoutInflater inflater = LayoutInflater.from(parent.getContext());
		View view = inflater.inflate(R.layout.time_item_list, parent, false);
		return view;
	}
}
TimeNoteDBHelper.java:
package com.simplecodestuffs.simplenote;
import android.content.Context;
import android.database.sqlite.SQLiteDatabase;
import android.database.sqlite.SQLiteOpenHelper;
public class TimeNoteDBHelper extends SQLiteOpenHelper {
	public static final String TIMETRACKER_COLUMN_ID = "_id";
	public static final String TIMETRACKER_COLUMN_TIME = "time";
	public static final String TIMETRACKER_COLUMN_NOTES = "notes";
	TimeNoteDBHelper(Context context) {
		super(context, "god.db", null,1 );
		}
		@Override
		public void onCreate(SQLiteDatabase db) {
			db.execSQL(
					"CREATE TABLE "+ "timerecords" + "( "
					+ TIMETRACKER_COLUMN_ID + " INTEGER PRIMARY KEY, "
							+ TIMETRACKER_COLUMN_TIME + " TEXT, "
							+ TIMETRACKER_COLUMN_NOTES + " TEXT )"
							);
		}
		@Override
		public void onUpgrade(SQLiteDatabase db, int oldVersion, int newVersion) {
			db.execSQL("DROP TABLE IF EXISTS " + "timerecords");
			onCreate(db);
		}
}
TimeNoteLdo.java:
package com.simplecodestuffs.simplenote;

public class TimeNoteLdo {

	String time;
	String note;

	public TimeNoteLdo(String time , String note) {
		this.time = time;
		this.note = note;
	}

	public TimeNoteLdo() {
		// TODO Auto-generated constructor stub
	}

	public String getTime() {
		return time;
	}
	public void setTime(String time) {
		this.time = time;
	}
	public String getNote() {
		return note;
	}
	public void setNote(String note) {
		this.note = note;
	}
}
activity_time_and_note.xml:
<?xml version="1.0" encoding="utf-8"?>
<ListView
    xmlns:android="http://schemas.android.com/apk/res/android"
    android:layout_width="fill_parent"
    android:layout_height="fill_parent"
  android:id="@+id/time_list"
     />
add_note.xml:
<?xml version="1.0" encoding="utf-8"?>
<LinearLayout xmlns:android="http://schemas.android.com/apk/res/android"
    android:layout_width="fill_parent"
    android:layout_height="fill_parent"
    android:orientation="vertical" >

     <TextView
        android:layout_width="wrap_content"
        android:layout_height="wrap_content"
        android:layout_marginLeft="10dp"
        android:text="Time" />


  <EditText android:id="@+id/time_view"
        android:layout_width="fill_parent"
        android:layout_height="wrap_content"
        android:layout_marginBottom="10dp" />

    <TextView
        android:layout_width="wrap_content"
        android:layout_height="wrap_content"
        android:layout_marginLeft="10dp"
        android:text="Notes" />

    <EditText
        android:id="@+id/notes_view"
        android:layout_width="fill_parent"
        android:layout_height="wrap_content"
        android:layout_marginBottom="10dp"
        android:layout_weight="1"
        android:gravity="top" />

    <LinearLayout
android:layout_width="fill_parent"
    android:layout_height="wrap_content"
    android:orientation="horizontal"
    android:layout_weight="0"
android:background="#FF8D8D8D"
android:gravity="center_horizontal" >

        <Button android:text="Save"
android:onClick="onSave"
android:layout_width="wrap_content"
android:layout_height="wrap_content" />

        <Button android:text="Cancel"
android:onClick="onCancel"
android:layout_width="wrap_content"
android:layout_height="wrap_content" />
</LinearLayout>
</LinearLayout>
time_item_list.xml:
<?xml version="1.0" encoding="utf-8"?>
<LinearLayout xmlns:android="http://schemas.android.com/apk/res/android"
    android:layout_width="fill_parent"
    android:layout_height="wrap_content"
    android:orientation="vertical" >

    <TextView android:id="@+id/time_view"
android:layout_width="fill_parent"
android:layout_height="wrap_content"
android:textSize="19dp"
android:paddingBottom="6dp" />

     <TextView android:id="@+id/note_view"
android:layout_width="fill_parent"
android:layout_height="wrap_content"
android:textSize="12dp" />
</LinearLayout>
Menu : activity_time_and_note.xml:
<menu xmlns:android="http://schemas.android.com/apk/res/android" >

    <item
        android:id="@+id/menu_settings"
        android:orderInCategory="100"
        android:title="@string/menu_settings"/>

</menu>
Menu -add_menu.xml:
<?xml version="1.0" encoding="utf-8"?>
<menu xmlns:android="http://schemas.android.com/apk/res/android" >
    <item android:id="@+id/add_time_note" android:title="Add"></item>


</menu>
Menu -add.xml:
<menu xmlns:android="http://schemas.android.com/apk/res/android" >

    <item
        android:id="@+id/menu_settings"
        android:orderInCategory="100"
        android:title="@string/menu_settings"/>

</menu>
AndroidManifest.xml:
<?xml version="1.0" encoding="utf-8"?>
<manifest xmlns:android="http://schemas.android.com/apk/res/android"
    package="com.simplecodestuffs.simplenote"
    android:versionCode="1"
    android:versionName="1.0" >

    <uses-sdk
        android:minSdkVersion="9"
        android:targetSdkVersion="9" />

    <application
        android:allowBackup="true"
        android:icon="@drawable/ic_launcher"
        android:label="@string/app_name"
        android:theme="@style/AppTheme" >
        <activity
            android:name="com.simplecodestuffs.simplenote.TimeAndNote"
            android:label="@string/app_name" >
            <intent-filter>
                <action android:name="android.intent.action.MAIN" />

                <category android:name="android.intent.category.LAUNCHER" />
            </intent-filter>
        </activity>
        <activity
            android:name="com.simplecodestuffs.simplenote.Add_Note"
            android:label="@string/title_activity_add__note" >
        </activity>
    </application>

</manifest>
strings.xml:
<?xml version="1.0" encoding="utf-8"?>
<resources>

    <string name="app_name">SimpleNote</string>
    <string name="hello_world">Hello world!</string>
    <string name="menu_settings">Settings</string>
    <string name="text">Text</string>
    <string name="title_activity_add__note">Add_Note</string>

</resources>
Styles. xml:
<resources>

    <!--
        Base application theme, dependent on API level. This theme is replaced
        by AppBaseTheme from res/values-vXX/styles.xml on newer devices.
    -->
    <style name="AppBaseTheme" parent="android:Theme.Light">
        <!--
            Theme customizations available in newer API levels can go in
            res/values-vXX/styles.xml, while customizations related to
            backward-compatibility can go here.
        -->
    </style>

    <!-- Application theme. -->
    <style name="AppTheme" parent="AppBaseTheme">
        <!-- All customizations that are NOT specific to a particular API-level can go here. -->
    </style>

</resources>
Run the android application:
Android applications can be run on the android devices. You can either connect a hardware to the system to test the application or you can use the android virtual devices (AVD) Manager to create/manage the virtual devices running on emulator to run the application.
If you are new to create a Android Virtual Device (AVD), refer Creating Android Virtual Device.
To run the application/ project, Build your project using Project –> Build Project.
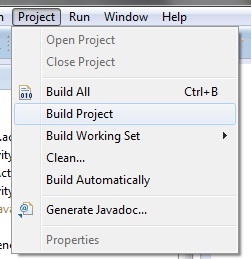
This will show errors in Console window at the bottom of the working area in case your project contains.
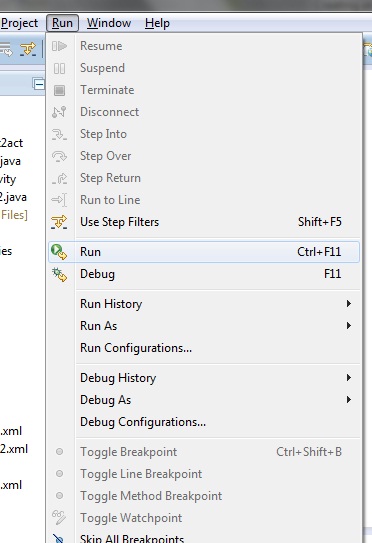
If your build is successful, Run your application using Run –> Run or Press Ctrl +F11.
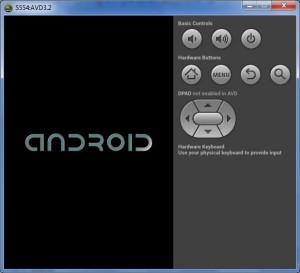
Upon running the application, the emulator will be launched which displays the AVD on your screen.
You can see your app with the image set during the android project creation in AVD.
Upon running the application, the emulator will be launched with the selected/ available AVD created on your screen.
To test your application, unlock the screen and double click on your app.
You can see your app with the image set during the android project creation in AVD.

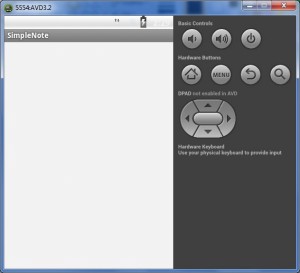
SimpleNotes App:
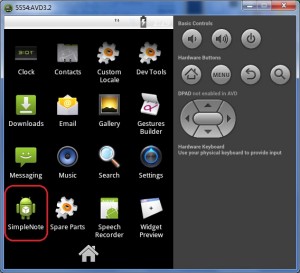
Launch App:
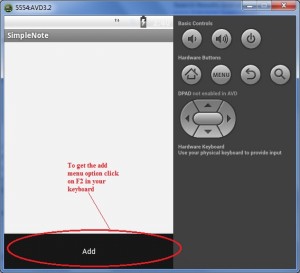
Add Menu:
Note: To identify/use the keyboard shortcuts for android emulator please refer the following android post . Eg : F2 for Menu option.
http://www.simplecodestuffs.com/?s=android+shortcut+keys&x=-1189&y=-18
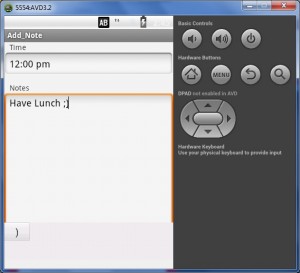
Add Notes:
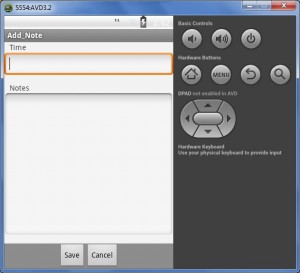
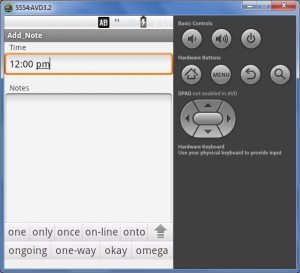
Add Note_Time:
Add Note_Notes:
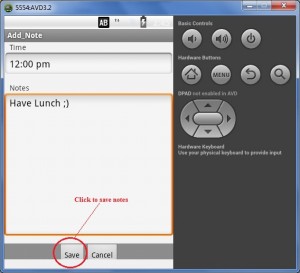
Save Notes:
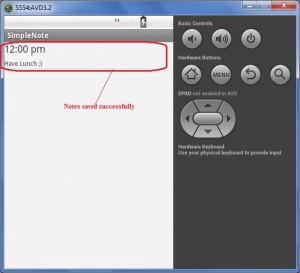
Simple Note:
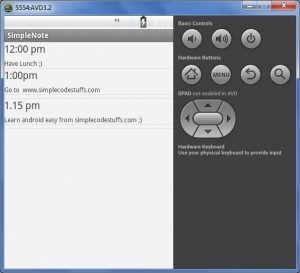
Thus the android application project is executed successfully.