Android Development Environment Setup in Eclipse.
In this Tutorial, you will learn How to setup Android Development Environment in Eclipse
Here you go!!!!
Before we start off with coding, let us see what is required to develop an android application. Three simple things for developing android applications are:
- IDE (Integrated Development Environment)
- ADT (Android Development Tool) Plugin
- Android SDK (Software development Kit)
System Requirements for developing android application:
Operating Systems:
- Windows XP (32-bit), Vista (32- or 64-bit), or Windows 7 (32- or 64-bit)
- Mac OS X 10.5.8 or later (x86 only)
- Linux (tested on Ubuntu Linux, Lucid Lynx)
- GNU C Library (glibc) 2.7 or later is required.
- On Ubuntu Linux, version 8.04 or later is required.
- 64-bit distributions must be capable of running 32-bit applications.
Let us now see how to setup the environment for developing android application.
How to setup the environment for android development???

Step 1: Download the IDE for developing android application. If you dont have eclipse, download eclipse here.
IDE preferred Eclipse Juno
Step 2: Add ADT plugin to your eclipse
- Once the download is complete, click on eclipse.exe to open it
- In the dialog box that pops up, choose the workspace location for storing your projects
- Click on OK
- Click on Workbench icon in the window that appears
- A window appears like the one below:

- To add ADT plugin to your IDE(eclipse), click on Help-> Install New Software.
- Install Dialog box appears.
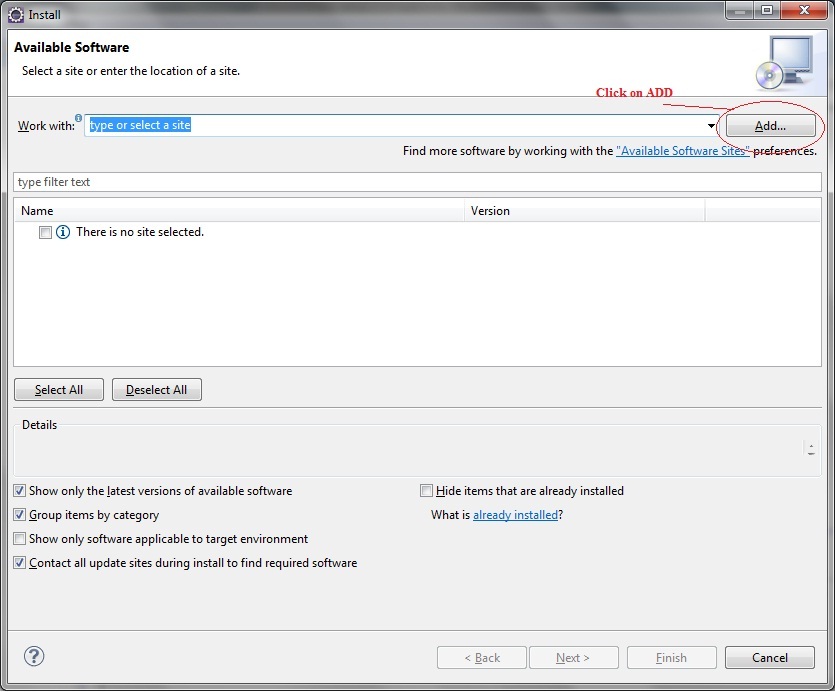
- Click on Add button in the right of the install dialog box.
- To add ADT plugin use any one of the methods mentioned below with numberings.
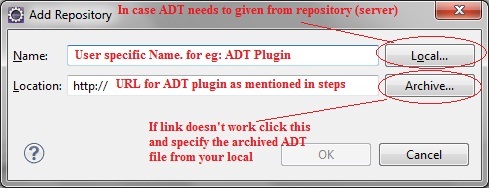
1) In the Add Repository dialog that appears, enter “ADT Plugin” for the Name and the following URL for the Location:
2) click OK.
3) If you have problem using the above URL, use the below URL:
4) click OK.
5) If you are still facing issues with both the urls, you can download the ADT plugin (Zip File) using the link.
6) In the Add Repository dialog, click Archive.
7) Select the downloaded ADT-21.0.1.zip file and click OK.
8) Enter “ADT Plugin” for the name and click OK.
- In the Available Software dialog, select the checkbox next to Developer Tools and click Next.

- In the next window, you’ll see a list of the tools to be downloaded. Click Next.
- Read and accept the license agreements, then click Finish.
- If you get a security warning saying that the authenticity or validity of the software can’t be established, click OK.
- When the installation completes, restart Eclipse.
- Now the ADT plugin is added to your eclipse.
To create a new project, we need to add SDK tools to our eclipse. To do so, please follow the below step.
Step 3: Download SDK tools using the SDK manager.
- To open SDK manager, you need to install SDK in your system.
- To install SDK, download SDK installer using the link for windows OS.
- To install SDK, download SDK installer using the link for MAC OS.
- To install SDK, download SDK installer using the link for LINUX OS.
The below steps are available for Windows OS.
- Click on SDK installer (installer_r21-windows.exe) to unzip the tool packages.
- Click Next and Accept the agreement
- While the installer asks for unzipping packages, click on browse and give your own location.
- Click Next and Finish. This will have your SDK tool packages.
- Once extraction is complete, click on SDK manager.
- The SDK manager will look as in the below figure:
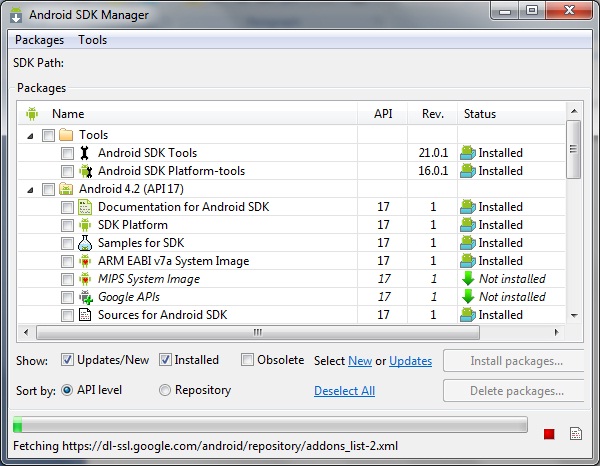
- Check the tools and packages you need and click on Install Packages.
- Click on Accept All and Install the packages available under the Android version available in SDK manager.
Step 4: Adding targets in Preferences
- Before creating a new project, you need to set the preferences in eclipse.
- Once the ADT plugin is installed it will prompt for automatic installation of SDK tools using SDK manager from eclipse.
- Follow the above steps for the SDK manager.
- If you have missed the above steps in Step 4. Please follow the below steps.
- Click on Window -> Preferences.
- Go to Android in Left pane of Preferences dialog box.
- After clicking on Android, we can see the below dialog box.
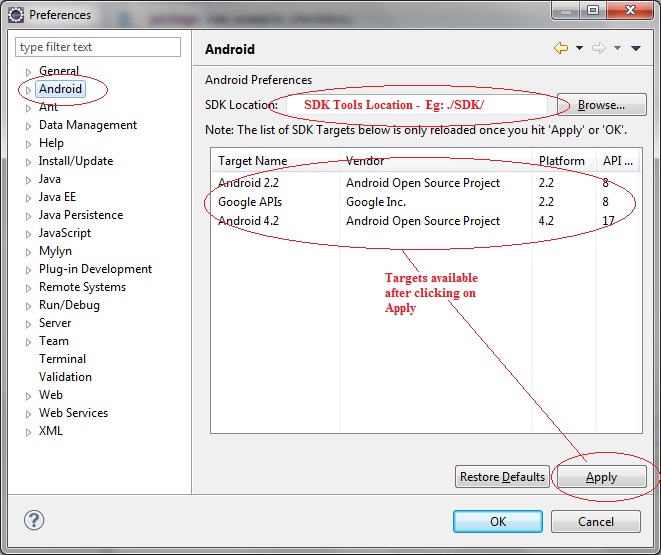
- Choose your SDK location by clicking on browse.
- The SDK location needs to be given before folder containing tools after installing SDK using Step 3. (For eg: D:\SDK\ )
- Inside SDK folder we have folders like tools, platform, platform-tools, sources, add-ons etc.,
- Click on Apply, so that the Android API version you have downloaded appears in the target pane below
- Click on OK.
Thus environment for Android application is setup successfully.
could you provide whole tutorial in PDF format?
Hi Abdhesh,
We will update them shortly..
Hi,this is awesome and nice way to explain .