Pagination in Struts 2 Using display tag
In Struts 2 Pagination can be implemented with the help of Displaytag. This tag can handle feature such as pagination, sorting and exporting of a table. In the following example we will see how to display data using display tag and to do pagination, sorting and exporting.
Download the Latest version of displaytag.jar in the following link
 |
|
Now Create a Dynamic web project and make sure that you have the following libraries are in your WEB-INF/lib directory.
commons-beanutils-1.8.0.jar
commons-collections-3.1.jar
commons-digester-2.0.jar
commons-io-2.0.1.jar
commons-lang-2.4.jar
commons-lang3-3.1.jar
commons-logging-1.1.1.jar
commons-logging-api-1.1.jar
displaytag-1.2.jar
freemarker-2.3.19.jar
ognl-3.0.6.jar
struts2-core-2.3.8.jar
xwork-core-2.3.8.jar
displaytag-export-poi.jar is used to export the files in xls,csv or xml format.
Example of Struts 2 Pagination
Action Class
StudentAction.java
package com.simplecode.action;

import java.util.ArrayList;
import java.util.List;

import com.opensymphony.xwork2.ActionSupport;
import com.simplecode.form.StudentBean;

public class StudentAction extends ActionSupport
{
private static final long serialVersionUID = 1L;
private List<StudentBean> students = new ArrayList<StudentBean>();

public String displayStudentList()
{
	students.add(new StudentBean("o7bb002", "Gokul", "ECE", 4));
	students.add(new StudentBean("o7bc074", "Muthu Vijay", "CSE", 6));
	students.add(new StudentBean("o7bb040", "Jaya Prakash", "ECE", 10));
	students.add(new StudentBean("o7bc055", "Mohiadeen", "CSE", 7));
	students.add(new StudentBean("o7bd047", "HariPriya", "IT", 1));
	students.add(new StudentBean("o7bd024", "Pavithra", "IT", 3));
	students.add(new StudentBean("o7bb009", "Aswin", "ECE", 8));
	students.add(new StudentBean("o7ba029", "Sharmila", "IT", 11));
	students.add(new StudentBean("o7ba027", "Nilafar", "IT", 2));
	students.add(new StudentBean("o7bd081", "Dinesh Babu", "MECH", 13));
	students.add(new StudentBean("o7ba062", "Lourde", "MECH", 9));
	students.add(new StudentBean("o7bc079", "Nisha", "CSC", 5));
	students.add(new StudentBean("o7bb039", "Guru Prasad", "MECH", 12));
	students.add(new StudentBean("o7bc033", "Gowtham Raj", "CSE", 15));
	students.add(new StudentBean("o7bb039", "Ibrahim Sha", "ECE", 14));
	students.add(new StudentBean("o7bd081", "Dinesh Babu", "MECH", 16));

	return SUCCESS;
}

public List<StudentBean> getStudents()
{
	return students;
}

public void setStudents(List<StudentBean> students)
{
	this.students = students;
}
}
StudentBean.java
package com.simplecode.form;

public class StudentBean
{
private String rollNo;
private String studentName;
private String department;
private int rank;

public StudentBean(String rollNo, String studentName, String department, int rank)
{
    this.rollNo = rollNo;
    this.studentName = studentName;
    this.department = department;
    this.rank = rank;
}
public String getRollNo()
{
	return rollNo;
}
public void setRollNo(String rollNo)
{
	this.rollNo = rollNo;
}
public String getStudentName()
{
	return studentName;
}
public void setStudentName(String studentName)
{
	this.studentName = studentName;
}
public String getDepartment()
{
	return department;
}
public void setDepartment(String department)
{
	this.department = department;
}
public int getRank()
{
	return rank;
}
public void setRank(int rank)
{
	this.rank = rank;
}
}
displaytag.jsp
<%@ page language="java" contentType="text/html; charset=ISO-8859-1"
	pageEncoding="ISO-8859-1"%>

<%@taglib prefix="s" uri="/struts-tags"%>
<%@taglib prefix="display" uri="http://displaytag.sf.net"%>


<meta http-equiv="Content-Type" content="text/html; charset=ISO-8859-1">
<title>Students Details</title>
<style type="text/css">

/* for hiding the page banner */
.pagebanner
{
	display: none;
}
/* for customizing page links */
.pagelinks
{
	color: maroon;
	margin: 20px 0px 20px 50px;
}
/* for shifting all the Export options*/
.exportlinks
{
	margin: 20px 0px 20px 30px;
}
/* For changing the spaces between export link */
.export
{
	margin-left: 30px;
}
/* For Table css */
table
{
	border: 1px solid #666;
	width: 60%;
	margin: 20px 0 20px 0px;
}
/* For odd and even row decoration */
tr.odd
{
	background-color: #fff
}
tr.tableRowEven,tr.even
{
	background-color: #CCCCCC
}
/* Css for table elements */
th,td
{
	padding: 2px 4px 2px 4px;
	text-align: left;
	vertical-align: top;
}
thead tr
{
	background-color: #999999;
}
/* For changing the background colour while sorting */
th.sorted
{
	background-color: #CCCCCC;
}
th.sorted a,th.sortable a
{
	background-position: right;
	display: block;
	width: 100%;
}
th a:hover
{
	text-decoration: underline;
	color: black;
}
th a,th a:visited
{
	color: black;
}
</style>

<html>
<body>

<display:table id="studentTable" name="students" pagesize="5" cellpadding="5px;"
cellspacing="5px;" style="margin-left:50px;margin-top:20px;" requestURI="">
<display:column property="rollNo" title="Roll No"/>
<display:column property="studentName" title="Student Name"/>
<display:column property="department" title="Department"/>
<display:column property="rank" title="Rank"/>
</display:table>
</body>
</html>
struts.xml
<?xml version="1.0" encoding="UTF-8" ?>
<!DOCTYPE struts PUBLIC
"-//Apache Software Foundation//DTD Struts Configuration 2.0//EN"
"http://struts.apache.org/dtds/struts-2.0.dtd">
<struts>
<package name="default" extends="struts-default">
<action name="displayStudentList" class="com.simplecode.action.StudentAction"
                  method="displayStudentList">
   <result name="success">/displaytag.jsp</result>
</action>
</package>
</struts>
After executing the project, you will get the following output:
Auto-sorting
If you want to allow the user to sort the data displayed then set the attribute sortable=”true” on the display:column tag that you want to sort by.
<display:column property="rollNo" title="Roll No" sortable="true"/>
<display:column property="studentName" title="Student Name" sortable="true"/>
<display:column property="department" title="Department" sortable="true"/>
<display:column property="rank" title="Rank" sortable="true"/>
Now on clicking the rank header the student resultset are sorted according to rank as shown below.
Here the problem is whenever we sort the table by clicking on any sortable column header it only sort the data visible in that page. We can override this behavior by setting sort attribute in column to list as shown below.
<display:table export="true" id="studentTable" name="students" pagesize="5" cellpadding="5px;"
cellspacing="5px;" style="margin-left:50px;margin-top:20px;" requestURI="" sort = "list">
So now when you click on sort, the data will be sorted based on whole list.
Data exporting
When you set the Table Tag’s export attribute to “true”, footer will appear below the sorted result, which will allow you to export the data being shown in various formats(CSV, XLS, and XML).
<display:table export="true" id="studentTable" name="students" pagesize="5" cellpadding="5px;"
cellspacing="5px;" style="margin-left:50px;margin-top:20px;" requestURI="">
Suppose if you want to place the banner at bottom , then you can use the following code, within the display-table tag
<display:setProperty name="paging.banner.placement" value="bottom" />
In my next post I have discussed about the problem faced in display tag in fetching the value into struts 2 tag and also about getting checkbox values from displaytag into struts 2 Action class
|
|
Read More

How To Get The ServletContext In Struts 2
In Struts 2 , you can use the following two methods to get the ServletContext object.
1. ServletContextAware
Make your class implements the org.apache.struts2.util.ServletContextAware interface.
When Struts 2 “servlet-config” interceptor is seeing that an Action class is implemented the ServletContextAware interface, it will pass a ServletContext reference to the requested Action class via the setServletContext()method.
package com.simplecode.action;

import javax.servlet.ServletContext;
import org.apache.struts2.util.ServletContextAware;

import com.opensymphony.xwork2.Action;

public class ContextAction  implements ServletContextAware,Action {

        ServletContext context;

        public String execute() throws Exception
        {
                return SUCCESS;
        }

        public void setServletContext(ServletContext context)
        {
                this.context = context;
        }
}
2. ServletActionContext
Get the ServletContext object directly from org.apache.struts2.ServletActionContext
package com.simplecode.action;

import javax.servlet.ServletContext;
import org.apache.struts2.ServletActionContext;

import com.opensymphony.xwork2.Action;

public class ContextAction implements Action
{
	public String execute() throws Exception
	{
		ServletContext context = ServletActionContext.getServletContext();
		return SUCCESS;
	}
}
Read More
Difference between Struts2 FilterDispatcher and StrutsPrepareAndExecuteFilter?
The FilterDispatcher is used in the early Struts2 development, and it has deprecated since Struts 2.1.3.
If you are using Struts version >= 2.1.3, it’s recommended to upgrade the new filter class StrutsPrepareAndExecuteFilter
The new filter was introduced for the following reasons
- There were a lot of issued with the
FilterDispatcherand its deployment. - New Filter provides a better way to enable customizations and overrides.
- Make it crystal clear to developers what filters are doing what processes.
- make dispatch process be more flexible to support things like native operation in OSGi or plugin system.
For your reference, the following code should be used when you are about to use Struts version <=2.1.3
1. FilterDispatcher example
...
<filter>
   <filter-name>struts2</filter-name>
   <filter-class>
     org.apache.struts2.dispatcher.FilterDispatcher
   </filter-class>
</filter>
...
The following code should be used when you are about to use Struts version >=2.1.3
2. StrutsPrepareAndExecuteFilter example
...
<filter>
<filter-name>struts2</filter-name>
<filter-class>
org.apache.struts2.dispatcher.ng.filter.StrutsPrepareAndExecuteFilter
</filter-class>
</filter>
...
Read More

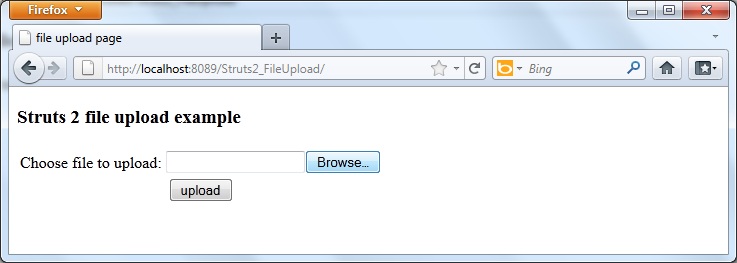
Struts 2 File Upload Example
In this example you will learn how to do file upload with the help of the built-in FileUploadInterceptor.
|
|
In Struts 2, the <s:file> tag is used to create a HTML file upload component to allow users to select file from their local disk and upload it to the server. In this tutorial, you will create a JSP page with file upload component, set the maximum size and allow content type of the upload file, and display the uploaded file details.
How File Upload Works in Struts 2?
The file upload function depends on the fileUpload Interceptor, to add support for uploading files in the Struts applications. The Struts 2 File Upload Interceptor is based on MultiPartRequestWrapper, which is automatically applied to the request if it contains the file element. Then it adds the following parameters to the request
In the action class you can get the file, the uploaded file name and content type by just creating getter and setters. (assuming the uploaded file name is uploadDoc).
- [uploadDoc]File – Will store the actual uploaded File
- [uploadDoc]ContentType : This String will store the content type of the file
- [uploadDoc]FileName : This String will store the actual name of the uploaded file (not the HTML name)
For example
private File uploadDoc;
This will store actual uploaded File
private String uploadDocFileName;
This string will contain the file name of uploaded file.
private String uploadDocContentType;
This string will contain the Content Type of uploaded file.
The file upload interceptor also does the validation and adds errors. These error messages are stored in the struts-messsages.properties file. The values of the messages can be overridden by providing the text for the following keys:
- struts.messages.error.uploading – error when uploading of file fails
- struts.messages.error.file.too.large – error occurs when file size is large
- struts.messages.error.content.type.not.allowed – when the content type is not allowed
Parameters
You can use the following parameters to control the file upload functionality.
- maximumSize This parameter is optional. The default value of this is 2MB.
<param name="maximumSize">1024000</param>
You can also set the upload file size using the following code
<constant name="struts.multipart.maxSize" value="20097152" />
- allowedTypes This parameter is also optional. It allows you to specify the allowed content type.
- To upload txt file
<param name="allowedTypes"> text/plain </param>
- To upload PDF files
<param name="allowedTypes"> application/pdf</param>
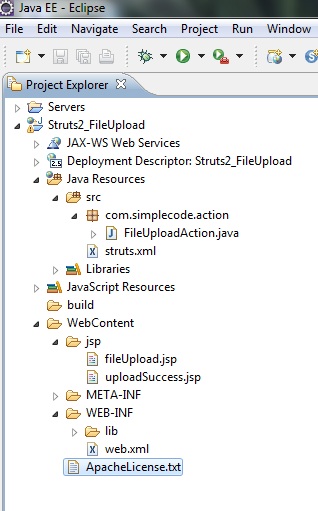
1. Folder Structure
2. Action class
FileUploadAction.java
package com.simplecode.action;

import java.io.File;
import com.opensymphony.xwork2.ActionSupport;

public class FileUploadAction extends ActionSupport {

	private static final long serialVersionUID = 1L;
	private File uploadDoc;
	private String uploadDocFileName;
	private String uploadDocContentType;

    public String execute() {
	return SUCCESS;
	}

	public File getUploadDoc() {
		return uploadDoc;
	}

	public void setUploadDoc(File uploadDoc) {
		this.uploadDoc = uploadDoc;
	}

	public String getUploadDocFileName() {
		return uploadDocFileName;
	}

	public void setUploadDocFileName(String uploadDocFileName) {
		this.uploadDocFileName = uploadDocFileName;
	}

	public String getUploadDocContentType() {
		return uploadDocContentType;
	}

	public void setUploadDocContentType(String uploadDocContentType) {
		this.uploadDocContentType = uploadDocContentType;
	}
}
3. Result Page
fileupload.jsp
<%@ page language="java" contentType="text/html; charset=ISO-8859-1"
	pageEncoding="ISO-8859-1"%>
<%@taglib uri="/struts-tags" prefix="s"%>
<html>
<head>
<title>file upload page</title>
</head>
<body>
	<h3>Struts 2 file upload example</h3>
	<s:form action="fileUpload" method="post" enctype="multipart/form-data">
	<s:file name="uploadDoc" label="Choose file to upload" />
	<s:submit value="upload" align="center" />
</s:form>
</body>
</html>
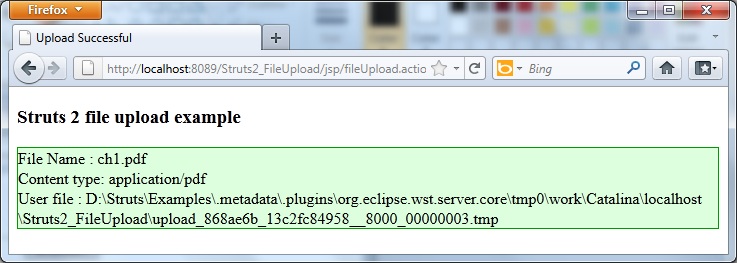
uploadSuccess.jsp
<%@ page language="java" contentType="text/html; charset=ISO-8859-1"
	pageEncoding="ISO-8859-1"%>
<%@taglib uri="/struts-tags" prefix="s"%>
<html>
<head>
<title>Upload Successful</title>
<s:head />
</head>
<body>

<h3>Struts 2 file upload example</h3>
 File Name :   <s:property value="uploadDocFileName"></s:property><br />
 Content type: <s:property value="uploadDocContentType"></s:property><br />
 User file :   <s:property value="uploadDoc"></s:property>
</body>
</html>
4. struts.xml
<?xml version="1.0" encoding="UTF-8" ?>
<!DOCTYPE struts PUBLIC
"-//Apache Software Foundation//DTD Struts Configuration 2.0//EN"
"http://struts.apache.org/dtds/struts-2.0.dtd">

<struts>
<package name="" namespace="/jsp" extends="struts-default">
<action name="fileUpload" class="com.simplecode.action.FileUploadAction" >
	<interceptor-ref name="defaultStack"></interceptor-ref>
	<interceptor-ref name="fileUpload">
            <param name="maximumSize">1024000</param>
            <param name="allowedTypes">application/pdf</param>
	</interceptor-ref>
	<interceptor-ref name="validation">
		<param name="excludeMethods">input,back,cancel,browse</param>
	</interceptor-ref>
	<interceptor-ref name="workflow">
		<param name="excludeMethods">input,back,cancel,browse</param>
	</interceptor-ref>
	<result name="success">/jsp/uploadSuccess.jsp</result>
	<result name="input">/jsp/fileUpload.jsp</result>
</action>
</package>

</struts>
5. Demo
http://localhost:8089/Struts2_FileUpload/
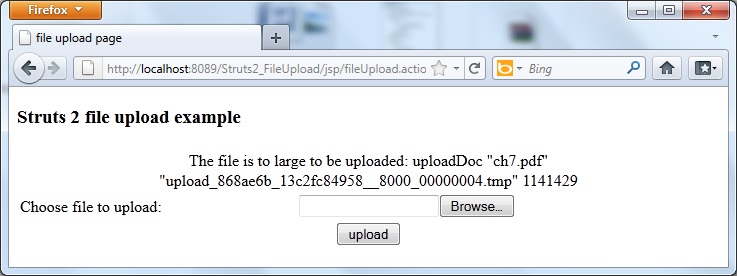
Error message prompts if you upload a file which is more than 10kb, or not a text file.
The uploaded file will be treat as a temporary file, with a long random file name, upload__376584a7_12981122379__8000_00000010.tmp. This file will be stored some where in the metadata directory
Note:
In order to save the .tmp file in a desired location ,which you wish , then use the following code in your struts.xml<constant name="struts.multipart.saveDir" value="D:/your folder"/>
Caution :
The problem with above code snippet is, you cannot see the uploaded file in the target folder. Also the file uploaded wont have any proper extension, instead it will have the extension as .tmp.
So in-order to upload and save a file in target space and in-order to have a file with proper extension, i.e .pdf , .doc etc, we should use the following code snippet in the action class’s execute method.
Modified execute method
public String execute()
{
// Location to store the uploaded file in our desired path
String targetPath = "D:/file target/";
File fileToCreate = new File(targetPath, uploadDocFileName);
	try
	{
		FileUtils.copyFile(this.uploadDoc, fileToCreate);
	}
	catch (IOException e)
	{
		addActionError(e.getMessage());
	}
	return SUCCESS;
}
Read More
Take Your Business Globally !!

Need a Website?