- In struts.xml we declare a package and wrap the action classes inside.
- package name= “default”? – Just give any valid unique name.
- struts-default? – By default, this package extends from struts-default base package, and it is nothing but an xml file present in struts2-core-2.x.x.jar
- This xml is responsible for invoking series of interceptors which is configured in it. We shall explore about what is role of this struts-default? and what is interceptors? in our latter part of our tutorial series. As of now forget about it :P :)
Hello world in Struts 2 – Getting started
In our previous article we learnt that there are 4 basic component in struts 2 framework.
They are
1. struts.xml
2. Interceptors
3. Action class
4. JSP
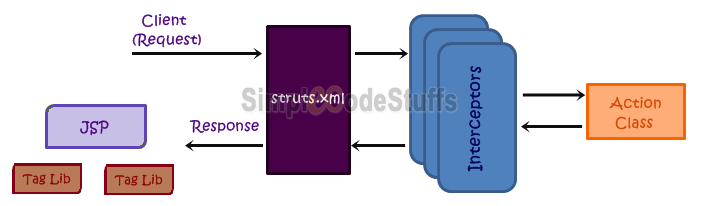
Since interceptor module is available in struts 2 by default, so for simplicity lets us ignore this module as of now and we shall explore then latter.
Now ignoring interceptors the flow diagram of struts 2 looks as below.
Now create a Dynamic web project with the following folder structure.
Include the below list of commonly used JAR files required by Struts 2 framework to your project’s WEB-INF/lib folder.
- commons-fileupload-1.2.2.jar
- commons-io-2.0.1.jar
- commons-lang-2.4.jar
- commons-lang3-3.1.jar
- commons-logging-1.1.1.jar
- commons-logging-api-1.1.jar
- freemarker-2.3.19.jar
- javassist-3.11.0.GA.jar
- ognl-3.0.6.jar
- struts2-core-2.3.8.jar
- xwork-core-2.3.8.jar

Now the role of struts.xml here is to Controls the execution flow of the request
1. It maps the input URL to the action classes
2. It maps the input URL to the Jsp
Now consider a scenario where i receive the input request as http://localhost/login, in this case I need this request to be mapped to a Action class, let assume that action class to be LoginAction.
Which Method ?
In case of Servlets when a servlet got invoked, then by either doget() or dopost() method will get invoked. But in case of struts 2, when an action class gets invoked then by default execute method will executed, provided the signature of this execute method should be as below
public String execute()
We can have other method configured in Action class, we will learn about that in our upcoming tutorials
Configuring request in struts.xml
The struts.xml file needs to be configured with these basic tags, and this file should always present in src folder.
<?xml version="1.0" encoding="UTF-8" ?>
<!DOCTYPE struts PUBLIC
"-//Apache Software Foundation//DTD Struts Configuration 2.0//EN"
"http://struts.apache.org/dtds/struts-2.0.dtd">
<struts>
<package name="default" extends="struts-default">
	<action name="login" class="com.action.LoginAction">

	</action>
</package>
</struts>
When a client’s request matches the action name, the framework uses the mapping from struts.xml file to process the request. The mapping to an action is usually generated by a Struts Tag. The action tag ( struts.xml file) specifies the action class to be executed.
Here the configuration in struts.xml is incomplete, I have just mapped the request to Action class and we need to map the response from our action class to jsp, once after creating action class we shall come back to configuring struts.xml again.
Note
Action class
package com.action;

public class LoginAction {

	private String userName;

	public String execute() {
		if (userName.isEmpty()) {
			return "error";
		} else {
			return "success";
		}
	}

	public String getUserName() {
		return userName;
	}

	public void setUserName(String userName) {
		this.userName = userName;
	}
}
Now note that the Action Class returns a string, which can be either “success” or “error”. In struts 2, the controller maps the response from action class to a jsp using this “string”.
Lets assume if Action class return “success” then we need to map the response to success page. If Action class returns “error” then we need to map its response to error.jsp.
Note:
- The Action class in struts 2 is not required to implement any interface or extend any class i.e, can be simple POJO, and there are four different ways to create an Action class which we shall explore in our upcoming tutorials.
- In case of struts 1 Action class used will be extending several classes in turn in order to process request and response.
Configuring Response struts.xml
Earlier we have configured request flow in struts.xml now we have to configure the response via result tag in it as shown below.
<?xml version="1.0" encoding="UTF-8" ?>
<!DOCTYPE struts PUBLIC
"-//Apache Software Foundation//DTD Struts Configuration 2.0//EN"
"http://struts.apache.org/dtds/struts-2.0.dtd">
<struts>
<package name="default" extends="struts-default">
	<action name="login" class="com.action.LoginAction">
		<result name="success">success.jsp</result>
		<result name="error">error.jsp</result>
	</action>
</package>
</struts>
Jsp pages
Now lets go a head and create jsp pages to receive request and send response back.
Create a new JSP file login.jsp inside the WebContent folder and type in the below code in this JSP file.
File : login.jsp use the Struts 2 tags to display username input fields and submit button.
File: login.jsp
<%@taglib uri="/struts-tags" prefix="s"%>
<html>
<head>
<title>Login</title>
</head>
<body>
<h3>Struts 2 Hello World</h3>
<s:form action="login">
	<s:textfield name="userName" label="Username" />
	<s:submit value="Submit" />
</s:form>
</body>
</html>
- In Struts 2, the “userName” will map to the JavaBean property of Action class automatically. In this case, on form submit, the textbox value with name=”userName” will call the corresponding Action’s setUserName(String xx) to set the value
- We shall explore different types of tags used in struts 2 in our tutorials.
- Also Note that I have referred taglib at the beginning of jsp, By defenision the Struts Taglib component provides a set of JSP custom tag libraries that help developers create interactive form-based applications. There are several different tags to help with everything from displaying error messages to dealing with nested ActionForm beans.
file : success.jsp : A JSP view page to display a welcome message to user.
<%@ taglib prefix="s" uri="/struts-tags"%>
<html>
<head>
<title>Welcome Page</title>
</head>
<body>
	Hello <s:property value="userName" />
</body>
</html>
file :error.jsp : A JSP view page to display error message when a wrong user id and password is entered.
<html>
<head>
<title>Error Page</title>
</head>
<body>
    <h3>Login failed</h3>
</body>
</html>
Configuring web.xml
web.xml is the entry point for any request sent, hence in order to indicate web.xml that this is a struts2 project, and to indicate that the request and response are handled in struts.xml, we have to provide any filter entry in web.xml file as shown below.
<?xml version="1.0" encoding="UTF-8"?>
<web-app xmlns:xsi="http://www.w3.org/2001/XMLSchema-instance"
  xmlns="http://java.sun.com/xml/ns/javaee" xmlns:web="http://java.sun.com/xml/ns/javaee/web-app_2_5.xsd"
  xsi:schemaLocation="http://java.sun.com/xml/ns/javaee http://java.sun.com/xml/ns/javaee/web-app_2_5.xsd"
  id="WebApp_ID" version="2.5">
  <display-name>Struts2</display-name>
  <filter>
    <filter-name>struts2</filter-name>
    <filter-class>
	org.apache.struts2.dispatcher.ng.filter.StrutsPrepareAndExecuteFilter
    </filter-class>
  </filter>
  <filter-mapping>
    <filter-name>struts2</filter-name>
    <url-pattern>/*</url-pattern>
  </filter-mapping>
  <welcome-file-list>
    <welcome-file>login.jsp</welcome-file>
  </welcome-file-list>
</web-app>
That all on building a struts 2 project, now lets go a head and run this application in TomCat Server
Demo
Since I have given welcome file to be login.jsp in my web.xml, so on running the application in tomcat the login.jsp gets rendered as shown below.
Url: http://localhost:8089/HelloWorldStruts2/
When you give a non empty value in userName then success page appears
If you have not entered any value for userName then error page appears as shown below.
In our next article we will learn about the conceptional difference between struts 2 and servlets