First hands on with spring

 |
|
Get your Eclipse IDE ready and make sure you are working on JDK 5 or above.
** UPDATE: Spring Complete tutorial now available here.
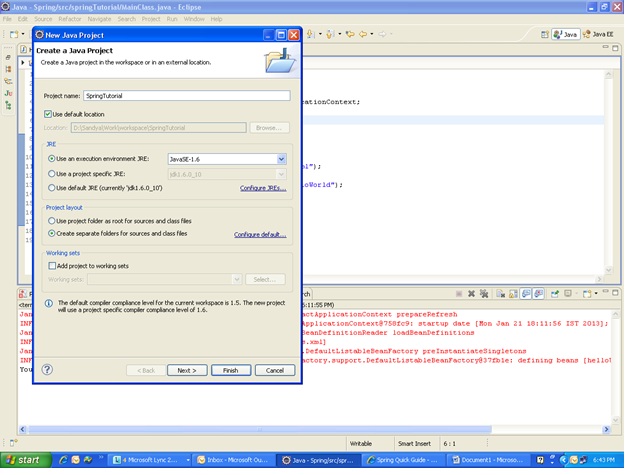
1. Create a new Java Project
Select File->New->Java project and provide an appropriate name for the project in the window that opens up.
2. Adding libraries:
Now you have a project ready to explore the world of Spring. Add the required library files that are needed to support Spring. You can download the latest JARs available from http://www.springsource.org/download. Or, you can include all the JAR files provided in the previous tutorial from the page – Tutorial : Spring set up
On the left pane in your Eclipse IDE, right click on the new project and select build path. Choose Configure buildpath on the appearing list. Choose libraries tab here and select Add External Jars. On the window appearing here, select the list of JARs(provided) that you have just downloaded.
3. Creating the POJO and the main class :
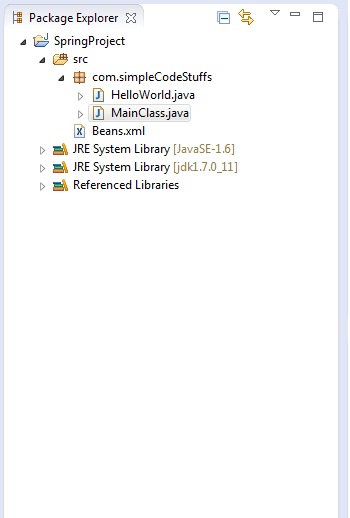
Create a new package under the src folder of your project. Right click on src and choose New ->Package. Provide the package name here com.simpleCodeStuffs. Now that the package is ready, create the POJO under this. Click on the package, select New->Class. Provide the class name HelloWorld. This is the POJO. Simply put, it is a java class with attributes plus getters and setters for the same. It is a java class at its very basic with no additional functionalities.
File : HelloWorld.java
package com.simpleCodeStuffs;

public class HelloWorld {
private String message;

public void setMessage(String message){
this.message = message;
}

public void getMessage(){
System.out.println("Your Message : " + message);
}
}
Now, let us create another class to operate on the POJO above. As is obvious, we will be using Spring Framework(in form of an xml file to provide the metadata) to bind the operating main class and the POJO. Right click on the package com.simpleCodeStuffs and select New->Class. Type in MainClass in the window.
File : MainClass.java
package com.simpleCodeStuffs;

import org.springframework.context.ApplicationContext;
import org.springframework.context.support.ClassPathXmlApplicationContext;

public class MainClass {
public static void main(String[] args) {
ApplicationContext context =
new ClassPathXmlApplicationContext("Beans.xml");
HelloWorld obj = (HelloWorld) context.getBean("helloWorld");
obj.getMessage();
}

}
Note here, the use of Spring framework.
2. The configuration xml file has been loaded. Now, the bean ID is used to obtain a generic object of the required class using getBean() method on the created context. This method returns a generic object which can be finally casted to actual object. Once this object is at hand, accessing the methods of this class is just the usual process.
4. Creating the configuration metadata :
The configuration metadata drives the framework providing the mapping and the values. This can be done by 3 ways
1. XML based configuration file.
2. Annotation-based configuration
3. Java-based configuration
Lets take up Xml based configuration style. Under the src folder, create a new xml file to provide the interface between the basic java class(POJO) and the outside world. This xml typically creates a bean corresponding to a java class by using the tag . The attributes of the bean are defined as of the bean in this xml file.
File : Beans.xml
Xml components Description
1. Bean Id -A unique Id defined for a particular class object/an aspect. Once this is defined, it can be used to access the corresponding class, just as a className is used
2. Class – Path of the class that is mapped to this particular bean
3. Scope -Defines the bean scope, as in singleton, prototype etc.,
4. Property- For one, used to inject values to attribute using setter injection. Name Attribute name , Value value to the attribute that is being injected
5. Constructor-arg Used to inject values to attribute using constructor injection
Make sure the package structure is as shown below.
5. Get Set Go : Running the program
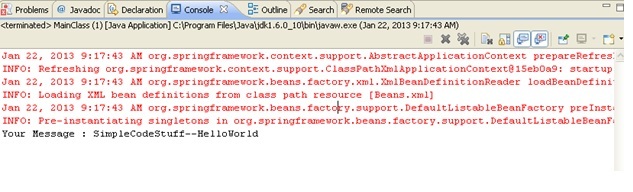
Go to the MainClass.java. Right click and choose RunAs->Java Application. The value injected as property in the xml file for the HelloWorld class gets displayed on the screen
The output here on running MainClass.java is :-
|
|