
Struts 2 File Upload Example

In this example you will learn how to do file upload with the help of the built-in FileUploadInterceptor.

|
|
In Struts 2, the <s:file> tag is used to create a HTML file upload component to allow users to select file from their local disk and upload it to the server. In this tutorial, you will create a JSP page with file upload component, set the maximum size and allow content type of the upload file, and display the uploaded file details.
How File Upload Works in Struts 2?
The file upload function depends on the fileUpload Interceptor, to add support for uploading files in the Struts applications. The Struts 2 File Upload Interceptor is based on MultiPartRequestWrapper, which is automatically applied to the request if it contains the file element. Then it adds the following parameters to the request
In the action class you can get the file, the uploaded file name and content type by just creating getter and setters. (assuming the uploaded file name is uploadDoc).
- [uploadDoc]File – Will store the actual uploaded File
- [uploadDoc]ContentType : This String will store the content type of the file
- [uploadDoc]FileName : This String will store the actual name of the uploaded file (not the HTML name)
For example
private File uploadDoc;
This will store actual uploaded File
private String uploadDocFileName;
This string will contain the file name of uploaded file.
private String uploadDocContentType;
This string will contain the Content Type of uploaded file.
The file upload interceptor also does the validation and adds errors. These error messages are stored in the struts-messsages.properties file. The values of the messages can be overridden by providing the text for the following keys:
- struts.messages.error.uploading – error when uploading of file fails
- struts.messages.error.file.too.large – error occurs when file size is large
- struts.messages.error.content.type.not.allowed – when the content type is not allowed
Parameters
You can use the following parameters to control the file upload functionality.
- maximumSize This parameter is optional. The default value of this is 2MB.
<param name="maximumSize">1024000</param>
You can also set the upload file size using the following code
<constant name="struts.multipart.maxSize" value="20097152" />
- allowedTypes This parameter is also optional. It allows you to specify the allowed content type.
- To upload txt file
<param name="allowedTypes"> text/plain </param>
- To upload PDF files
<param name="allowedTypes"> application/pdf</param>
1. Folder Structure
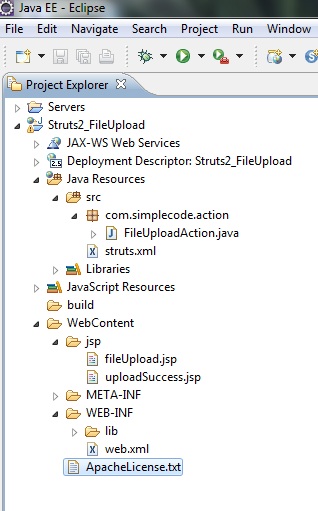
2. Action class
FileUploadAction.java
package com.simplecode.action;

import java.io.File;
import com.opensymphony.xwork2.ActionSupport;

public class FileUploadAction extends ActionSupport {

	private static final long serialVersionUID = 1L;
	private File uploadDoc;
	private String uploadDocFileName;
	private String uploadDocContentType;

    public String execute() {
	return SUCCESS;
	}

	public File getUploadDoc() {
		return uploadDoc;
	}

	public void setUploadDoc(File uploadDoc) {
		this.uploadDoc = uploadDoc;
	}

	public String getUploadDocFileName() {
		return uploadDocFileName;
	}

	public void setUploadDocFileName(String uploadDocFileName) {
		this.uploadDocFileName = uploadDocFileName;
	}

	public String getUploadDocContentType() {
		return uploadDocContentType;
	}

	public void setUploadDocContentType(String uploadDocContentType) {
		this.uploadDocContentType = uploadDocContentType;
	}
}
3. Result Page
fileupload.jsp
<%@ page language="java" contentType="text/html; charset=ISO-8859-1"
	pageEncoding="ISO-8859-1"%>
<%@taglib uri="/struts-tags" prefix="s"%>
<html>
<head>
<title>file upload page</title>
</head>
<body>
	<h3>Struts 2 file upload example</h3>
	<s:form action="fileUpload" method="post" enctype="multipart/form-data">
	<s:file name="uploadDoc" label="Choose file to upload" />
	<s:submit value="upload" align="center" />
</s:form>
</body>
</html>
uploadSuccess.jsp
<%@ page language="java" contentType="text/html; charset=ISO-8859-1"
	pageEncoding="ISO-8859-1"%>
<%@taglib uri="/struts-tags" prefix="s"%>
<html>
<head>
<title>Upload Successful</title>
<s:head />
</head>
<body>

<h3>Struts 2 file upload example</h3>
 File Name :   <s:property value="uploadDocFileName"></s:property><br />
 Content type: <s:property value="uploadDocContentType"></s:property><br />
 User file :   <s:property value="uploadDoc"></s:property>
</body>
</html>
4. struts.xml
<?xml version="1.0" encoding="UTF-8" ?>
<!DOCTYPE struts PUBLIC
"-//Apache Software Foundation//DTD Struts Configuration 2.0//EN"
"http://struts.apache.org/dtds/struts-2.0.dtd">

<struts>
<package name="" namespace="/jsp" extends="struts-default">
<action name="fileUpload" class="com.simplecode.action.FileUploadAction" >
	<interceptor-ref name="defaultStack"></interceptor-ref>
	<interceptor-ref name="fileUpload">
            <param name="maximumSize">1024000</param>
            <param name="allowedTypes">application/pdf</param>
	</interceptor-ref>
	<interceptor-ref name="validation">
		<param name="excludeMethods">input,back,cancel,browse</param>
	</interceptor-ref>
	<interceptor-ref name="workflow">
		<param name="excludeMethods">input,back,cancel,browse</param>
	</interceptor-ref>
	<result name="success">/jsp/uploadSuccess.jsp</result>
	<result name="input">/jsp/fileUpload.jsp</result>
</action>
</package>

</struts>
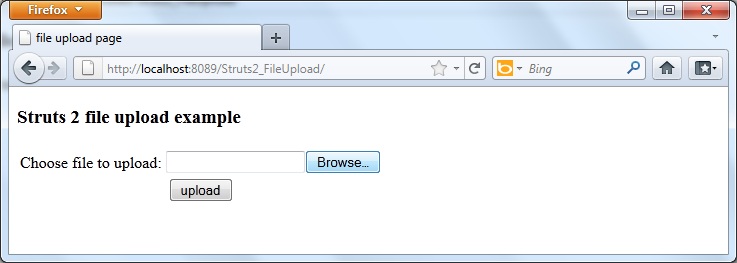
5. Demo
http://localhost:8089/Struts2_FileUpload/
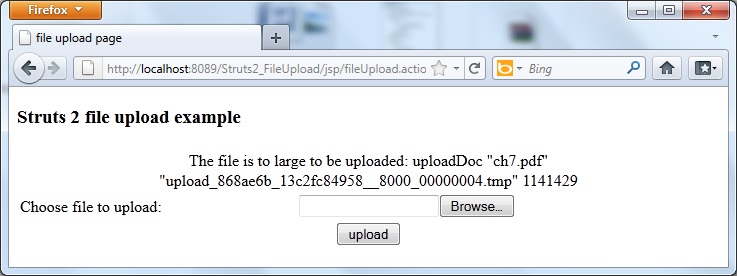
Error message prompts if you upload a file which is more than 10kb, or not a text file.
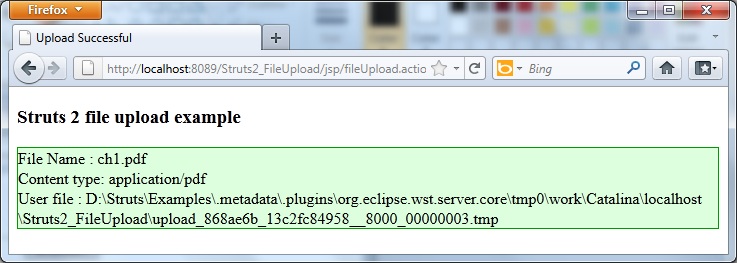
The uploaded file will be treat as a temporary file, with a long random file name, upload__376584a7_12981122379__8000_00000010.tmp. This file will be stored some where in the metadata directory
Note:
In order to save the .tmp file in a desired location ,which you wish , then use the following code in your struts.xml<constant name="struts.multipart.saveDir" value="D:/your folder"/>
Caution :
The problem with above code snippet is, you cannot see the uploaded file in the target folder. Also the file uploaded wont have any proper extension, instead it will have the extension as .tmp.
So in-order to upload and save a file in target space and in-order to have a file with proper extension, i.e .pdf , .doc etc, we should use the following code snippet in the action class’s execute method.
Modified execute method
public String execute()
{
// Location to store the uploaded file in our desired path
String targetPath = "D:/file target/";
File fileToCreate = new File(targetPath, uploadDocFileName);
	try
	{
		FileUtils.copyFile(this.uploadDoc, fileToCreate);
	}
	catch (IOException e)
	{
		addActionError(e.getMessage());
	}
	return SUCCESS;
}

About Jamil



Take Your Business Globally !!

Need a Website?