Transfer property(SOAPUI)
Property Transfer TestSteps are used to transfer properties between TestSteps(Requests) and their containing TestCase, TestSuite and Project. They are extremely useful in a number of situations, especially when properties containing XML are involved.
This tutorial involves,
- Extracting a value from an XML message
- Write a value into an XML message
- Transfer complex XML content between properties
** Update – Complete SoapUi Tutorials now available here
Follow the steps below to transfer properties between TestSteps inside a testsuite.
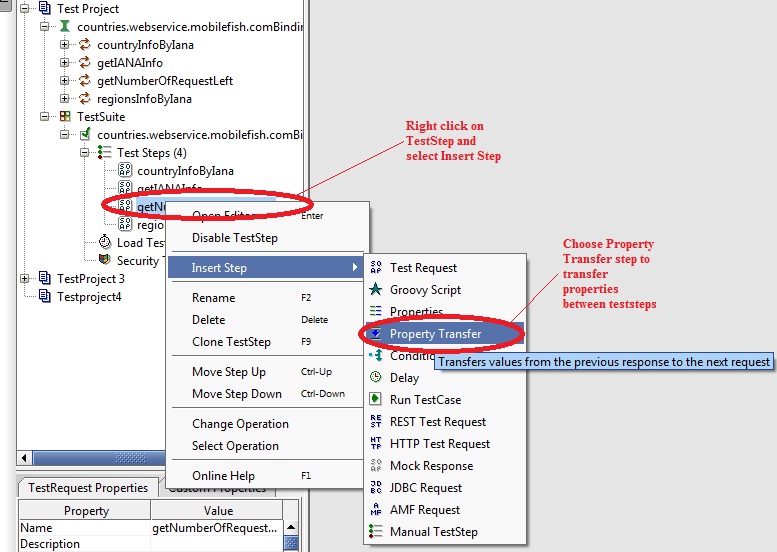
Step 1: To transfer property within the request, right click on a teststep and select Insert step–> Property Transfer from the dropdown menu.
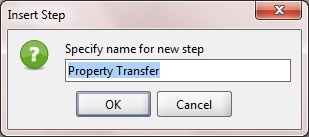
Step 2: In the Insert Step window, enter a userdefined name for the property transfer teststep and click OK.
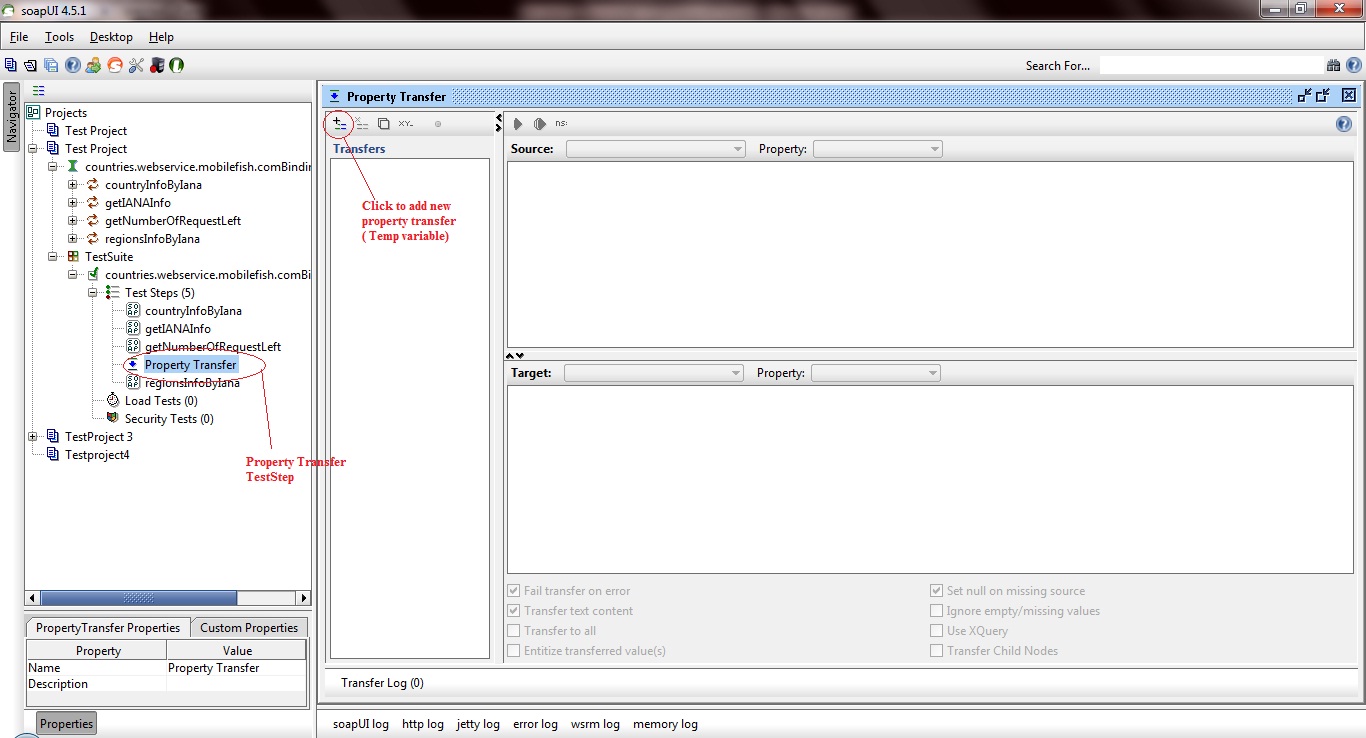
Step 3:
Click on ![]() icon to add new property transfer to the property transfer editor window.
icon to add new property transfer to the property transfer editor window.
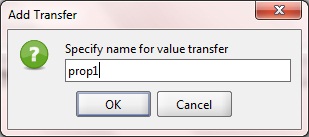
Step 4:
Enter property transfer name and click OK in the Add transfer to add the property to the property transfer editor window as shown in the image below.
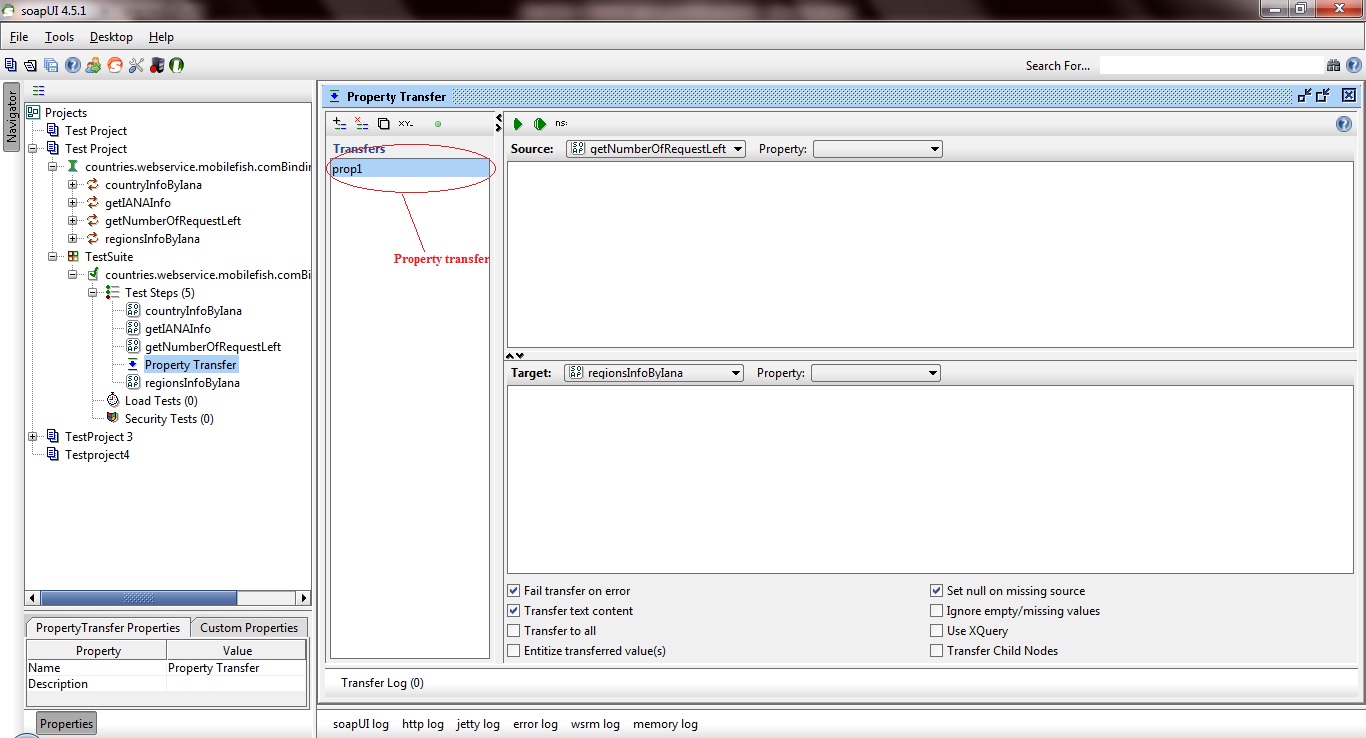
The various tabs and options available in the property transfer editor window are as follows.
- The Source area at the top specifies the source property and optional XPath for the transfer
- The Target area under that specifies the target property and optional XPath for the transfer
- The area below that holds different configuration options set on a transfer to transfer level.
- The Transfer Log at the bottom shows the latest executed transfers while the window was open and their actual transferred values.
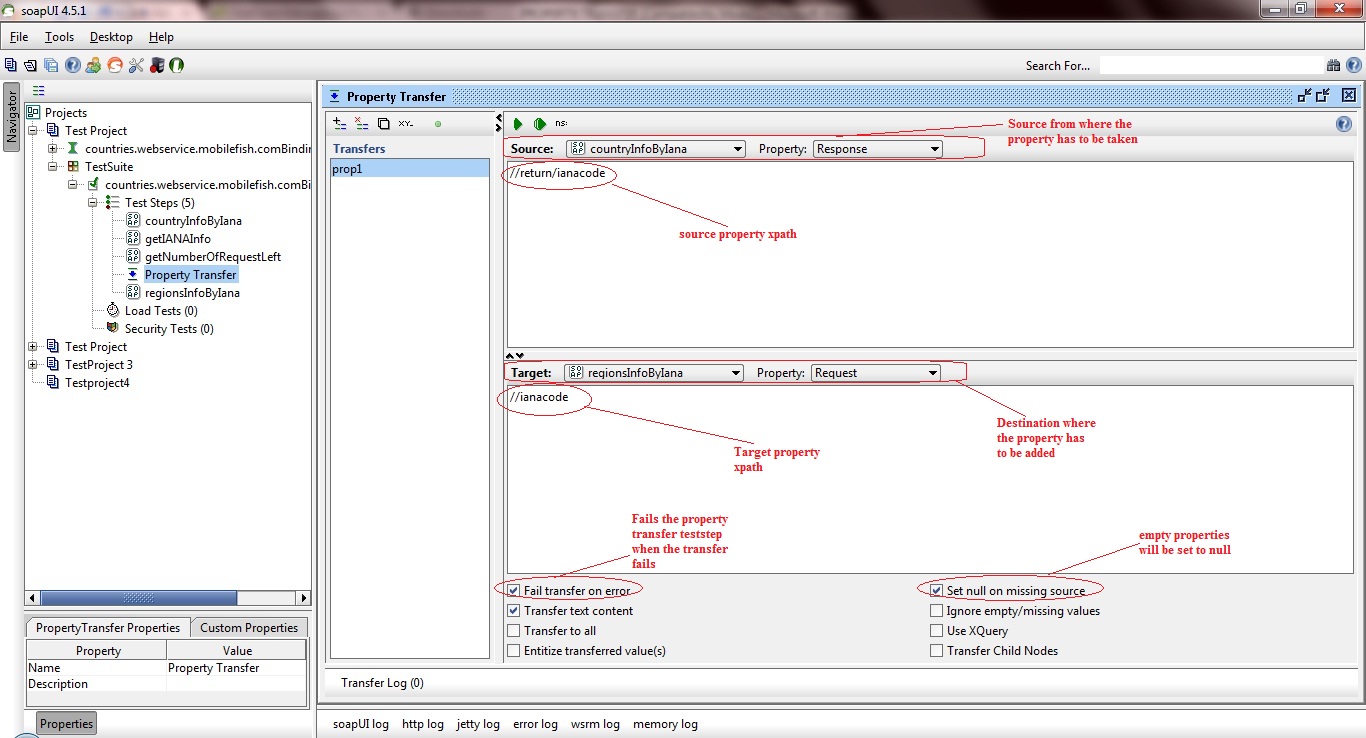
The available configuration options can drastically change what is transferred and their respective is defined as:
- Fail transfer on error – The transfer step will fail in case any errors happen while attempting to perform the transfer
- Transfer text content – Only text content will be transferred. No structural elements will be preserved
- Transfer to all – The matched values will be transferred to all the target locations in case there are several that matches
- Entitize transferred values – The values will have certain characters for example ampersand (“&”) replaced with it’s corresponding character entity value (“&”)
- Set null on missing source – The target will be set to null in case the source resource is missing. This means that if the target already has a value it will be lost
- Ignore empty/missing values – This means that if the matched value of the source is empty or missing it will be ignored and the target value left untouched
- Use XQuery – SoapUI will assume that the source is XQuery rather than the default XPath when trying to extract the source values
- Transfer child nodes – SoapUI will not attempt any textual extraction from the matched source node but rather pick the children of the matched node and thus preserving the subtree XML structure
Step 4:
Now in the property transfer teststep editor window, choose the source property and the target property by providing the xpath as shown in the image below.
Step 5:
Now click on run ![]() icon to test whether the property is getting transferred successfully. The result can be viewed in the transfer log as shown in the image below.
icon to test whether the property is getting transferred successfully. The result can be viewed in the transfer log as shown in the image below.
Note: Before running the property transfer editor, check if the source property (xpath) is not empty/null. Otherwise the property value while property transfer will be null (since Set null for missing source option is checked).

Running the testcase to check property transfer:
Now, let’s run the testcase to check whether the property is getting transferred successfully between the requests. Follow the steps discussed below to verify property transfer is successful.
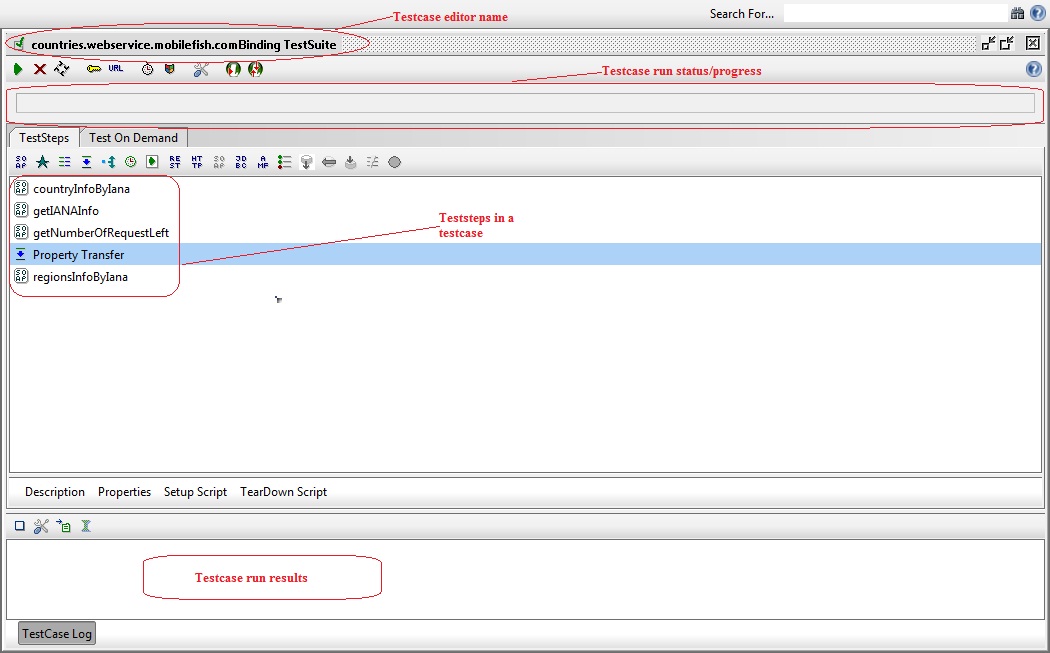
Step 1:
Now click on the testcase name to run the teststeps available in the testcase in the editor window as shown in the image below.
Step 2:
Click on run![]() icon to execute the property transfer in the testcase.
icon to execute the property transfer in the testcase.
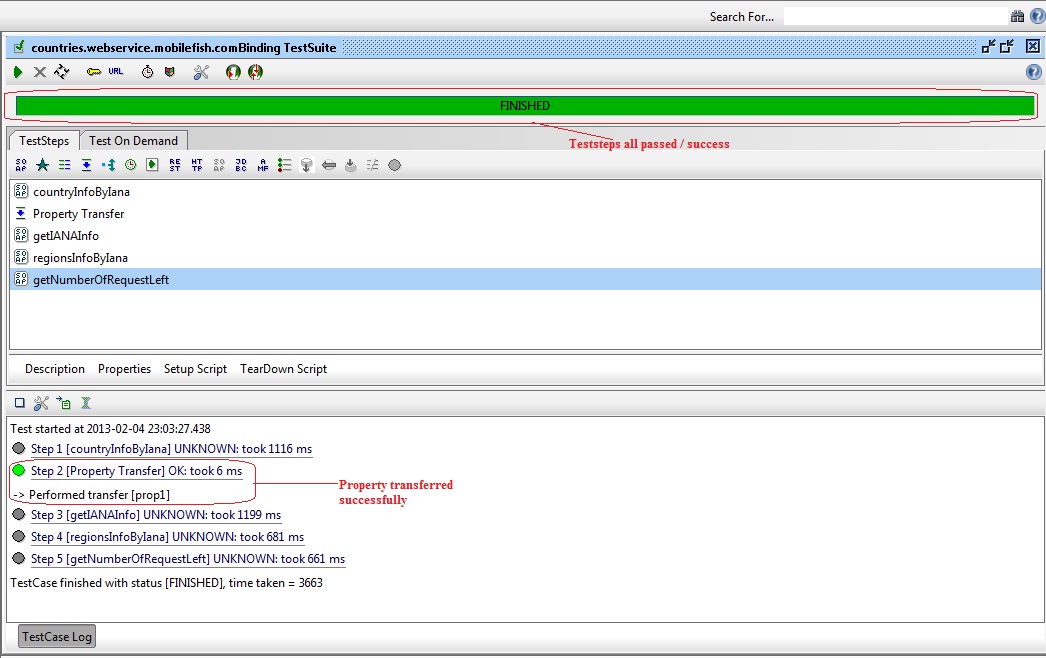
Thus properties can be transferred between requests (from xml content) at testcase level.
Read MoreHow to choose between SOAP Web Services and RESTful services?
Choose SOAP:
- If you require asynchronous processing
- In your service operations are statefull
- If you need formal contract/Interfaces
Choose RESTful Services:
- If you have limited bandwidth
- If your clients require caching.
- If your operations are stateless
Read More
Web Services
‘Web services’ is the name given to a technology for providing loosely coupled and interoperable communications between computer systems over a network. Applications of this technology include enterprise application integration, enabling communications between distributed systems and interoperability with partners or other businesses. The major benefits of using web services are platform independence, flexibility and ease of maintenance, which are the result of the open standards employed and the simplified underlying request-response concept that avoids the complexity of other distributed technologies such as CORBA.
Web services communications are primarily XML-based and essentially provide the ability to make RPC-like function calls between remote systems, regardless of their underlying platform. Specifically, SOAP over HTTP is the most common implementation of a web service. Supporting protocols such as UDDI [OASIS 1] and WSDL [W3C 1] provide discovery and description services that contain enough information for client applications to be built to utilise the service.
The ability to expose functionality through HTTP provides the benefit of minimal firewall configuration but also has the effect of circumventing firewall rules that may restrict unauthorised access to these functions. The addition of UDDI and WSDL allow remote users to easily locate and use the functionality provided. This exposure poses a far greater threat than was present in the previous generation of distributed technologies that typically used proprietary binary encoding schemes and restrictive firewall rule sets to limit access.
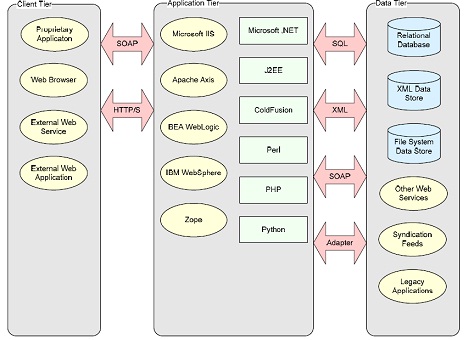
Web services communication is based upon the Simple Object Access Protocol (SOAP). SOAP is an XML-based information packaging definition which can be used for exchanging structured and typed information between peers in a distributed environment, relying on Internet transport protocols such as HTTP. Because SOAP is standards based, it also provides interoperability in heterogeneous environments.
The most relevant documents are
“SOAP Version 1.2 Part 0: Primer” [W3C 2]
“SOAP Version 1.2 Part 1: Messaging Framework” [W3C 3]
“SOAP Version 1.2 Part 2: Adjuncts” [W3C 4].
Read MoreRunning functional tests from the command-line
Running functional tests from the command-line is straightforward and simple using the included testrunner.bat/.sh script, which takes a number of arguments to control which tests to run, output, etc:
- e : The endpoint to use when invoking test-requests, overrides the endpoint set in the project file
- h : The host:port to use when invoking test-requests, overrides only the host part of the endpoint set in the project file
- s : The TestSuite to run, used to narrow down the tests to run
- c : The TestCase to run, used to narrow down the tests to run
- u : The username to use in any authentications, overrides any username set for any TestRequests
- p : The password to use in any authentications, overrides any password set for any TestRequests
- w : Sets the WSS password type, either ‘Text’ or ‘Digest’
- d : The domain to use in any authentications, overrides any domain set for any TestRequests
- r : Turns on printing of a small summary report (see below)
- f : Specifies the root folder to which test results should be exported (see below)
- j : Turns on exporting of JUnit-compatible reports, see below
- a : Turns on exporting of all test results, not only errors
- : Opens the generated report in a browser (SoapUI Pro only)
- i : Enables SoapUI UI-related components, required if you use the UISupport class for prompting or displaying information
- t : Sets the soapui-settings.xml file to use, required if you have custom proxy, ssl, http, etc setting
- x : Sets project password for decryption if project is encrypted
- v : Sets password for soapui-settings.xml file
- D : Sets system property with name=value
- G : Sets global property with name=value
- P : Sets project property with name=value, e.g. -Pendpoint=Value1 -PsomeOtherProperty=value2
- S : Sets to save the project file after tests have been run
- I : Do not stop if error occurs, ignore them
- R : Selects which report to generate for the test objects executed, for example if running the entire project, this could specify the name of a test-suite-level report that would be generated for each TestSuite. The report is saved as specified with the -F option to the folder specified with the -f option. (SoapUI Pro only)
- F : Sets the format of the report specified with the -R option, for Printable reports this is one of PDF, XLS, HTML, RTF, CSV, TXT, and XML. For Data Export this is either XML or CSV (SoapUI Pro only)
- g : Sets the output to include Coverage HTML reports ( SoapUI Pro only )
- E : Sets which environment to use (SoapUI Pro only)
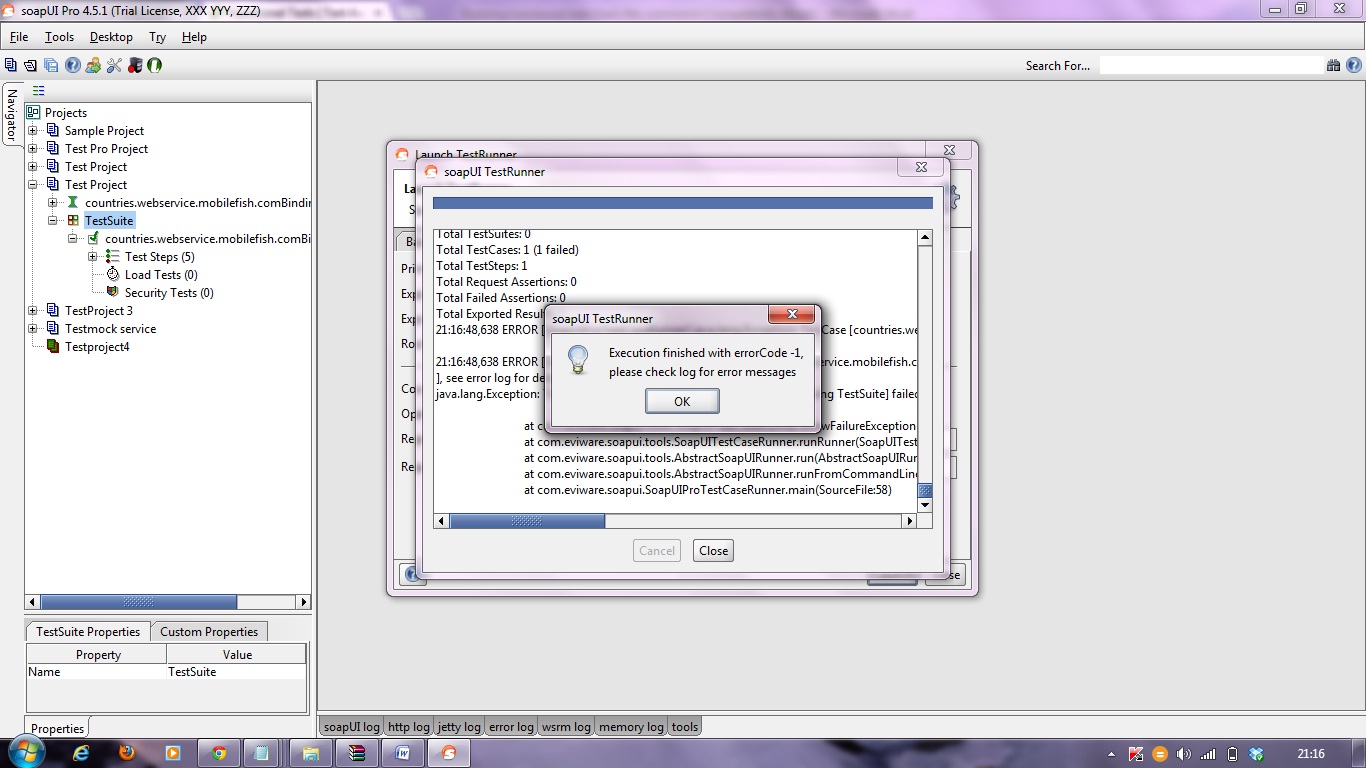
Launching the TestRunner from within SoapUI
Before getting started, with the command line testrunner, SoapUI includes a “Launch TestRunner” action available from Project, TestSuite or TestCase popup menus, which launches the bundled command-line tools from inside SoapUI.
The IDE plugins do not include these runners, you will need to download/install SoapUI seperately and point the “TestRunner Path” option in this dialog to the install directory).
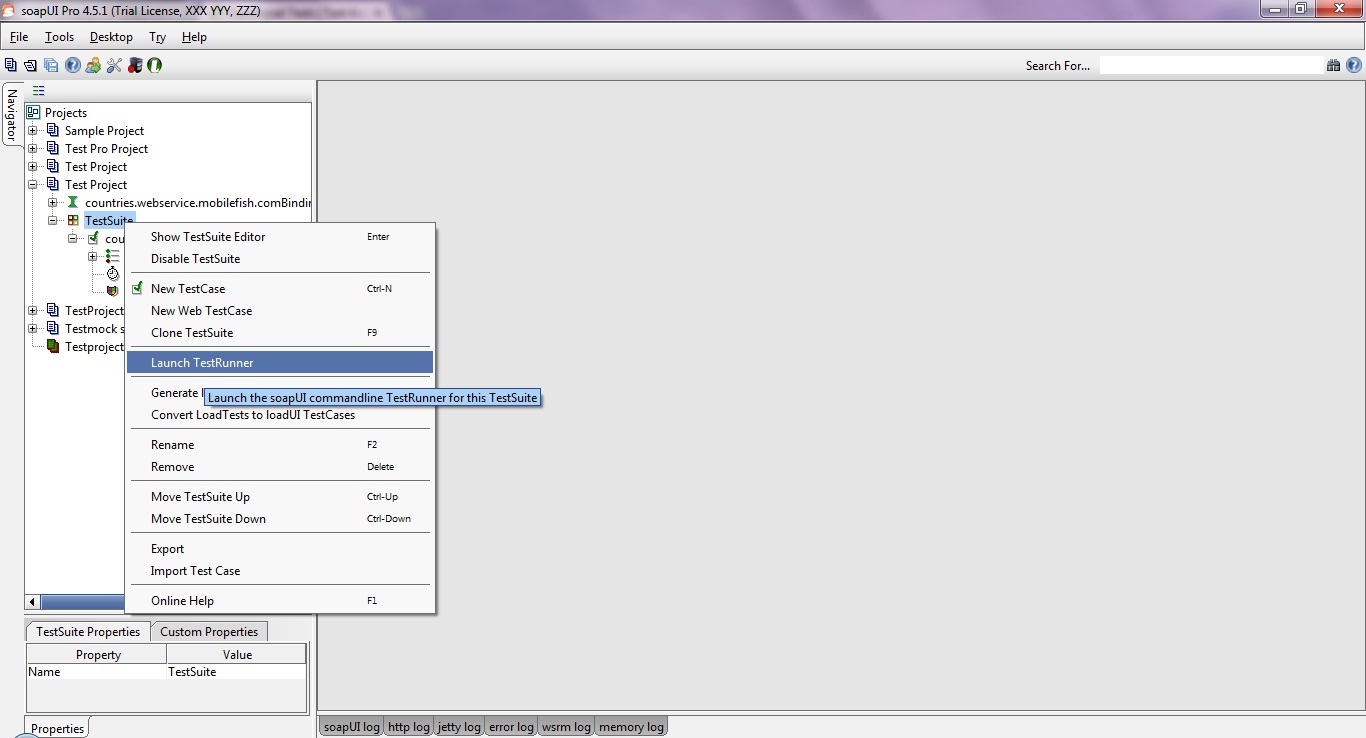
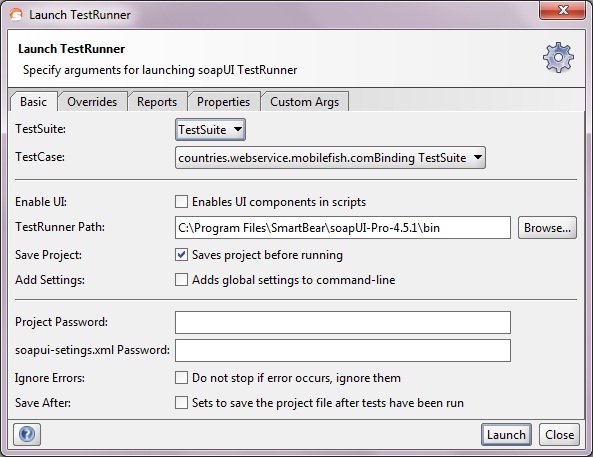
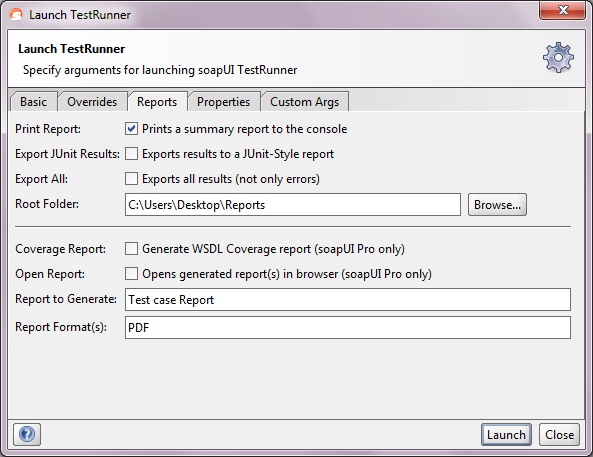
The dialog looks as follows:

Here we’ve specified some initial settings to run the current TestCase, in the Report tab we can specify which reports to generate:
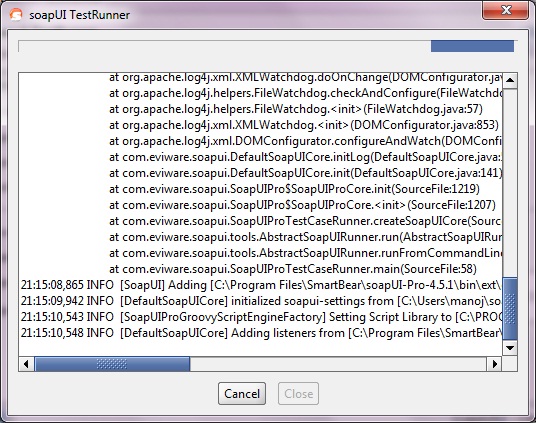
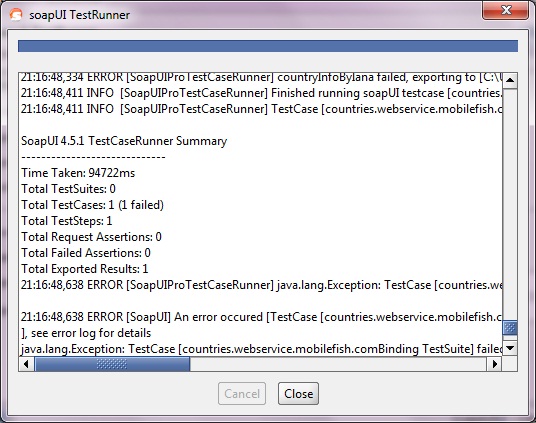
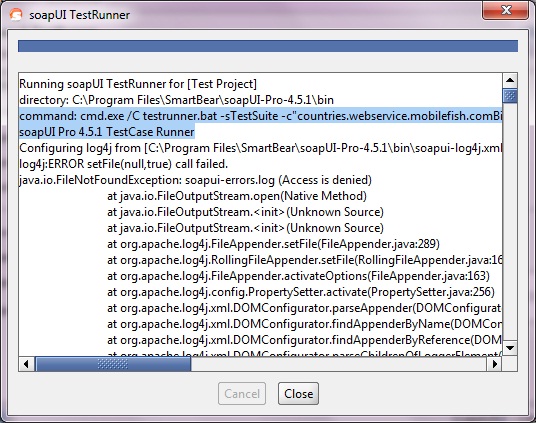
Now if we run the testrunner we get:
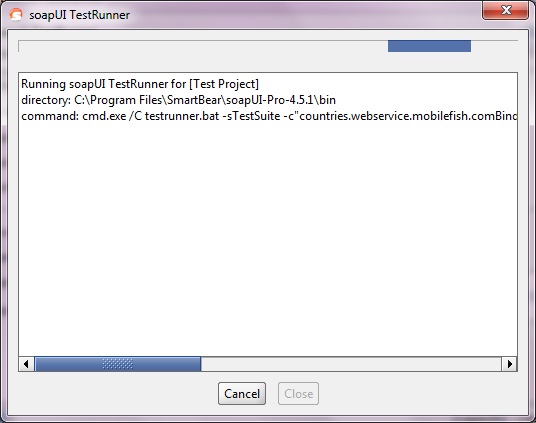
Scrolling back up in the opened window we can see the actual command issued at the command-line:
Copy and paste the below highlighted into your favorite automation tool for rerun these tests as configured.
That is all!!! ;)
Read More
What is the difference between HTTP and REST and SOAP in web services?
SOAP uses WSDL for communication between consumer and provider, whereas REST just uses XML or JSON to send and receive data
WSDL Defines contract between client and service and is static by its nature. In case of REST contract is somewhat complicated and is defined by HTTP, URI, Media Formats and Application Specific Coordination Protocol. It’s highly dynamic unlike WSDL.
This is not true. Plain XML or JSON are not RESTful at all. None of them define any controls(i.e. links and link relations, method information, encoding information etc…) which is against REST as far as messages must be self contained and coordinate interaction between agent/client and service.
With links + semantic link relations clients should be able to determine what is next interaction step and follow these links and continue communication with service.
It is not necessary that messages be human readable, it’s possible to use cryptic format and build perfectly valid REST applications. It doesn’t matter whether message is human readable or not.
Thus, plain XML(application/xml) or JSON(application/json) are not sufficient formats for building REST applications. It’s always reasonable to use subset of these generic media types which have strong semantic meaning and offer enough control information(links etc…) to coordinate interactions between client and server.
REST is over only HTTP. HTTP is most widely used and when we talk about REST web services we just assume HTTP. HTTP defines interface with it’s methods(GET, POST, PUT, DELETE, PATCH etc) and various headers which can be used uniformly for interacting with resources. This uniformity can be achieved with other protocols as well.
REST permits many different data formats where as SOAP only permits XML.
While this may seem like it adds complexity to REST because you need to handle multiple formats, in my experience it has actually been quite beneficial. JSON usually is a better fit for data and parses much faster. REST allows better support for browser clients due to it’s support for JSON.
HTTP is an application protocol. REST is a set of rules, that when followed, enable you to build a distributed application that has a specific set of desirable constraints.
If you are looking for the most significant constraints of REST that distinguish a RESTful application from just any HTTP application, I would say the “self-description” constraint and the hypermedia constraint (aka Hypermedia as the Engine of Application State (HATEOAS)) are the most important.
The self-description constraint requires a RESTful request to be completely self descriptive in the users intent. This allows intermediaries (proxies and caches) to act on the message safely.
The HATEOAS constraint is about turning your application into a web of links where the client’s current state is based on its place in that web. It is a tricky concept and requires more time to explain than I have right now.
Establish JDBC connection in SOAPUI PRO
To establish JDBC connection all you need is 3 simple things,
- OJDBC 14 Jar File
- Database Connection String
- Database details
Now I am gonna tell you how to establish JDBC connection in PRO using Oracle XE (eXpress Edition). Before you start this, you have to download OJDBC 14 Jar file from oracle site and place it in the path specified.
** Update – Complete SoapUi Tutorials now available here
SmartBear\soapUI-Pro-4.5.1\bin\ext
Now you can proceed with the below steps to work with the connection.
Step 1: Open ur SOAPUI Pro by clicking on SOAPUIPro.exe
Step 2: Now choose a project and double click on it.
Step 3: In the Project editor window we have many tabs. Choose JDBC connections tab.
Step 4: Click on Add a New Data Connection icon.
Step 5: Specify a name for your connection.
Step 6: Now configure your database connection by providing the following details.
Driver : Choose the driver based on the type of Database (Eg: Oracle, MySql, MSAccess, etc.,)
User : Your Database username
Password : Your Database password
Database : Database Name
Note: For some of the databases like Oracle, it will prompt for another field called SID (System Identification)
The query to find the above details is as follows:
select ora_database_name from dual;
select * from v$database;
select * from global_name;
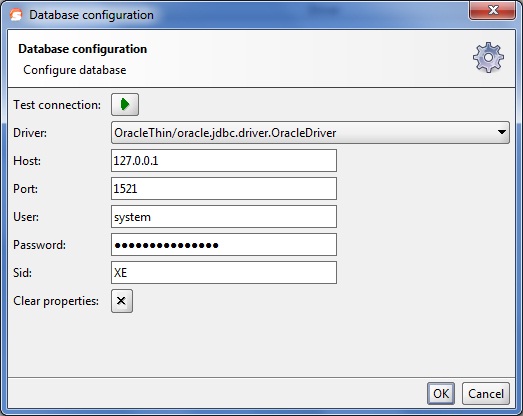
Step 7: Now test your connection by clicking on the run button.
The connection will be established successfully.
Read More