How To Create Toggle Button in an Android Application using Eclipse:
In this tutorial, you will be Learning, How to display Toggle Button in an activity?
Here you go!!!!
Before creating an android application using Eclipse, let us see some of the key terms involved while developing this application.
Key terms involved in this project:
Intent Filters: If Intents is sent to the Android system, it will determine suitable applications for this Intent. If several components have been registered for this type of Intents, android offers the user the choice to open one of them. This determination is based on IntentFilters. An IntentFilter specifies the types of Intent that an Activity, Service, or Broadcast Receiver can respond to. An Intent Filter declares the capabilities of a component. It specifies what an Activity or Service do and what types of broadcasts a Receiver can can handle. It allows the corresponding component to receive Intents of the declared type. IntentFilters are typically defined via the AndroidManifest.xml file.
Toggle: A toggle button allows the users to change the setting between two states. You can add a basic toggle button to your layout with the ToggleButton object. When the user selects a ToggleButton, the object receives an on-click event.
** UPDATE: Android Complete tutorial now available here.
The tutorial is about how to create two toggle buttons and a normal button and when the user clicks on the normal button, it will display the current state of both toggle buttons.
Context: Interface to global information about an application environment. This is an abstract class whose implementation is provided by the Android system. It allows access to application-specific resources and classes, as well as up-calls for application-level operations such as launching activities, broadcasting and receiving intents, etc.
This project is developed in Eclipse 4.2 (Juno) and tested with Android 2.2
If you are new to new to android application project, to create a new project in Eclipse refer Creation of Android Project.
Coding:
Now let’s go to the coding section. This project requires following files.
Source Code:
- Toggle.java- Activity (main screen)
Activity Files:
- activity_toggle.xml – main screen/ layout
res – Values:
- strings.xml – strings available in layout/activity
Manifest file:
- AndroidManifest.xml
Here are the coding for the above files.
Toggle.java:
package com.example.toggle; // Package Toggle
import android.app.Activity; // Required to create an activity
import android.os.Bundle; // A mapping from String values to various Parcelable types.
import android.view.View; // For various views/ widgets
import android.view.View.OnClickListener;
import android.widget.Toast; // Required for pop up notification message.
import android.widget.ToggleButton; // Required for using toggle button properties in activity
public class Toggle extends Activity{  // all classes extends activity
ToggleButton tb; // object for toggle class
public void onCreate(Bundle savedInstanceState) //Creates a new activity
	{
		super.onCreate(savedInstanceState);
        setContentView(R.layout.activity_toggle); // Display toggle activity when app starts (Main Screen)
        tb = (ToggleButton) findViewById(R.id.togglebutton); // Obtain toggle button attributes from layout
        tb.setOnClickListener(new OnClickListener() // On clicking toggle button change the status
        		{
        			public void onClick(View v)
        				{ //display toggle button status as pop up notification
        					Toast.makeText(getBaseContext(),
        					"Button is "+tb.getText().toString(),
        					Toast.LENGTH_LONG).show();
                        }
                });
    }
}
activity_toggle.xml:
<?xml version="1.0" encoding="utf-8"?>

<!--Setting the linear layout with vertical orientation-->

<LinearLayout xmlns:android="http://schemas.android.com/apk/res/android"
android:orientation="vertical"
android:layout_width="fill_parent"
android:layout_height="fill_parent">

<!--Displays text in the activity toggle -->
<TextView android:layout_width="fill_parent"
android:layout_height="wrap_content"
android:text="@string/toggle" />

<!-- Toggle button with status ON/OFF -->
<ToggleButton android:id="@+id/togglebutton"
android:layout_width="100dp"
android:layout_height="35dp"
android:textOn="ON"
android:textOff="OFF"/>

</LinearLayout>
Menu : activity_toggle.xml
    <menu xmlns:android="http://schemas.android.com/apk/res/android">
    </menu>
AndroidManifest.xml:
<?xml version="1.0" encoding="utf-8"?>
<manifest xmlns:android="http://schemas.android.com/apk/res/android"
    package="com.example.toggle"
    android:versionCode="1"
    android:versionName="1.0" >

    <uses-sdk
        android:minSdkVersion="8"
        android:targetSdkVersion="8" />

    <application
        android:allowBackup="true"
        android:icon="@drawable/ic_launcher"
        android:label="@string/app_name"
        android:theme="@style/AppTheme" >
        <activity
            android:name="com.example.toggle.Toggle"
            android:label="@string/app_name" >
            <intent-filter>
                <action android:name="android.intent.action.MAIN" />

                <category android:name="android.intent.category.LAUNCHER" />
            </intent-filter>
        </activity>
    </application>

</manifest>
strings.xml:
<?xml version="1.0" encoding="utf-8"?>
<resources>

<!--Application Name-->
    <string name="app_name">Toggle</string>
<!-- Text to be displayed in activity -->
    <string name="toggle">Toggle success</string>

</resources>
Styles. xml:
<resources>
<!-- specify properties such as height, padding, font color, font size, background color -->

    <!--
        Base application theme, dependent on API level. This theme is replaced
        by AppBaseTheme from res/values-vXX/styles.xml on newer devices.
    -->
    <style name="AppBaseTheme" parent="android:Theme.Light">
        <!--
            Theme customizations available in newer API levels can go in
            res/values-vXX/styles.xml, while customizations related to
            backward-compatibility can go here.
        -->
    </style>

    <!-- Application theme. -->
    <style name="AppTheme" parent="AppBaseTheme">
        <!-- All customizations that are NOT specific to a particular API-level can go here. -->
    </style>

</resources>
Run the android application:
Android applications can be run on the android devices. You can either connect a hardware to the system to test the application or you can use the android virtual devices (AVD) Manager to create/manage the virtual devices running on emulator to run the application.
If you are new to create a Android Virtual Device (AVD), refer Creating Android Virtual Device.
To run the application/ project, Build your project using Project -> Build Project.
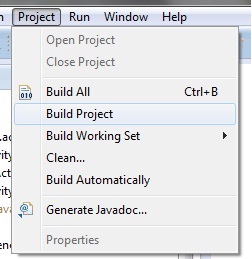
This will show errors in Console window at the bottom of the working area in case your project contains.
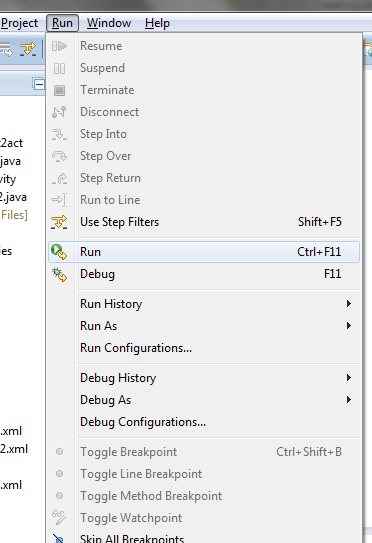
If your build is successful, Run your application using Run -> Run or Press Ctrl +F11.
Upon running the application, the emulator will be launched which displays the AVD on your screen.

To test your application, unlock the screen and double click on your app.
You can see your app with the image set during the android project creation in AVD.
AVD home screen_5
Now the application runs and the activity toggle appears as shown below. Default status is set as OFF.
Toggle button
Click on Toggle button. Now status changes to ON as shown.
Toggle button_ON
Again clicking on Toggle button changes status to OFF.
Toggle button_OFF
Thus the android application project is developed successfully.
![]()
Click Here To Share This..!!
Share