
Microsoft SharePoint Server 2013 installation scenarios are not supported
The following SharePoint Server 2013 installation scenarios are not supported:
- You try to install SharePoint Server 2013 on a drive that is formatted by using Resilient File System (ReFS). In this scenario, the installation fails, and the following error message is logged in the Setup log file:var>datetime::[940] Catalyst file system check failed: The path root D:\ is not NTFS datetime::[940] Showing message Title: ‘Setup Warning’, Message: ‘The install location must be on a drive formatted with NTFS. Select another drive.’ datetime::[940] Message returned: 1
- You install SharePoint Server 2013 in a workgroup.
- You install SharePoint Server 2013 on a domain controller. This scenario is supported only for development configurations and not for production configurations.
- You install SharePoint Server 2013 on Windows Web Server.
- You install SharePoint Server 2013 on a virtual machine (VM) that uses Dynamic Memory. For more information about best practice configurations for SharePoint Server 2013 and virtual machines, go to the following Microsoft TechNet website:
Use best practice configurations for the SharePoint 2013 virtual machines and Hyper-V environment
Read More
Geolocation Field in SharePoint 2013
SharePoint 2013 has introduced a new field type called Geolocation for storing the latitude and logitude information from the end users and displaying it using Bing Maps.
I am not very sure why SharePoint 2013 does not offer any UI to add the use this field, but they have provided nice step by step guide to add and use these fields programmatically. I am just summarizing the step taken to get this new feature working.
1. Add a valid Bing Map key to web or farm.
“The Bing Maps key set at web level has higher precedence order than the Bing Maps key set at farm level.”
Go to the following link to generate the key https://www.bingmapsportal.com/ and sign in using your windows live id. I selected trial key used for non profitable work for this PoC.
Please refer to the following link for step by step on adding the key.
http://msdn.microsoft.com/en-us/library/jj163283.aspx
2. Create a Geolocation Field programmatically.
http://msdn.microsoft.com/en-us/library/jj164050.aspx
You will just have to create a console application to run the code. Make sure to select Any CPU build and .NET framework 4.0 to create the application.
3. Finally, create a Map View for you location list.
http://msdn.microsoft.com/en-us/library/jj656773.aspx
I followed all these steps as is and got an end result which looks something like this
Read More
How to Customize List View Web part XSLT using custom XSLT in SharePoint 2010
Tied up customizing the XSLT for a XSLT list View webpart?
Want to customize XSLT list View webpart without detaching the page layout?
Here is the solution :):)
1. Add your custom XSLT style in the attached file
2. Upload it to the Style Library or any document library where you want to maintain
3. Add the List view webpart in the page
4. Edit the webpart. Under miscellaneous section, give the path of your custom xsl file
XSLT-1
5.Click on OK. Now the list view webpart appears in your custom Style.
Note: Add the columns you used in the XSLT in the current view of the List view webpart
Read More
List FactoryBean, Set FactoryBean and Map FactoryBean in Spring

We have previously seen how to deal with List, Set and Map type attributes inside a bean class. Further let us venture into having concrete List collection (ArrayList and LinkedList), Set collection(HashSet and TreeSet)Â Map collection(HashMap and TreeMap)
Step 1 : Create the POJO
File : ClassABC.java
package com.simpleCodeStuffs;

import java.util.List;
import java.util.Map;
import java.util.Set;

public class ClassABC {

	private List listVariable;
	private Map mapVariable;
	private Set setVariable;

	public List getListVariable() {
		return listVariable;
	}

	public void setListVariable(List listVariable) {
		this.listVariable = listVariable;
	}

	public Map getMapVariable() {
		return mapVariable;
	}

	public void setMapVariable(Map mapVariable) {
		this.mapVariable = mapVariable;
	}

	public Set getSetVariable() {
		return setVariable;
	}

	public void setSetVariable(Set setVariable) {
		this.setVariable = setVariable;
	}

	public String toString() {
		return ("listVariable t" + listVariable + "nsetVariable t"
				+ setVariable + "nmapVariable t" + mapVariable);
	}
}
File : Amount.java
package com.simpleCodeStuffs;

public class Amount {

	private String val;

	public String getVal() {
		return val;
	}

	public void setVal(String val) {
		this.val = val;
	}

	public String toString() {
		return ("amount bean val: " + val);
	}
}
Step 2 : Provide the configuration metadata in the xml file
SAXParseException because of it
File : Beans.xml
<?xml version="1.0" encoding="UTF-8"?>

<beans xmlns="http://www.springframework.org/schema/beans"
xmlns:xsi="http://www.w3.org/2001/XMLSchema-instance"
xmlns:util="http://www.springframework.org/schema/util"
xsi:schemaLocation="http://www.springframework.org/schema/beans

http://www.springframework.org/schema/beans/spring-beans-2.5.xsd


http://www.springframework.org/schema/util


http://www.springframework.org/schema/util/spring-util-2.5.xsd">

<bean id="abc" class="com.simpleCodeStuffs.ClassABC">
	<property name="listVariable">
		<util:list list-class="java.util.ArrayList">
			<value>1</value>
			<value>ArrayList</value>
			<ref bean="amount" />
		</util:list>
	</property>

	<property name="setVariable">
		<util:set set-class="java.util.HashSet">
			<value>2</value>
			<value>HashSet</value>
			<ref bean="amount" />
		</util:set>
	</property>

	<property name="mapVariable">
		<util:map map-class="java.util.HashMap">
			<entry key="Key1" value="3" />
			<entry key="Key2" value="HashMap" />
			<entry key="Key3" value-ref="amount" />
		</util:map>
	</property>
</bean>

<bean id="amount" class="com.simpleCodeStuffs.Amount">
	<property name="val" value="simpleCodeStuffs" />
</bean>
</beans>
Step 3 :
File : MainClass.java
package com.simpleCodeStuffs;

import org.springframework.context.ApplicationContext;
import org.springframework.context.support.ClassPathXmlApplicationContext;

public class MainClass
{
public static void main(String[] args)
{
ApplicationContext context = new ClassPathXmlApplicationContext("Beans.xml");
	ClassABC abc = (ClassABC) context.getBean("abc");
	System.out.println(abc);
}
}
Step 4: Run the application. The output is
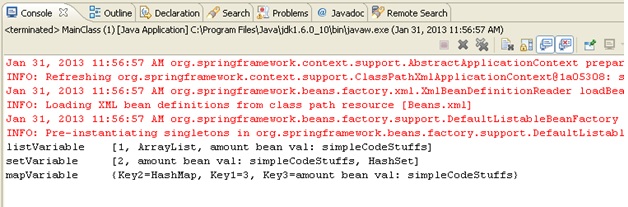
Read More

Auto Scale TextView Text to Fit within Bounds
1. You can create a Class to check for the TextView size
2. Edit the text view size to the maximum size allotted.
public FitView(Context context, AttributeSet attrs) {

super(context, attrs);

float size = this.getTextSize();

if (size > MAX_TEXT_SIZE)

setTextSize(MAX_TEXT_SIZE);

}
3. Then create an object for the Class in your activity. The constructor will be called automatically and resizing will be done.
This resized TextView will be stored in the object created textViewName.
FitView textViewName = new FitView(context, attrs);
4. Then add it to a view by
layoutName.addView(textViewName);
Thus you can use the resized TextView in your layout.