Spring AOP BeforeAdvice, AfterReturningAdvice
 |
|
Considering a log has to be printed once the method execution(in this case, after value is returned from method) in the ‘target’ bean is complete, then AfterReturningAdvice can be made use of. To insert this functionality into our existing code, let us expand the existing scenario and take that another method(goPrevious() ) is present in the existing interface -Iterator and subsequently defined in IteratorImpl class.
The design needs to be modified in such a way that a log is printed before execution of the goNext() method (as already available) and after execution of the goPrevious() method.
** UPDATE: Spring Complete tutorial now available here.
Step 1 :
Add another method declaration in Interface Iterator and correspondingly provide the method definition in IteratorImpl class.
File : Iterator.java
package com.simpleCodeStuffs.aop;

	public interface Iterator {
		void goPrevious();
	    void goNext();
	}
File : IteratorImpl.java
package com.simpleCodeStuffs.aop;

public class IteratorImpl implements Iterator{
	String flowName;
    public void goNext() {

        System.out.println("goNext Method Called on flow - "+flowName);
    }

    public void goPrevious(){
    	System.out.println("goPrevious Method called on flow - "+flowName);
    }

	public String getFlowName() {
		return flowName;
	}
	public void setFlowName(String flowName) {
		this.flowName = flowName;
	}
}
Step 2 :
Create a new class AopExampleAfter to provide the newly added functionality of logging after returning from the method goPrevious(). The concept underlying is much the same as seen in the previous tutorial for Before Advice.
File : AopExampleBefore.java
package com.simpleCodeStuffs.aop;

import java.lang.reflect.Method;
import org.springframework.aop.MethodBeforeAdvice;

public class AopExampleBefore implements MethodBeforeAdvice {
	public void before(Method arg0, Object[] arg1, Object arg2)
			throws Throwable {
	     System.out.println("Logging step :Before Advice Called");
}
}
File : AopExampleAfter.java
package com.simpleCodeStuffs.aop;

import java.lang.reflect.Method;
import org.springframework.aop.AfterReturningAdvice;

public class AopExampleAfter implements AfterReturningAdvice{
	@Override
	public void afterReturning(Object arg0, Method arg1, Object[] arg2,
			Object arg3) throws Throwable {
             System.out.println("Logging step : After returning advice called on "+arg0);
}
}
AopExampleAfter is similar to implementing and defining of the abstract method from the supporting class done in the previous example of MethodBeforeAdvice.
Step 3 :
The main changes need to be done at the aopBeans.xml.
In the available ‘businesslogicbean’ bean, add another value in the list of interceptorNames. Similar to the logic in previous tutorial, define advisor(with advice and pattern as properties) bean and advice bean. In case Before Advice logic is not needed, remove <value>theTracingBeforeAdvisor</value> from the list and its associated definitions.
File : aopBeans.xml
<?xml version="1.0" encoding="UTF-8"?>
<!DOCTYPE beans PUBLIC
    "-//SPRING//DTD BEAN//EN"
    "http://www.springframework.org/dtd/spring-beans.dtd">

<beans>
<!- Bean Classes
    <bean id="beanTarget" class="com.simpleCodeStuff.aop.IteratorImpl" >
    <property name="flowName" value="existing code"/>
    </bean>

      <!- Bean configuration
    <bean id="businesslogicbean"
        class="org.springframework.aop.framework.ProxyFactoryBean">
        <property name="proxyInterfaces">
            <value>com.simpleCodeStuff.aop.Iterator</value>
        </property>
        <property name="target">
            <ref local="beanTarget" />
        </property>
        <property name="interceptorNames">
            <list>
                <value>theTracingBeforeAdvisor</value>
                <value>theTracingAfterAdvisor</value>
            </list>
        </property>
    </bean>

    <bean id="theTracingAfterAdvisor"
      class="org.springframework.aop.support.RegexpMethodPointcutAdvisor">
      <property name="advice">
         <ref local="theTracingAfterAdvice "/>
      </property>
      <property name="pattern">
         <value>.*Previous*.</value>
      </property>
   </bean>
    <bean id="theTracingAfterAdvice"
      class="com.simpleCodeStuff.aop.AopExampleAfter"/>


    <!- Advisor pointcut definition for before advice
    <bean id="theTracingBeforeAdvisor"
        class="org.springframework.aop.support.RegexpMethodPointcutAdvisor">
        <property name="advice">
            <ref local="theTracingBeforeAdvice"/>
        </property>
        <property name="pattern">
            <value>.*Next*.</value>
        </property>
    </bean>


    <!- Advice classes
    <bean id="theTracingBeforeAdvice"
        class="com.simpleCodeStuff.aop.AopExampleBefore" />


</beans>
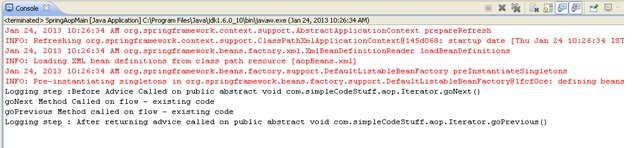
Here, note that log has to be printed BEFORE method execution in the case of goNext() method and AFTER method execution in the case of goPrevious() method. Accordingly, the value in âpatternâ in the corresponding Advisor bean is modified.
Step 4 :
Make a call to the newly added goPrevious() method as well, from the Main class.
File : SpringAopMain.java
package com.simpleCodeStuffs.aop;

import org.springframework.context.ApplicationContext;
import org.springframework.context.support.ClassPathXmlApplicationContext;

public class SpringAopMain {
    public static void main(String[] args) {
        // Read the configuration file
    	 ApplicationContext context =
	             new ClassPathXmlApplicationContext("aopBeans.xml");

        // Instantiate an object
        Iterator IteratorInterface = (Iterator) context
                .getBean("businesslogicbean");

        // Execute the public method of the bean
        IteratorInterface.goNext();
        IteratorInterface.goPrevious();
    }
}
Step 5 :
Run the Main class. The output received is
Step 6 :
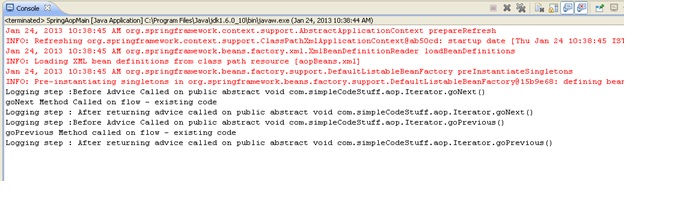
Lets make a small change in the aopBeans.xml to understand the usage of âpatternâ in the advisor bean. When no explicit value of pattern is mentioned for the two advisors(before,after), then a log is printed before and after the execution of both methods.
File : aopBeans.xml
<bean id="theTracingAfterAdvisor"
      class="org.springframework.aop.support.RegexpMethodPointcutAdvisor">
      <property name="advice">
         <ref local="theTracingAfterAdvice"/>
      </property>
      <property name="pattern">
         <value>.*</value>
      </property>
   </bean>
    <bean id="theTracingAfterAdvice"
      class="com.simpleCodeStuff.aop.AopExampleAfter"/>


    <!- Advisor pointcut definition for before advice
    <bean id="theTracingBeforeAdvisor"
        class="org.springframework.aop.support.RegexpMethodPointcutAdvisor">
        <property name="advice">
            <ref local="theTracingBeforeAdvice"/>
        </property>
        <property name="pattern">
            <value>.*</value>
        </property>
    </bean>
The output now will be
|
|
Spring framework architecture
Spring has a layered architecture which consists of various modules. All the modules are built on top of the core container and are mostly independent. This way, the developer is free to use only the modules that are needed for the particular requirements. The modules in Spring framework are grouped into Core Container, Data Access/Integration, Web, AOP (Aspect Oriented Programming), Instrumentation, and Test.
** UPDATE: Spring Complete tutorial now available here.
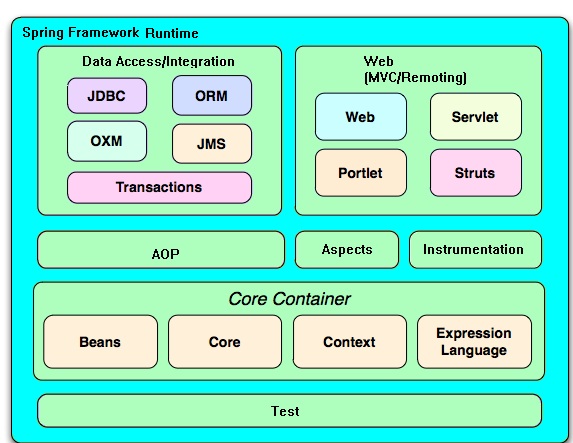
CORE CONTAINER
- Core and Beans provide the most fundamental part of the framework including IOC container and Dependency Injection(DI)
- Context provides a means to access objects in a framework-style manner. It inherits its features from the Beans module and adds support for internationalization (using, for example, resource bundles), event-propagation and resource-loading,
- Expression Language(EL) supports setting and getting property values, property assignment, method invocation, accessing the context of arrays, collections and indexers, logical and arithmetic operators, named variables and retrieval of objects by name from Spring’s IoC container.
DATA ACCESS/INTEGRATION
- JDBC[Java DataBase Connectivity] provides a JDBC abstraction layer
- ORM[Object Relational Mapping] is responsible for Database access and related activities. It provides integration layers for popular object-relational mapping APIs, including JDO, Hibernate
- OXM [Object/XML Mapping] provides an abstraction layer that supports Object/XML mapping implementations for JAXB, Castor, XMLBeans, JiBX and XStream.
- JMS [Java Messaging Service] provides features for creating and consuming messages.
- Transaction provides support to programmatic and declarative transaction management for classes that implement special interfaces and for all the POJOs (Plain Old Java Objects)
AOP
It is used as a replacement for EJB container and is much simpler than EJBs. The most important service provided by AOP is declarative transaction management. The AOP implementation allows the developer to define point-cuts and method interceptors to keep the ‘concerns’ apart. This clearly enables decoupling the functionality of the code that needs to be separated.
INSTRUMENTATION
It provides class instrumentation support and also class loader implementations to be used in a certain application servers. It also exposes performance and resource utilization metrics for the Spring container and thus facilitates run time control over the spring container.
WEB
The WEB module consists of Web, Web-servlet, Web-porlet, Web-struts as sub-modules.
- Web provides the basic web-oriented integration features such as multi part file upload functionality , a web-oriented application context and the initialization of the IoC using servlet listeners and.
- Web-Servlet contains Spring’s MVC for the web applications. It is a part of Spring’s web application development stack.
- Web-Struts helps in integrating a Struts web tier within a Spring application.
- Web-Portlet typically mirrors the functionality of the web-servlet module. It provides the MVC implementation for portlet environment.
TEST
Supports testing of Components using Junits.
Read More

First hands on with spring
|
|
Get your Eclipse IDE ready and make sure you are working on JDK 5 or above.
** UPDATE: Spring Complete tutorial now available here.
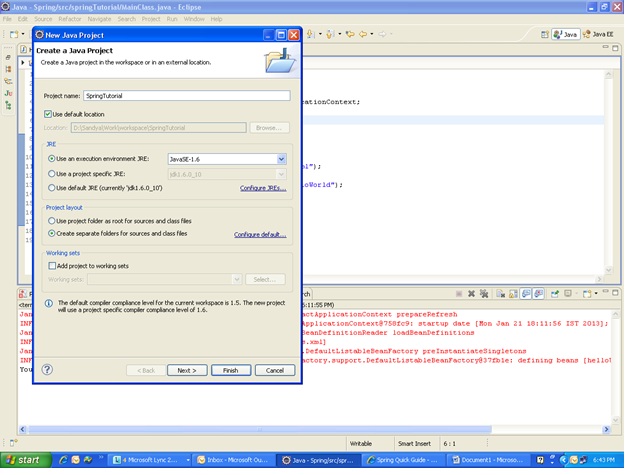
1. Create a new Java Project
Select File->New->Java project and provide an appropriate name for the project in the window that opens up.
2. Adding libraries:
Now you have a project ready to explore the world of Spring. Add the required library files that are needed to support Spring. You can download the latest JARs available from http://www.springsource.org/download. Or, you can include all the JAR files provided in the previous tutorial from the page - Tutorial : Spring set up
On the left pane in your Eclipse IDE, right click on the new project and select build path. Choose Configure buildpath on the appearing list. Choose libraries tab here and select Add External Jars. On the window appearing here, select the list of JARs(provided) that you have just downloaded.
3. Creating the POJO and the main class :
Create a new package under the src folder of your project. Right click on src and choose New ->Package. Provide the package name here com.simpleCodeStuffs. Now that the package is ready, create the POJO under this. Click on the package, select New->Class. Provide the class name HelloWorld. This is the POJO. Simply put, it is a java class with attributes plus getters and setters for the same. It is a java class at its very basic with no additional functionalities.
File : HelloWorld.java
package com.simpleCodeStuffs;

public class HelloWorld {
private String message;

public void setMessage(String message){
this.message = message;
}

public void getMessage(){
System.out.println("Your Message : " + message);
}
}
Now, let us create another class to operate on the POJO above. As is obvious, we will be using Spring Framework(in form of an xml file to provide the metadata) to bind the operating main class and the POJO. Right click on the package com.simpleCodeStuffs and select New->Class. Type in MainClass in the window.
File : MainClass.java
package com.simpleCodeStuffs;

import org.springframework.context.ApplicationContext;
import org.springframework.context.support.ClassPathXmlApplicationContext;

public class MainClass {
public static void main(String[] args) {
ApplicationContext context =
new ClassPathXmlApplicationContext("Beans.xml");
HelloWorld obj = (HelloWorld) context.getBean("helloWorld");
obj.getMessage();
}

}
Note here, the use of Spring framework.
2. The configuration xml file has been loaded. Now, the bean ID is used to obtain a generic object of the required class using getBean() method on the created context. This method returns a generic object which can be finally casted to actual object. Once this object is at hand, accessing the methods of this class is just the usual process.
4. Creating the configuration metadata :
The configuration metadata drives the framework providing the mapping and the values. This can be done by 3 ways
1. XML based configuration file.
2. Annotation-based configuration
3. Java-based configuration
Lets take up Xml based configuration style. Under the src folder, create a new xml file to provide the interface between the basic java class(POJO) and the outside world. This xml typically creates a bean corresponding to a java class by using the tag . The attributes of the bean are defined as of the bean in this xml file.
File : Beans.xml
Xml components Description
1. Bean Id -A unique Id defined for a particular class object/an aspect. Once this is defined, it can be used to access the corresponding class, just as a className is used
2. Class - Path of the class that is mapped to this particular bean
3. Scope -Defines the bean scope, as in singleton, prototype etc.,
4. Property- For one, used to inject values to attribute using setter injection. Name Attribute name , Value value to the attribute that is being injected
5. Constructor-arg Used to inject values to attribute using constructor injection
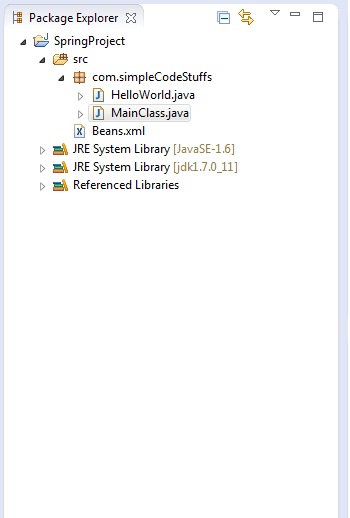
Make sure the package structure is as shown below.
5. Get Set Go : Running the program
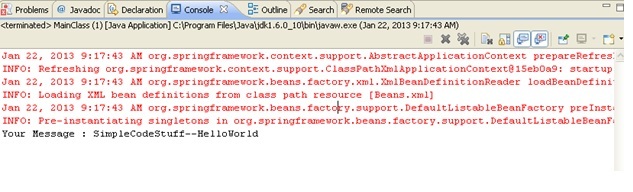
Go to the MainClass.java. Right click and choose RunAs->Java Application. The value injected as property in the xml file for the HelloWorld class gets displayed on the screen
The output here on running MainClass.java is :-
|
|
Constructor injection for reference bean
|
|
The basic working of spring framework is now clear. Now, we can keep doing modifications in the existing base project to further build on our understanding. Let us take up a practical scenario for the next step. One of the attributes of a class <Candidate> is another class<Address>. The value of the class Candidate depends on the value of the Class Address. i.e., there is a dependency here.

In case of constructor injection, the constructor is used to inject value into the bean. Just like in normal OOP concept, the base class constructor can be used to pass values to the child class constructor.
The end result of setter and constructor injection are the same. Still at times, one might prove to be more advantageous than the other. Now, let us make small modifications to the above classes to inject the values for the attributes using the constructor.
Step 1 :
Create Candidate and Address class. Make a note to add constructors to these classes to allow constructor injection
File : Candidate.java
package com.simpleCodeStuffs;

public class Candidate {

private String name;
private int age;
private Address addrs;

public Candidate(String name,int age,Address addrs){
this.name=name;
this.age=age;
this.addrs=addrs;
}

public String getName() {
return name;
}

public void setName(String name) {
this.name = name;
}

public int getAge() {
return age;
}

public void setAge(int age) {
this.age = age;
}

public Address getAddrs() {
return addrs;
}

public void setAddrs(Address addrs) {
this.addrs = addrs;
}
}
File : Address.java
package com.simpleCodeStuffs;

public class Address {

private String doorNo;
private String street;
private String area;

public Address(String doorNo, String street,String area){
this.doorNo=doorNo;
this.street=street;
this.area=area;
}

public String getArea() {
return area;
}

public void setArea(String area) {
this.area = area;
}

public String getDoorNo() {
return doorNo;
}

public void setDoorNo(String doorNo) {
this.doorNo = doorNo;
}

public String getStreet() {
return street;
}

public void setStreet(String street) {
this.street = street;
}
}
In case of setter injection, we know that the property values are assigned to the attributes of the class using the setter methods. In that case, default constructor is used for creating the instance. But here in constructor injection , we explicitly pass values to the constructor of the class from the metadata. This means that an explicit constructor has to be provided in the bean classes with parameters appropriate to what is about to be passed from the configuration metadata file.
Step 2 :
There is no need to make any changes in the MainClass.java. i.e., the accessing of the objects from a third party remains totally unchanged no matter the type of injection used on these classes.
File : MainClass.java
package com.simpleCodeStuffs;

import org.springframework.context.ApplicationContext;
import org.springframework.context.support.ClassPathXmlApplicationContext;

public class MainClass {

public static void main(String[] args) {
ApplicationContext context =
new ClassPathXmlApplicationContext("Beans.xml");
Candidate can = (Candidate)context.getBean("candidate");
Address add = (Address)context.getBean("address");

System.out.println("Name    : "+can.getName());
System.out.println("Age     : "+can.getAge());
System.out.println("Address : "+can.getAddrs().getDoorNo());
System.out.println("t  "+add.getStreet());
System.out.println("t  "+add.getArea());
}
}
Step 3:
The obvious change required now, is in the configuration metadata xml (Beans.xml). Instead of setting values using the <property name=” ” value=” ” />(thereby calling the setter method) we can now make use of <constructor-arg> to call the constructor with the appropriate parameters.
File : Beans.xml
<?xml version="1.0" encoding="UTF-8"?>

<beans xmlns="http://www.springframework.org/schema/beans"
	xmlns:xsi="http://www.w3.org/2001/XMLSchema-instance"
	xsi:schemaLocation="http://www.springframework.org/schema/beans

http://www.springframework.org/schema/beans/spring-beans-3.0.xsd">

	<bean id="candidate" class="com.simpleCodeStuffs.Candidate">
		<constructor-arg index="0" value="sandy" />
		<constructor-arg index="1" value="22" />
		<constructor-arg ref="address" />
	</bean>

	<bean id="address" class="com.simpleCodeStuffs.Address">
		<constructor-arg index="0" value="1-B/25" />
		<constructor-arg index="1" value="KLN Street" />
		<constructor-arg index="2" value="M.K Nagar, Ayapakkam" />
	</bean>

</beans>
<constructor-arg> tag has the index defined to clarify on the value being passed. The value (0,1,2) of the index is in the order of the parameters being passed to the constructor. When one of the parameters to a constructor is an object(as in Address) the value for this object can not be assigned directly. In such cases, uses ref=<beanID>(reference injection) to point that value to the actual bean (bean id=â”address”). The value for the attributes inside Address is set inside this bean.
Step 4 :
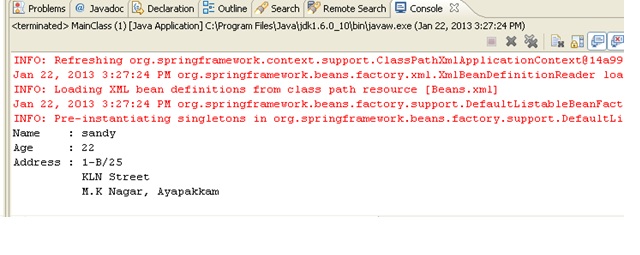
The output on running the above code (setter injection or constructor injection will be the same) will be :-
|
|
Read More

Setter injection for reference bean
|
|
In most of the cases, one of the attributes of a class(A) is a class(B) by itself. In such cases, setting values for class A would involve setting values for Class B in turn. Then, reference to the bean ID can be passed while setting the bean using Setter injection.
The basic working of spring framework is now clear. Now, we can keep doing modifications in the existing base project to further build on our understanding. Let us take up a practical scenario for the next step. One of the attributes of a class <Candidate> is another class<Address>. The value of the class Candidate depends on the value of the Class Address. i.e., there is a dependency here.
Step 1:
Create a new classes Candidate, Address(POJOs) and define the attributes as above. For this example, simply create the setter and getter methods for each attributes, through which their values will be injected
File : Candidate.java
package com.simpleCodeStuffs;

public class Candidate {

	private String name;
	private int age;
	private Address addrs;

	public String getName() {
		return name;
	}

	public void setName(String name) {
		this.name = name;
	}

	public int getAge() {
		return age;
	}

	public void setAge(int age) {
		this.age = age;
	}

	public Address getAddrs() {
		return addrs;
	}

	public void setAddrs(Address addrs) {
		this.addrs = addrs;
	}
}
File :Address.java
package com.simpleCodeStuffs;

public class Address {

	private String doorNo;
	private String street;
	private String area;

	public String getArea() {
		return area;
	}

	public void setArea(String area) {
		this.area = area;
	}

	public String getDoorNo() {
		return doorNo;
	}

	public void setDoorNo(String doorNo) {
		this.doorNo = doorNo;
	}

	public String getStreet() {
		return street;
	}

	public void setStreet(String street) {
		this.street = street;
	}
}
Step 2:
Create the main class.
File : MainClass.java
package com.simpleCodeStuffs;
import org.springframework.context.ApplicationContext;
import org.springframework.context.support.ClassPathXmlApplicationContext;
public class MainClass {
public static void main(String[] args) {
ApplicationContext context = new ClassPathXmlApplicationContext(
"Beans.xml");
Candidate can = (Candidate) context.getBean("candidate");
Address add = (Address) context.getBean("address");
System.out.println("NameÃÂ : " + can.getName());
System.out.println("Age: " + can.getAge());
System.out.println("Address : " + can.getAddrs().getDoorNo());
System.out.println("t " + add.getStreet());
System.out.println("t " + add.getArea());
}
}
Make sure that all these xml files are loaded properly in your project classpath.
File : Beans.xml
<?xml version="1.0" encoding="UTF-8"?>

<beans xmlns="http://www.springframework.org/schema/beans"
	xmlns:xsi="http://www.w3.org/2001/XMLSchema-instance"
	xsi:schemaLocation="http://www.springframework.org/schema/beans

http://www.springframework.org/schema/beans/spring-beans-3.0.xsd">

	<bean id="candidate" class="com.simpleCodeStuffs.Candidate">
		<property name="name" value="Sandy" />
		<property name="age" value="22" />
		<property name="addrs" ref="address" />
	</bean>

	<bean id="address" class="com.simpleCodeStuffs.Address">
		<property name="doorNo" value="1-B/25" />
		<property name="street" value="KLN Street" />
		<property name="area" value="M.K Nagar, Ayapakkam" />
	</bean>
</beans>
A bean is created corresponding to both the classes(Candidate and Address).Make changes here to add multiple property tags corresponding to the various attributes present inside each of the classes. One major difference here is, the property Address under Candidate does not have a direct value for itself, but is rather a separate bean. Hence, instead of providing value, provide ref for this property. The value provided in ref will be nothing but the beanID of the Address class.
We have used setter injection to set values for the properties. Hence, we use the tag property and give the value to be set (which is passed to the corresponding setter methods) as the value correspondingly.
Run it :
The output on running the above code (setter injection or constructor injection will be the same) will be :-
|
|
Basic example of Constructor injection in spring
|
|
Instead of using the setter methods to inject values to attributes, the constructor of a class can be used to inject the values from outside the class. This work again, is done through the spring metadata file , as is in the case of setter injection.
** UPDATE: Spring Complete tutorial now available here.
1. Create the POJO class into which values are to be injected using setter injection
File : SimpleConstructorInjection
package com.simpleCodeStuffs;

public class SimpleConstructorInjection {
public SimpleConstructorInjection(String message){
this.message=message;
}

private String message;

public void setMessage(String message){

this.message = message;
}
public void getMessage(){
System.out.println("Your Message : " + message);
}
}
2 Define the metadata
The value for the attribute of the POJO is provided as<constructor-arg value=” ” /> thereby setting the values of these attributes through the constructor.
File : Beans.xml
<?xml version="1.0" encoding="UTF-8"?>
<beans xmlns="http://www.springframework.org/schema/beans"
xmlns:xsi="http://www.w3.org/2001/XMLSchema-instance"
xsi:schemaLocation="http://www.springframework.org/schema/beans

http://www.springframework.org/schema/beans/spring-beans-3.0.xsd">

<bean id="simpleConstructorInjection" class="com.simpleCodeStuffs.SimpleConstructorInjection">
<constructor-arg value="SimpleCodeStuffs--Simple Constructor Injection"/>
</bean>
</beans>
3. Write the main class to place a call to this POJO
File : MainClass.java
package com.simpleCodeStuffs;

import org.springframework.context.ApplicationContext;
import org.springframework.context.support.ClassPathXmlApplicationContext;

public class MainClass {
public static void main(String[] args) {
ApplicationContext context =
new ClassPathXmlApplicationContext("Beans.xml");
SimpleConstructorInjection obj =
(SimpleConstructorInjection) context.getBean("simpleConstructorInjection");
obj.getMessage();
}

}
4. Run it
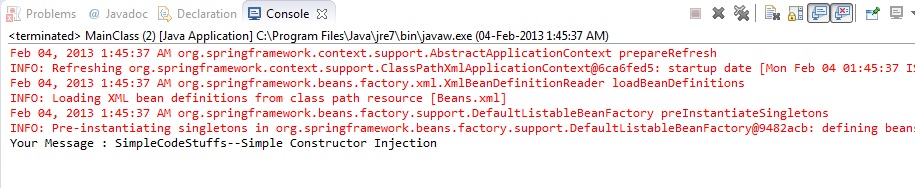
The output appears as :-
|
|