AJAX implementation in JSP and Servlet using JQuery
In this post, we will learn to implement AJAX calls from a JSP page to a Servlet using JQuery and update the same JSP page back with the response from the Servlet.
Servlet
package com.simplecodestuffs.ajax;

import java.io.IOException;
import javax.servlet.ServletException;

import javax.servlet.http.HttpServlet;
import javax.servlet.http.HttpServletRequest;
import javax.servlet.http.HttpServletResponse;

public class JqueryServlet extends HttpServlet {
private static final long serialVersionUID = 1L;

protected void doGet(HttpServletRequest request,
	HttpServletResponse response) throws ServletException, IOException {

	String userName = request.getParameter("userName");
	if (userName.equals("")) {
		userName = "User name cannot be empty";
	} else {
		userName = "Hello " + userName;
	}
	response.setContentType("text/plain");
	response.getWriter().write(userName);
}

protected void doPost(HttpServletRequest request,
	HttpServletResponse response) throws ServletException, IOException {
}
}
Jsp Page
<html>
<head>
<title>AJAX using Jquery in Servlet</title>
<script src="js/jquery-1.8.2.js" type="text/javascript"></script>
<script>
	$(document).ready(function() {
		$('#submit').click(function(event) {
			var name = $('#userName').val();
			$.get('JqueryServlet', {
				userName : name
			}, function(responseText) {
				$('#ajaxResponse').text(responseText);
			});
		});
	});
</script>
</head>
<body>
<form>
	<fieldset>
	<legend>AJAX implementation in JSP and Servlet using JQuery</legend>
		<br/>
		Enter your Name: <input type="text" id="userName" />
		<input type="button" id="submit" value="Ajax Submit" />
	</fieldset>
		 <br /> <br />
	<fieldset>
		<legend>Response from jQuery Ajax Request</legend>
		<br/>
		<div id="ajaxResponse"></div>
	</fieldset>

</form>
</body>
</html>
Note that I have referenced jQuery files in the head section in the jsp which is responsible for the AJAX call made to the servlet and for displaying the response back in the JSP.
When the user clicks on “Ajax Submit” button, its click event is fired and the ‘get’ function executes the Ajax GET request on the Servlet. The second argument of the get function is a key-value pair that passes the input value from JSP page to Servlet. The third argument is a function that defines what is to be done with the response that is got back from the servlet.
Web.xml
<?xml version="1.0" encoding="UTF-8"?>
<web-app ..>
  <display-name>s</display-name>
  <welcome-file-list>
    <welcome-file>index.jsp</welcome-file>
  </welcome-file-list>
  <servlet>
    <servlet-name>JqueryServlet</servlet-name>
    <servlet-class>com.simplecodestuffs.ajax.JqueryServlet</servlet-class>
  </servlet>
  <servlet-mapping>
    <servlet-name>JqueryServlet</servlet-name>
    <url-pattern>/JqueryServlet/*</url-pattern>
  </servlet-mapping>
</web-app>
Demo
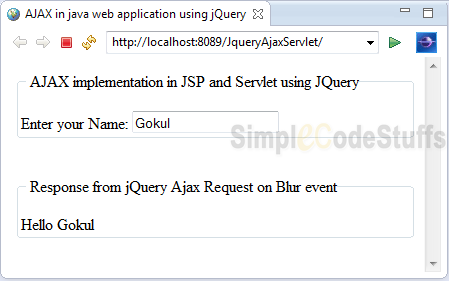
On running the application the above webpage is generated, in which the user will be prompted to enter a value and on clicking the “Ajax Submit” button, the user will see a welcome message saying “Hello (userName)”. This action is done asynchronously and hence there won’t be any page refresh whenever the user clicks on the “Ajax Submit” button.
If you want to return complex Java objects such as list, map, etc. as response instead of plain text then you can use JSON. In the article here I have implemented the same.
Read MorejQuery jTable in Servlets and JSP
In this article we will learn to setup jTable and dependent libraries in a Java web application(using Servlets and JSP’s)
jTable is a jQuery plugin which is used to create AJAX based CRUD tables without coding HTML or Javascript. jTable takes a div id and automatically generates the html table inside the div and it uses jQuery UI dialog that pops up when the user clicks on add, edit or update record buttons and it offers you several themes from which we can select a theme which suit our requirement. In this example I have used metro blue theme for my project.
To know more on jTable plugin please read on its official home page.
Libraries required for the setup,
Jsp Page
File : jTable.jsp
<html>
<head>
<meta http-equiv="Content-Type" content="text/html; charset=ISO-8859-1">
<title>Setup and Load Data in Servlet and JSP using jQuery
	jTable</title>
<!-- Include one of jTable styles. -->
<link href="css/metro/blue/jtable.css" rel="stylesheet" type="text/css" />
<link href="css/jquery-ui-1.10.3.custom.css" rel="stylesheet"
	type="text/css" />
<!-- Include jTable script file. -->
<script src="js/jquery-1.8.2.js" type="text/javascript"></script>
<script src="js/jquery-ui-1.10.3.custom.js" type="text/javascript"></script>
<script src="js/jquery.jtable.js" type="text/javascript"></script>
<script type="text/javascript">
	$(document).ready(function() {
		$('#StudentTableContainer').jtable({
			title : 'Students List',
			actions : {
				listAction : 'CRUDController?action=list'
			},
			fields : {
				studentId : {
					title : 'Student Id',
					width : '30%',
					key : true,
					list : true,
					create : true
				},
				name : {
					title : 'Name',
					width : '30%',
					edit : false
				},
				department : {
					title : 'Department',
					width : '30%',
					edit : true
				},
				emailId : {
					title : 'Email',
					width : '20%',
					edit : true
				}
			}
		});
		$('#StudentTableContainer').jtable('load');
	});
</script>

</head>
<body>
<div>
	<h4>Setup and Load Data in Servlet and JSP using jQuery jTable</h4>
	<div id="StudentTableContainer"></div>
</div>
</body>
</html>
In the above jsp we have not written any markup for html table and all we have is a div that acts as a placeholder for the table to be created by the jTable plugin. Here we have defined an option called ‘actions’ for the method ‘jtable’, in which we can provide the action url for list , create, delete and update server side functions. Another option ‘field’ defines the field names that represent columns in the data source. In the jsp above I have only provided action url for list and here we have called the ‘load’ method in to fire AJAX call to server listAction method.
Model Class
Model class, which will have getters and setters for the above fields which we specified in jsp
package com.simplecodestuffs.model;

public class Student {

	public Student() {
	}

	public Student(int studentId, String name, String department, String emailId) {
		super();
		this.studentId = studentId;
		this.name = name;
		this.department = department;
		this.emailId = emailId;
	}

	private int studentId;
	private String name;
	private String department;
	private String emailId;

	public int getStudentId() {
		return studentId;
	}

	public String getName() {
		return name;
	}

	public String getDepartment() {
		return department;
	}

	public String getEmailId() {
		return emailId;
	}

	public void setStudentId(int studentId) {
		this.studentId = studentId;
	}

	public void setName(String name) {
		this.name = name;
	}

	public void setDepartment(String department) {
		this.department = department;
	}

	public void setEmailId(String emailId) {
		this.emailId = emailId;
	}
}
Servlet
package com.simplecodestuffs.controller;

import java.io.IOException;
import java.util.ArrayList;
import java.util.List;

import javax.servlet.ServletException;
import javax.servlet.http.HttpServlet;
import javax.servlet.http.HttpServletRequest;
import javax.servlet.http.HttpServletResponse;

import com.google.gson.Gson;
import com.google.gson.JsonArray;
import com.google.gson.JsonElement;
import com.google.gson.reflect.TypeToken;
import com.simplecodestuffs.model.Student;

public class CRUDController extends HttpServlet {
private static final long serialVersionUID = 1L;

public void doGet(HttpServletRequest request,
		HttpServletResponse response) throws ServletException, IOException {
}

public void doPost(HttpServletRequest request,
		HttpServletResponse response) throws ServletException, IOException {

String action = request.getParameter("action");
if ( action != null)
{
	List<Student> studentList = new ArrayList<Student>();

	Gson gson = new Gson();
	response.setContentType("application/json");

	if (action.equals("list"))
	{
	try
	{
	// Add data to Student list
	studentList.add(new Student(1, "Haripriya", "IT", "[email protected]"));
	studentList.add(new Student(2, "Dinesh", "ECE", "[email protected]"));
	studentList.add(new Student(3, "Prabhu", "MECH", "[email protected]"));
	studentList.add(new Student(4, "Badru", "ECE", "[email protected]"));
	studentList.add(new Student(5, "Lahir nisha", "CSC", "[email protected]"));
	studentList.add(new Student(6, "Nilafar nisha", "CSC", "[email protected]"));
	studentList.add(new Student(7, "Jamil", "ECE", "[email protected]"));
	studentList.add(new Student(8, "Mahes", "ECE", "[email protected]"));
	studentList.add(new Student(9, "Lourde", "IT", "[email protected]"));

	//Convert Java Object to Json
	JsonElement element = gson.toJsonTree(studentList,
			new TypeToken<List<Student>>() {
			}.getType());
	JsonArray jsonArray = element.getAsJsonArray();
	String jsonString=jsonArray.toString();

	//Return Json in the format required by jTable plugin
	jsonString="{\"Result\":\"OK\",\"Records\":"+jsonString+"}";
	response.getWriter().print(jsonString);
	}
	catch(Exception ex){
		String error = "{\"Result\":\"ERROR\",\"Message\":"
				+ ex.getMessage() + "}";
		response.getWriter().print(error);
	}
	}
	}
 }
}
In the Servlet, we are populating a list of type “Student”(Model). Since jTable accepts data only in Json format, so we are converting this List (Java Object) to Json format using using Google json jar since jTable accepts data only in Json format and list actions used by jTable should return json in the format as in the following sample,
{
"Result":"OK",
"Records":
[{
"studentId":1,
"name":"Haripriya",
"department":"IT",
"emailId":"[email protected]"
}]
}
In json string formed, the Result property can be “OK” or “ERROR”. If it is “OK”, Records property must be an array of records. If it is “ERROR”, a Message property can explain reason of the error to show to the user.
web.xml
<?xml version="1.0" encoding="UTF-8"?>
<web-app .. version="3.0">
<display-name>jTableServlet</display-name>
<welcome-file-list>
     <welcome-file>jTable.jsp</welcome-file>
</welcome-file-list>
<servlet>
     <servlet-name>CRUDController</servlet-name>
     <servlet-class>com.simplecodestuffs.controller.CRUDController</servlet-class>
</servlet>
<servlet-mapping>
     <servlet-name>CRUDController</servlet-name>
     <url-pattern>/CRUDController</url-pattern>
</servlet-mapping>
</web-app>
Demo

Now on including action for create, update and delete in jsp page as below
actions : {
          listAction: 'CRUDController?action=list',
          createAction:'CRUDController?action=create',
          updateAction: 'CRUDController?action=update',
          deleteAction: 'CRUDController?action=delete'
}

On clicking ‘Add new record’
On clicking edit button
On clicking delete button
Note :
In the above program I have not included the logic for create, delete and update functions. In our next tutorial we will learn how to use jTable jQuery plugin to perform AJAX based CRUD operations in Servlet & Jsp.
 |
|
Read More

Create Auto-Refreshing Pie Chart/Bar Chart in Servlet dynamically using JFreeChart
In this article we will learn about the step by step process of creating a pie chart in Servlet with values retrieved from database and displaying it in an auto-refreshing JSP page using JFreeChart library.
The JFreeChart is easiest and the most widely used library for creating a wide variety of good looking charts. In this post, we’ll learn to create pie chart using JFreeChart that can be returned as an image from a servlet. Here, I am going to retrieve data from database, create pie charts in a Servlet and display it using JSP.
In order to sync the pie chart with values from a database that is frequently updated, I have written auto-refresh script which refresh the page automatically at regular intervals.
Libraries required :
jfreechart-x.x.x.jar
jcommon-x.x.x.jar
Download Jfreechart library from here.
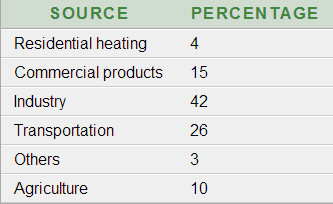
Now let us create a sample table called ‘air_pollution’ in oracle database, that consists of the factors which causes air pollution and its percentage of emission.
create table air_pollution(source varchar(50), percentage int)
Here is the data contained in the above table
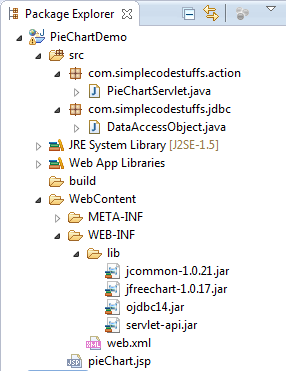
Now Create a New Dynamic Web Project in eclipse with following folder structure
DAO Class
File : DataAccessObject.java
package com.simplecodestuffs.jdbc;

import java.sql.Connection;
import java.sql.DriverManager;
import java.sql.SQLException;

public class DataAccessObject
{
	private static Connection dbConnection = null;

	private static final String dbDriver = "oracle.jdbc.driver.OracleDriver";
	private static String serverName = "127.0.0.1";
	private static String portNumber = "1521";
	private static String sid = "XE";
	private static final String dbUrl ="jdbc:oracle:thin:@"+serverName+":"+ portNumber+":"+sid;
	private static final String dbUser = "system";
	private static final String dbPassword = "admin";

	public static Connection getConnection()
	{
        if (dbConnection != null)
            return dbConnection;
        else
        {
		try
		{
		Class.forName(dbDriver);
		}
		catch (ClassNotFoundException e)
		{
		System.out.println("Please add Oracle JDBC Driver in your classpath ");
		e.printStackTrace();
		}

		try
		{
		dbConnection = DriverManager.getConnection(dbUrl, dbUser, dbPassword);
		}
		catch (SQLException e)
		{
		e.printStackTrace();
		}

		if (dbConnection == null)
		{
		System.out.println("Failed to make connection!");
		}
		}
		return dbConnection;
	}
}
Servlet
File : PieChartServlet.java
package com.simplecodestuffs.action;

import java.io.IOException;
import java.io.OutputStream;
import java.sql.Connection;
import java.sql.SQLException;

import javax.servlet.ServletException;
import javax.servlet.http.HttpServlet;
import javax.servlet.http.HttpServletRequest;
import javax.servlet.http.HttpServletResponse;

import org.jfree.chart.ChartFactory;
import org.jfree.chart.ChartUtilities;
import org.jfree.chart.JFreeChart;
import org.jfree.data.jdbc.JDBCPieDataset;

import com.simplecodestuffs.jdbc.DataAccessObject;

public class PieChartServlet extends HttpServlet {
	private static final long serialVersionUID = 1L;
	private Connection dbConnection = null;

	public PieChartServlet() {
		dbConnection = DataAccessObject.getConnection();
	}

	public void doGet(HttpServletRequest request, HttpServletResponse response)
			throws ServletException, IOException {
		JDBCPieDataset dataSet = new JDBCPieDataset(dbConnection);

		try {
		dataSet.executeQuery("SELECT SOURCE,PERCENTAGE FROM AIR_POLLUTION ORDER BY PERCENTAGE");
		JFreeChart chart = ChartFactory.createPieChart(
		 "Source of Air Pollution ", // Title
	         dataSet,                    // Data
	         true,                       // Display the legend
	         true,                       // Display tool tips
	         false                       // No URLs
		 );

		chart.setBorderVisible(true);

		if (chart != null) {
			int width = 600;
			int height = 400;
			response.setContentType("image/jpeg");
			OutputStream out = response.getOutputStream();
			ChartUtilities.writeChartAsJPEG(out, chart, width, height);
		}
		}
		catch (SQLException e) {
			System.err.println(e.getMessage());
		}
	}

	public void doPost(HttpServletRequest request,
			HttpServletResponse response) throws ServletException, IOException {
	}
}
Here Jfreechart provides JDBCPieDataSet method to retrieve appropriate data from database and createPieChart() method creates the pie chart with the populated dataset. writeChartAsJPEG() method is responsible for rendering the image in jpeg format.
Note :
Set the content type to the appropriate image format before trying to write it with the writeChartAs method. Here the content type is set as ‘image/jpeg’ since I have used writeChartAsJPEG() method.
Web.xml
<servlet>
   <servlet-name>PieChartServlet</servlet-name>
   <servlet-class>com.simplecodestuffs.action.PieChartServlet</servlet-class>
</servlet>
<servlet-mapping>
   <servlet-name>PieChartServlet</servlet-name>
   <url-pattern>/displayChart</url-pattern>
</servlet-mapping>
<welcome-file-list>
   <welcome-file>pieChart.jsp</welcome-file>
</welcome-file-list>
Jsp page
<!DOCTYPE html PUBLIC "-//W3C//DTD HTML 4.01 Transitional//EN" "http://www.w3.org/TR/html4/loose.dtd">
<html>
<head>
<title>Pie Chart Demo</title>
<script type="text/javascript">
	function refreshPage()
	{
		document.forms.formId.submit();
	}
</script>
</head>
<body>
	<h3>Create Pie Chart Dynamically using JFreechart</h3>
	<%
		response.setIntHeader("Refresh", 10);
	%>
	<form id="formId">
	   <input type="button" onclick="refreshPage()" value="Refresh Page" />
	   <br /> <img src="displayChart" />
	</form>
</body>
</html>
In Jsp, servlet is called via img tag’s src attribute. This triggers the servlet and render the image on the page.
To automate the page refreshing process, the following code is used
response.setIntHeader("Refresh",10);
which sends back header “Refresh” to the browser along with an integer value which indicates time interval in seconds. Here the time interval is 10 seconds, which means the page will refresh and render updated data from database for every 10 seconds, this value can be set based on your requirement.
Note :
This automatic refreshing can cause a considerable performance impact since it hits database for every 10 second, so it is a good practice to have a ‘Refresh’ button to enable the end-users to decide on when to refresh the page.
Demo
Now right click on the project name and select Run As –> Run on Server.
jFree chart using servlet
Similarly to Create bar chart, replace the doGet method in the Servlet with the following code.
	public void doGet(HttpServletRequest request, HttpServletResponse response)
			throws ServletException, IOException {
		JDBCCategoryDataset dataset = new JDBCCategoryDataset(dbConnection);

		try {
		dataset.executeQuery("SELECT SOURCE,PERCENTAGE FROM AIR_POLLUTION ORDER BY PERCENTAGE");

		JFreeChart chart = ChartFactory.createBarChart(
                "Source of Air Pollution", "Scource", "Percentage",
                dataset, PlotOrientation.VERTICAL, false, true, false);
		chart.setBorderVisible(true);

		if (chart != null) {
			int width = 600;
			int height = 400;
			response.setContentType("image/jpeg");
			OutputStream out = response.getOutputStream();
			ChartUtilities.writeChartAsJPEG(out, chart, width, height);
		}
		}
		catch (SQLException e) {
			System.err.println(e.getMessage());
		}
	}
Demo
Bar chart – demo
Bar Chart Using JfreeChart
|
|
Read More

Java Heap Dump Analysis using Eclipse Memory Analyzer (MAT)
In this article we will learn what a Java heap dump is and how to analyze a heap dumps generated through OutOfMemoryError using Memory Analyzer in Eclipse.
What is a heap dump?
A heap dump is a snapshot of memory at a given point in time. It contains information on the Java objects and classes in memory at the time the snapshot was taken.
Why would we want to read heap dump?
If your Java application crashes with an OutOfMemoryError it is possible to automatically get a heap dump to analyze. This view into the memory profile of the application at the time it crashed can help us to figure out what caused the error. This can help decide what to optimize in our code.
How to get a heap dump?
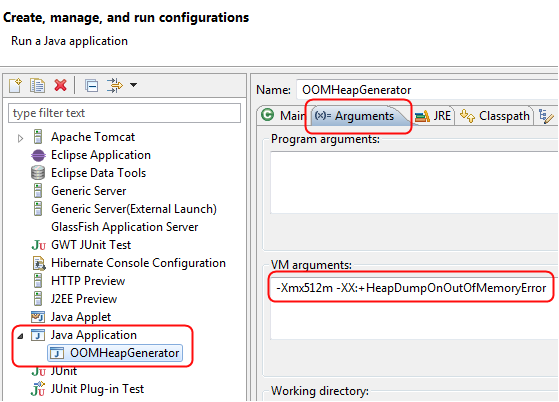
To generate heap dump we have to execute a JVM with the following parameters in eclipse
-XX:+HeapDumpOnOutOfMemoryError writes heap dump on first OutOfMemoryError
Here the heap dump will be generated in the “current directory” of the JVM by default. It can be explicitly redirected with
-XX:HeapDumpPath= for example -XX: HeapDumpPath=/disk/myFolder.
How to read a heap dump?
Heap dump will be in binary format so you don’t read the plain file. Instead use a tool like Memory Analyzer Tool.
Download MAT plugin from this location, and install it in your eclipse.
OOM Java program
Here the Java program below is used to trigger an OutOfMemoryError. This program is basically creating multiple String instances within a List data structure until the Java Heap depletion.
package com.simplecode.heap;

import java.util.ArrayList;
import java.util.List;

public class OOMHeapGenerator
{
public static void main(String[] args)
{
	System.out.println("JVM OutOfMemoryError Simulator");
	List<String> leakingVariable = new ArrayList<String>();

	try
	{
		while (1 < 2)
		{
		leakingVariable.add("OutOfMemoryError");
		}
	}
	catch (Throwable exp)
	{
	     if (exp instanceof java.lang.OutOfMemoryError)
	     {
	     System.out.println("OutOfMemoryError triggered! " + "[" + exp + "]");
	     }
	     else
	     {
	     System.out.println("Other Exception! " + "[" + exp + "]");
	     }
	}
	System.out.println("Simulator done!");
}
}
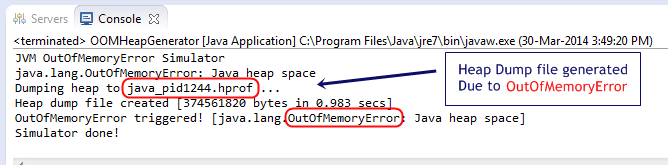
On running this program, when the JVM ran out of memory it created a heap dump file java_ pid1244.hprof.
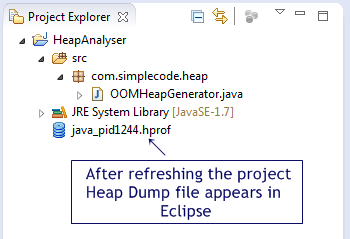
Press F5 in your project folder, so now the generated heap dump file will appear in eclipse.
Load Heap Dump
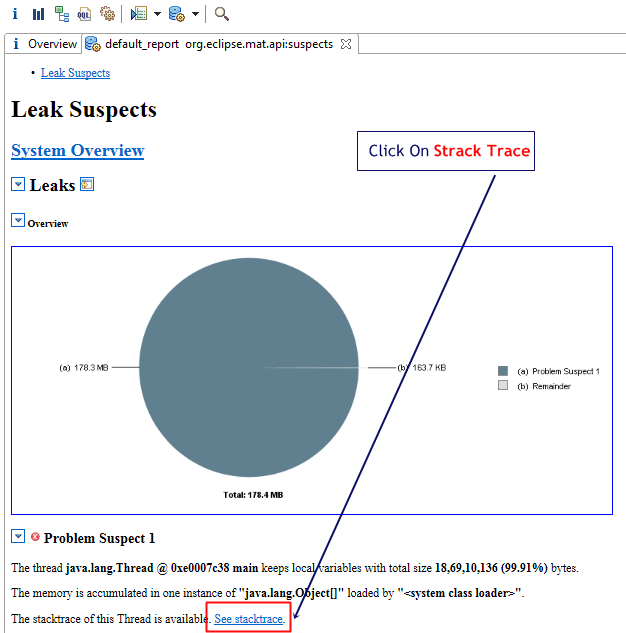
Just double click on the heap dump file and select the Leak Suspects Report, and then this file will be loaded into MAT.
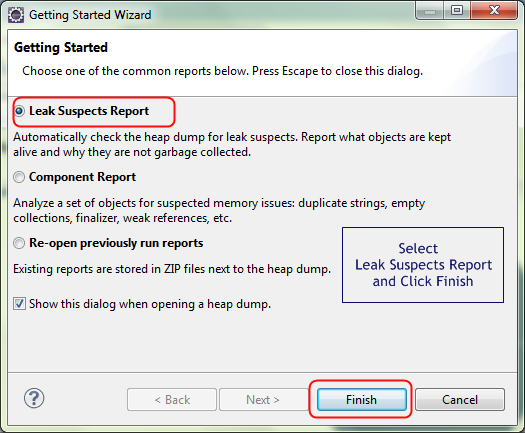
On clicking finish the following Screen is obtained
Analyze Heap Dump
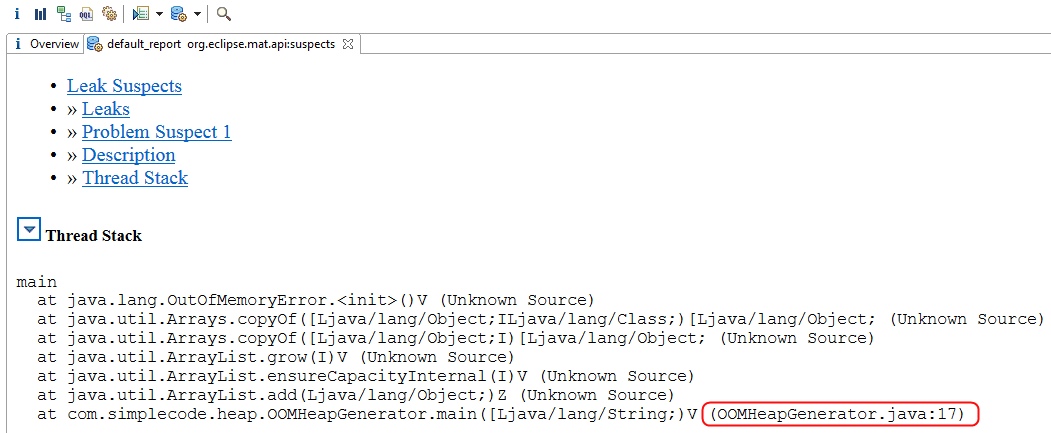
Clicking on the “See stacktrace” link will give you the exact line of code that was building up the huge List causing the application to crash.
Now we know where to go look in at the code to fix this bug. Hence by analysing the Heap Dump using the MAT we could easily identify our primary leaking Java class and data structure.
Read More

What’s New in JDK 8
Oracle announced the general availability of Java 8 on March 18 2014. One of the features is complete removal of Permanent Generation (PermGen) space. The JDK 8 HotSpot JVM is now using native memory for the representation of class metadata and is called Metaspace”; similar to the Oracle JRockit and IBM JVM’s. The good news is that it means no more java.lang.OutOfMemoryError: PermGen problems and no need for you to tune and monitor this memory space anymore.
In Java 8, we will still need to worry about the class metadata memory footprint. Please also keep in mind that this new feature does not magically eliminate class and classloader memory leaks. You will need to track down these problems using a different approach and by learning the new naming convention.
- Refer the article at Dzone.com for details about the PermGen successor: Metaspace.
- JDK 8 Release Notes can be found here. It covers – what’s new in JDK8, Compatibility info, known issues, troubleshooting guide etc.
- Here is another article from techempower.com, which contains a summary of the developer faced changes introduced in java 8.
- The motive for removing permanent generation is mentioned at openjdk.java.net
How To Change Default Port number of Tomcat Server?
Tomcat by default runs on port number 8080, but many times other Java application also uses 8080 and starting tomcat may result in java.net.BindException. In order to avoid this exception you can change default port of tomcat from 8080 to some other port
Steps in changing the Tomcat Port
Go to the installation directory of Tomcat Server and then open folder named “conf” and locate the file server.xml and Search for the entry shown bellow:
<Connector port="8080" protocol="HTTP/1.1" connectionTimeout="20000" redirectPort="8443" />
Change the value of attribute port to your desire value and restart the Tomcat Server.
<Connector port="8089" protocol="HTTP/1.1" connectionTimeout="20000" redirectPort="8443" />
Read More