- You need to use <input type=”file”/>.
- Next step is that form method should be POST with enctype as multipart/form-data, which makes file data available in parts inside request body.
- The form action attribute should be set to a servlet file which would handle file uploading at backend server. Following example is using UploadServlet servlet to upload file.
Introduction to Java web application & Servlets
In this article let’s us learn about how the communication happens in a web world.
Client: In case of web application, web browser acts as client through which a user sends a request to server.
Server: A server is a combination of a hardware machines and a number of software’s running on that machine. The duty of server is to serve resources that are being requested by the client.
Server: A server is a combination of a hardware machines and a number of software’s running on that machine. The duty of server is to serve resources that are being requested by the client.
Note:
Servers itself are capable of serving static resources only.
HTTP Protocol
Inorder to communicate between client and server we need some set of rules so called http (Hyper text transfer protocol). In web there are a number of protocols other than http that does the communication work done, but almost in 99% of applications the requests being made are http requests.
Http: Http can be assumed as a common interface of interaction that both client and server understand.
Note
HTTP is a stateless protocol i.e. HTTP supports only one request per connection. This means that with HTTP the clients connects to the server to send one request and then disconnects. This mechanism allows more users to connect to a given server over a period of time.
Request/Response cycle
Web flow starts when a request is made by user via browser (client), this request is made as http request so that server can understand it. The server receives the request, finds the resources and return response to the client in form of HTTP. When a server answers a request the server usually sends some type of content to the client. The server often sends responds to the browser with a set of instructions written in HTML (HyperText Markup Language). All browsers know how to display HTML page to the user.
Http Request: Http requests basically have three major components.
1 – HTTP method, there are 7 methods defined in java servlets but most of the time you will see either a get or post method.
2 – The requested page URL, the page to access like www.fb.com.
3 – Parameters, parameters (as userName, password… etc.) are being send as part of request on which the response is being generated.
Http Response: Http requests basically have three major components.
1 – A status code, this code tells the browser whether the request is successful or not.
2 – Content type, it tells the browser about the type of content that response web page contains in it (text, picture, html…etc).
3 – The content is the information that is served as response that the user was requested.
So far we are familiar with the request-response cycle and client-server model over the web.
So here, where the Servlet does come into the picture?
Let’s assume a user requests a page having some text information written on some topic. This page content is never going to change and the same page is sent back to every user request.
But if a user requests to access his facebook account, this time server needs to create a page of that user’s information based on username and password provided by the user. Here the username and password are called parameters and the response is being generated dynamically based on user’s request parameter are called dynamic pages.
As I said before that the server can serve only static pages as response, so in case if we need to serve dynamic pages then server must have something that provides dynamic contents to serve and this can be done via servlets. Servlets are nothing but helper applications that helps the server to response back dynamic pages.
We shall learn about how these servlets helps server in serving dynamic contents in our upcoming tutorials. In our next article we shall learn about Servlet Architecture.
Pie Chart using YUI3 jquery chart plugin in Java web application
In this article we will learn to create a pie chart in Servlet with YUI3 jquery chart plugin and this demo is as follows

YUI3 provides a “charts” module for creating a wide variety of good looking charts, this module can be called using use() method. These charts requires input data to be in JSON format. For more Information on YUI3 chart, read on its official document – http://yuilibrary.com/yui/docs/charts/
Recommended reading
Create Auto-Refreshing Pie Chart/Bar Chart in Servlet dynamically using JFreeChart
In this example, I am going to retrieve values from a csv file insted of database and display its data in from of pie chart, for this, I am going to use OpenCSV library which simplifies the work of parsing CSV files. Here the Data table will load the data by making an Ajax call.
Note:
• Refer the article on how to Read / Write CSV file in Java using Opencsv library/ .
Download the csv file from which the data is to be read from here and place it under src folder. This csv files contains 2 columns – Source and Percentage.
Final folder structure is as shown below

Model class
Create a model class that gets and sets the data from the columns of the csv file.
package com.model;

public class AirPollution {

	private String Source;
	private int Percentage;

	public AirPollution() {
	}

	public AirPollution(String source, int percentage) {
		Source = source;
		Percentage = percentage;
	}

	public String getSource() {
		return Source;
	}

	public int getPercentage() {
		return Percentage;
	}

	public void setSource(String source) {
		Source = source;
	}

	public void setPercentage(int percentage) {
		Percentage = percentage;
	}
}
Business class
Create a Business Service class that would fetch data from the csv file using model class.
BusinessService
package com.service;

import java.io.BufferedReader;
import java.io.IOException;
import java.io.InputStream;
import java.io.InputStreamReader;
import java.util.LinkedList;
import java.util.List;

import au.com.bytecode.opencsv.CSVReader;

import com.model.AirPollution;

public class BusinessService {

public static List<AirPollution> getAirPollutionSource() {

	List<AirPollution> airPollutionList = new LinkedList<AirPollution>();
	String fileName = "AirPollution.csv";

	InputStream is = Thread.currentThread().getContextClassLoader()
			.getResourceAsStream(fileName);
	BufferedReader br = new BufferedReader(new InputStreamReader(is));

	try {
		CSVReader reader = new CSVReader(br,',','\"',1);
		String[] row = null;
		while ((row = reader.readNext()) != null)
		{
		airPollutionList.add(new AirPollution(row[0], Integer.parseInt(row[1])));
		}
		reader.close();
	} catch (IOException e) {
		System.err.println(e.getMessage());
	}
	return airPollutionList;
}
}
Also read
Struts2-Jfreechart integration
Jsp page
Now create the jsp file to display the data fetched from csv file in form of pie chart.
<!DOCTYPE html>
<html>
<head>
<title>Pie Chart using YUI3 Charts in Java web application</title>
<link rel="stylesheet" href="css/style.css">
<script src="http://yui.yahooapis.com/3.8.1/build/yui/yui-min.js"></script>
<script>
YUI().use(
'charts',
'charts-legend',
'io',
function m(Y) {
	var data, urifordata = "./PieChartDemo",
	marklinechart = Y.one("#pieChartId"), configuration = {
		method : 'POST',
		headers : {
			'Content-Type' : 'application/json',
		},

		on : {
			success : function(transactionid, response,	arguments)
			{
			data = JSON.parse(response.responseText),
				pieChart = new Y.Chart(
					{
					type : "pie",
					stacked : true,
					dataProvider : data,
					categoryKey : 'Source',
					legend : {
						position : "right",
						width : 100,
						height : 100,
					},
					render : marklinechart,
				});
			},

	failure : function(transactionid, response,	arguments) {
				alert("Error In Data Loading.");
			}
		}
	};
	Y.io(urifordata, configuration);
});
</script>
<style>
#pieChartId {
	height: 400px;
	margin: 10px;
	max-width: 500px;
	width: 90%;
}
</style>
</head>
<body>
<div class="wrapper">
<div class="container">
	<div class="header">
		<h3>Pie Chart Demo using YUI3 Charts in Java web application</h3>
	</div>
	<br />
	<div id="pieChartId"></div>
</div>
</div>

</body>
</html>
Controller
package com.controller;

import java.io.IOException;
import java.util.List;

import javax.servlet.ServletException;
import javax.servlet.http.HttpServlet;
import javax.servlet.http.HttpServletRequest;
import javax.servlet.http.HttpServletResponse;

import com.google.gson.Gson;
import com.google.gson.GsonBuilder;
import com.model.AirPollution;
import com.service.BusinessService;

public class PieChartDemo extends HttpServlet {
	private static final long serialVersionUID = 1L;

	protected void doGet(HttpServletRequest request,
			HttpServletResponse response) throws ServletException, IOException {

		response.setContentType("application/json");
		// Call business service class to get list of Air Pollution Source
		List<AirPollution> airPollutionList = BusinessService.getAirPollutionSource();

		Gson gson = new GsonBuilder().setPrettyPrinting().create();
		// Convert Java Object to Json
		String json = gson.toJson(airPollutionList);

		response.getWriter().print(json);
	}

	protected void doPost(HttpServletRequest request,
			HttpServletResponse response) throws ServletException, IOException {
		doGet(request, response);
	}
}
Web.xml
Make sure you have done servlet mapping properly in web.xml file as shown below
  <welcome-file-list>
    <welcome-file>index.jsp</welcome-file>
  </welcome-file-list>
  <servlet>
    <display-name>PieChartDemo</display-name>
    <servlet-name>PieChartDemo</servlet-name>
    <servlet-class>com.controller.PieChartDemo</servlet-class>
  </servlet>
  <servlet-mapping>
    <servlet-name>PieChartDemo</servlet-name>
    <url-pattern>/PieChartDemo</url-pattern>
  </servlet-mapping>
</web-app>

Reference
Read MoreServlets – Life Cycle
In this article we will learn about lifecycle of a servlet and about servlet lifecycle methods doGet() & doPost() and their implementation.
During its lifecycle, servlet went through three main methods and all these methods are called by web container, they are as follows.
1. Call the servlets init() method.
2. Call the servlets service() method.
3. Call the servlets destroy() method.

init() :
init() method of a servlet is called only once in its lifecycle, when a very first request comes to servlet it makes servlet state from does not exists to initialized state and during all other requests servlet remains already initialized. The container calls the init() method before the servlet can serve any client request. This method can be overridden in our servlet classes to write some initialization code in it. Initialization means something like initializing your data source or other things that we want ready before servlet starts serving the request.
Why constructor is not used for servlet initialization ?
In java, constructors are used for initialization stuff, so in case of servlet why do we use an init() method and not a constructor?
The init() method have access to two special objects called servletContext and servletConfig and we needs to use these two many times during our application. A constructor does not have access to servletConfig and servletContext that’s why we use init() instead of constructor to initialize a servlet.
We shall learn about servletContext and servletConfig in upcoming article
service() :
The service() method is the main method to where working of servlet is defined, The web container calls the service method each time when request for the servlet is received. If servlet is not initialized, then it calls the init method as described above then calls the service method. If servlet is initialized, it calls the service method. Notice that servlet is initialized only once. This method determines which http method should be called based on client request. There are 7 http methods but doGet() and doPost() are most frequently used methods with in each service request.
If user request is a get request than doGet() method of servlet is called and if the request is a post than doPost() method is called and all the business logic goes into either a doGet() or a doPost() method of servlet.
destroy() :
This method is called by the container when the servlet is no longer required.
AJAX File Upload in Java Web Application using jQuery.AjaxFileUpload plugin

In my previous article on File Upload Example in Servlet & Jsp we learnt how to upload a file into sever via Apache Commons FileUpload plugin, In this article we shall add ajax style feature to our previous example using jQuery.AjaxFileUpload.js plugin.
Modifications
Before getting into the tutorial, I will let you know the small modification which I made in jQuery Form Plugin.
1. By default this plugin allows only images, this is specified in jQuery.AjaxFileUpload.js as below.
valid_extensions : ['gif','png','jpg','jpeg']
So inorder to upload file with other extensions, I have modified this to
valid_extensions : ['gif','png','jpg','jpeg','txt','docx','pdf','mkv']
You can include/remove these extensions according to your requirement
2. When file upload fails this plugin sends two parameter in response, they are
status : Just has the status code, it is set to false when file upload fails
message : This holds the error message.
When file upload is successful, no response is sent back to client. So in order to send an upload success message I have modified the code from
settings.onComplete.apply(element, [response, settings.params]);
to
settings.onComplete.apply(element, [ {
	status : true,
	message : 'Your file has been uploaded!'
}, settings.params ]);
Now let’s go ahead implement ajax file upload functionality in java web application
Library
Folder structure
Now Create a dynamic web project in Eclipse with following folder structure
JSP
<!DOCTYPE html>
<html>
<head>
<title>Asynchronous file Upload in Java Web Application</title>
<script src="jquery-1.8.2.js"></script>
<script src="jQuery.AjaxFileUpload.js"></script>
<script lang="Javascript">
$(document).ready(function() {
  $('input[type="file"]').ajaxfileupload({
  'action' : 'UploadFile',
  'onComplete' : function(response) {
      $('#upload').hide();
      $('#message').show();

      var statusVal = JSON.stringify(response.status);

     if(statusVal == "false")
     {
     $("#message").html("<font color='red'>"+JSON.stringify(response.message)+"</font>");
     }
     if(statusVal == "true")
     {
     $("#message").html("<font color='green'>"+JSON.stringify(response.message)+"</font>");
     }
},
'onStart' : function() {
	$('#upload').show();
	$('#message').hide();
}
});
});
</script>
<style type="text/css">
.centered {
	width: 100%;
	margin-left: auto;
	margin-right: auto;
	text-align: center;
}
</style>
</head>
<body>
<form>
<div class="centered">
	<h4>AJAX Style File upload in Java Web Application</h4>
	<input type="file" name="file" /><br />
	<div id="upload" style="display: none;">Uploading..</div>
	<div id="message"></div>
</div>
</form>
</body>
</html>
The required jquery files are referenced in the head section of jsp file. Here whenever a file is selected, the script gets fired and triggers the servlet via action parameter, which holds the servlet url. This servlet in turn handles the file upload logic in the server side.
Another must read:
jQuery form validation using jQuery Validation plugin
Servlet
package com.fileupload;

import java.io.File;
import java.io.IOException;
import java.util.List;

import javax.servlet.ServletException;
import javax.servlet.http.HttpServlet;
import javax.servlet.http.HttpServletRequest;
import javax.servlet.http.HttpServletResponse;

import org.apache.commons.fileupload.FileItem;
import org.apache.commons.fileupload.FileItemFactory;
import org.apache.commons.fileupload.disk.DiskFileItemFactory;
import org.apache.commons.fileupload.servlet.ServletFileUpload;

public class UploadFile extends HttpServlet {
	private static final long serialVersionUID = 1L;
	private final String UPLOAD_DIRECTORY = "C:/Files";

	protected void doPost(HttpServletRequest request,
             HttpServletResponse response) throws ServletException, IOException {
	boolean isMultipart = ServletFileUpload.isMultipartContent(request);

	// process only if it is multipart content
	if (isMultipart) {
		// Create a factory for disk-based file items
		FileItemFactory factory = new DiskFileItemFactory();

		// Create a new file upload handler
		ServletFileUpload upload = new ServletFileUpload(factory);
		try {
		// Parse the request
		List<FileItem> multiparts = upload.parseRequest(request);

		for (FileItem item : multiparts) {
		if (!item.isFormField()) {
		String name = new File(item.getName()).getName();
		item.write(new File(UPLOAD_DIRECTORY + File.separator + name));
		}
		}
		}
		catch (Exception e)
		{
		  e.printStackTrace();
		}
	}
}
}
web.xml
Make sure that the web.xml has following mappings
<servlet>
	<servlet-name>UploadFile</servlet-name>
	<servlet-class>com.fileupload.UploadFile</servlet-class>
</servlet>
<servlet-mapping>
	<servlet-name>UploadFile</servlet-name>
	<url-pattern>/UploadFile</url-pattern>
</servlet-mapping>
<welcome-file-list>
    <welcome-file>index.jsp</welcome-file>
</welcome-file-list>
Demo
On Running this application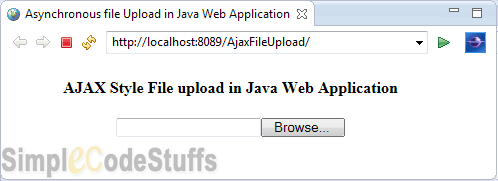
When file upload is successful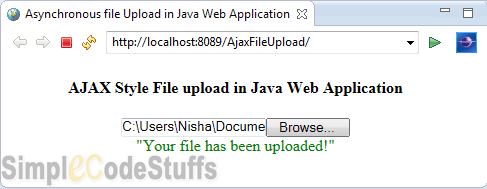
When we try to upload a file whose format is not specified in jQuery.AjaxFileUpload.js file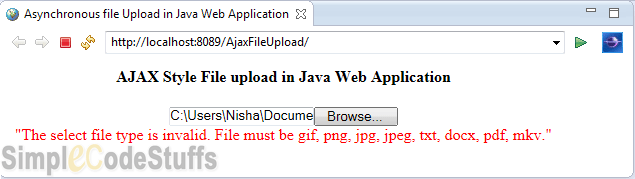
I our next article we shall implement ajax file upload functionality with file upload progress bar.
Reference
Read MoreFile Upload Example in Servlet & Jsp – Java web application

If you want your user to choose files from file system and upload to server then following are the important points to be noted down:
Recommended reading
Final Project Structure
Now create a Dynamic web project in eclipse with following project structure
JSP
Now create index.jsp to handle file upload as below
<html>
<head>
<title>File Upload Example in Java web application</title>
</head>
<body>
	<h3>Choose File to Upload in Server</h3>
	<form action="UploadFile" method="post" enctype="multipart/form-data">
		<input type="file" name="file" />
		<input type="submit" value="upload" />
	</form>
</body>
</html>
Library
Servlet
package com.fileupload;

import java.io.File;
import java.io.IOException;
import java.util.List;

import javax.servlet.ServletException;
import javax.servlet.http.HttpServlet;
import javax.servlet.http.HttpServletRequest;
import javax.servlet.http.HttpServletResponse;

import org.apache.commons.fileupload.FileItem;
import org.apache.commons.fileupload.FileItemFactory;
import org.apache.commons.fileupload.disk.DiskFileItemFactory;
import org.apache.commons.fileupload.servlet.ServletFileUpload;

public class UploadFile extends HttpServlet {
	private static final long serialVersionUID = 1L;
	private final String UPLOAD_DIRECTORY = "C:/Files/";

	protected void doPost(HttpServletRequest request,
		HttpServletResponse response) throws ServletException, IOException {
	boolean isMultipart = ServletFileUpload.isMultipartContent(request);

	// process only if its multipart content
	if (isMultipart) {
		// Create a factory for disk-based file items
		FileItemFactory factory = new DiskFileItemFactory();

		// Create a new file upload handler
		ServletFileUpload upload = new ServletFileUpload(factory);
		try {
	            // Parse the request
		    List<FileItem> multiparts = upload.parseRequest(request);

                   for (FileItem item : multiparts) {
		   if (!item.isFormField()) {
   		   String name = new File(item.getName()).getName();
		   item.write(new File(UPLOAD_DIRECTORY + File.separator + name));
		   }
		}

		// File uploaded successfully
		request.setAttribute("message", "Your file has been uploaded!");
		}
		catch (Exception e)
		{
      	         request.setAttribute("message", "File Upload Failed due to " + e);
		}
	} else
	{
	request.setAttribute("message", "This Servlet only handles file upload request");
	}
	request.getRequestDispatcher("/result.jsp").forward(request, response);
}
}
Here DiskFileItemFactory is default Factory class for FileItem. It provides a method to parse the HttpServletRequest object and return list of FileItem. FileItem provides useful method to get the file name, field name in form, size and content type details of the file that is uploaded. To write file to a directory, all we need to do it create a File object and pass it as argument to FileItem write() method.
Do read
JSP
Create a file result.jsp to render the file upload success or error message
<html>
<head>
<title>File Upload Example in Java web application</title></head>
<body>
	<h4>${requestScope["message"]}</h4>
</body>
</html>
Web.xml
Servlet mapping should be done in web.xml as shown below
<welcome-file-list>
   <welcome-file>index.jsp</welcome-file>
</welcome-file-list>
<servlet>
   <servlet-name>UploadFile</servlet-name>
   <servlet-class>com.fileupload.UploadFile</servlet-class>
</servlet>
<servlet-mapping>
   <servlet-name>UploadFile</servlet-name>
   <url-pattern>/UploadFile</url-pattern>
</servlet-mapping>
Demo
Now on Running the application

In our next article we shall learn to implement AJAX style File Upload in Java Web Application using jQuery plugin