AJAX Tooltip in Java Web Application using qTip2 jQuery plugin

This article discusses AJAX Tooltip in Java Web Application using qTip2 jQuery plugin. This library is used for creating Asynchronous display of tool tip.
Library required
Project Structure
Now Create a dynamic web project in Eclipse with following folder structure

Set up from browser perspective: jQuery qTip2
Jsp form which ToolTip via ajax
<!DOCTYPE html>
<html>
<head>
<link rel="stylesheet" href="./css/jquery.qtip.min.css" type="text/css" media="screen"/>
<title>AJAX Tool tip using qTip2 jQuery plugin</title>
<style>
.qtip-content {
	border: 1px solid grey;
}

.student-name {
	color: blue;
	cursor: pointer;
}

.name-style {
	font-weight: bold;
	font-size: 14px
}

.style {
	font-weight: bold;
}
</style>
</head>
<body>
<h2>Qtip2 Demo With Ajax Call</h2>

<h3>Student Details</h3>
	<p >
		<span class="student-name" id="1" >Mohaideen</span> <br>
		<span class="student-name" id="2">Ameer</span> <br>
		<span class="student-name" id="3">Badru</span> <br>
		<span class="student-name" id="4">Prabhu</span>
	</p>

<script src="./js/jquery-1.9.0.min.js"></script>
<script src="./js/jquery.qtip.min.js"></script>
<script>
$(document).ready(function(){

	$('span.student-name').each(function()
	{
		$(this).qtip(
		{
		content: {
		text: '<img  src="./image/loading.gif" alt="Loading..." />',

		ajax: {
			url: './Qtip2Servlet',
			type: 'GET',
			data: {id  :$(this).attr('id')},
			dataType: 'json',

			success: function(data, status) {
		 	   var content = new Array();
			   content.push("<div class='name-style'>"+data.name+"</div><br>");
			   content.push("<div class='style'>Mark : "+data.mark+"</div>");
			   content.push("<div class='style'>Roll : "+data.id+"</div>");
			   content.push("<div class='style'>Address : "+data.address+"</div>");
			   content.push("<div class='style'>Phone : "+data.phoneNo+"</div>");
			   this.set('content.text', content.join(""));
			}
			}
			},

			position: {
				at: 'bottom center',
				my: 'top center',
				viewport: $(window),
				effect: true
			},

			show: {
				event: 'mouseover',
				solo: true
			},

			hide: 'unfocus',
			style: {
				classes: 'qtip-light'
			}
		})
	})
});
</script>
</body>
</html>
The JQuery code written on the head section of the jsp page is responsible for the AJAX call made to the servlet.
Another must read:
jQuery form validation using jQuery Validation plugin
jQuery Tutorial for Beginners
From the server’s perspective: Servlet
In Servlet, I’m going to use a GSON library to convert Java objects to JSON strings that will be parsed by JQuery in the JSP page and will be displayed on the web page and note that I have returned the response back to jsp based on the value of ‘id’ parameter which i pass to the servlet via jQuery’s ajax() method.
Servlet implementation
package servlet;

import java.io.IOException;

import javax.servlet.ServletException;
import javax.servlet.http.HttpServlet;
import javax.servlet.http.HttpServletRequest;
import javax.servlet.http.HttpServletResponse;
import model.Student;
import service.StudentService;
import com.google.gson.Gson;

public class Qtip2StudentServlet extends HttpServlet {
	private static final long serialVersionUID = 1L;

	protected void doGet(HttpServletRequest request,
  	    HttpServletResponse response) throws ServletException, IOException {

		String id = request.getParameter("id");
		Student student = StudentService.getStudentWithId(id);

		String json = new Gson().toJson(student);
		response.setContentType("application/json");
		response.getWriter().write(json);
	}
}
Model class
package model;

public class Student {

	private String name;
	private String mark;
	private String id;
	private String address;
	private String phoneNo;

	public String getName() {
		return name;
	}

	public String getMark() {
		return mark;
	}

	public String getId() {
		return id;
	}

	public String getAddress() {
		return address;
	}

	public String getPhoneNo() {
		return phoneNo;
	}

	public void setName(String name) {
		this.name = name;
	}

	public void setMark(String mark) {
		this.mark = mark;
	}

	public void setId(String id) {
		this.id = id;
	}

	public void setAddress(String address) {
		this.address = address;
	}

	public void setPhoneNo(String phoneNo) {
		this.phoneNo = phoneNo;
	}
}
Business class
This Business Service class which provides static data using model class.
package service;

import java.util.ArrayList;
import java.util.List;

import model.Student;

public class StudentService {

	public static List<Student> getStudentList() {

		List<Student> listOfStudent = new ArrayList<Student>();

		Student s1 = new Student();
		s1.setName("Mohaideen");
		s1.setMark("98");
		s1.setAddress("Chennai India");
		s1.setPhoneNo("+91- 123456789");
		s1.setId("1");
		listOfStudent.add(s1);

		Student s2 = new Student();
		s2.setName("Ameer");
		s2.setMark("90");
		s2.setAddress("Kolkatta India");
		s2.setPhoneNo("+91- 542789");
		s2.setId("2");
		listOfStudent.add(s2);

		Student s3 = new Student();
		s3.setName("Badru");
		s3.setMark("97");
		s3.setAddress("Bangalore India");
		s3.setPhoneNo("+91- 123456");
		s3.setId("3");
		listOfStudent.add(s3);

		Student s4 = new Student();
		s4.setName("Prabhu");
		s4.setMark("88");
		s4.setAddress("Vizag India");
		s4.setPhoneNo("+91- 6789012");
		s4.setId("4");
		listOfStudent.add(s4);

		return listOfStudent;

	}

	public static Student getStudentWithId(String id) {

		List<Student> listOfStudent = getStudentList();

		Student targetStudent = null;

		for (Student student : listOfStudent) {

			if (student.getId().equalsIgnoreCase(id)) {
				targetStudent = student;
				break;
			} else {
				continue;
			}
		}
		return targetStudent;
	}
}
web.xml
Make sure you have done servlet mapping properly in web.xml file. An example of this is given below,
<servlet>
	<servlet-name>Qtip2Servlet</servlet-name>
	<servlet-class>servlet.Qtip2StudentServlet</servlet-class>
</servlet>
<servlet-mapping>
	<servlet-name>Qtip2Servlet</servlet-name>
	<url-pattern>/Qtip2Servlet</url-pattern>
</servlet-mapping>
<welcome-file-list>
	<welcome-file>index.jsp</welcome-file>
</welcome-file-list>
Demo
While loading tooltip from server side, a simple loading image gets displayed as below.

Once the data is loaded from server side via ajax, that data is displayed in the browser as shown below.


Pagination in Servlet and JSP using jQuery jTable plugin

This is the 3rd article on jQuery jTable plugin that describes on how to implement pagination feature to do server side paging and here I have not explained about how to setup jTable plugin in java web application. So If you have not read my previous articles “Setting up JQuery jTable plugin in Java web application” and “Ajax based curd operation in Java web application using JQuery jTables plugin”, I will recommend that you read that article first because first one explains how you can integrate the JTable plugin in Java web application and in second article explains on how to implement ajax based curd operation. This article will assume that the code for the integration of jQuery JTable plugin is implemented, and only the code required for implementing pagination in Java web application using jTable will be explained here.
Setup
Now download the sample application of my previous tutorial and import the project in eclipse. Now follow the steps in previous tutorial to create table in database and make sure you have atleast 5 records in the table.
Now on running this application, you will see a table displaying records without pagination such as the one shown below.

Now the following steps are needed to be followed to enable paging feature in jTable
Changes from the browser perspective: jTable
To enable paging, paging option must set to true. You can also set pageSize option (default value is 10) in jQuery Script code.
$('#StudentTableContainer').jtable({
    //...
    paging: true, //Set paging enabled
    pageSize: 3, //Set page size
    actions: {
        //...
    },
    fields: {
        //...
    }
});
Note: pageSize sets the initial number of records to be displayed per page.
Modified Jsp page is shown below
<!DOCTYPE html>
<html>
<head>
<title>Pagination in Java Web Applications using jTable plugin</title>
<!-- Include one of jTable styles. -->
<link href="css/metro/blue/jtable.css" rel="stylesheet" type="text/css" />
<link href="css/jquery-ui-1.10.3.custom.css" rel="stylesheet"
	type="text/css" />
<!-- Include jTable script file. -->
<!-- Include jTable script file. -->
<script src="js/jquery-1.8.2.js" type="text/javascript"></script>
<script src="js/jquery-ui-1.10.3.custom.js" type="text/javascript"></script>
<script src="js/jquery.jtable.js" type="text/javascript"></script>

<script type="text/javascript">
$(document).ready(function() {
	$('#StudentTableContainer').jtable({
		title : 'Students List',
           paging: true, //Enable paging
           pageSize: 3, //Set page size (default: 10)
           actions: {
               listAction: 'Controller?action=list',
               createAction:'Controller?action=create',
               updateAction: 'Controller?action=update',
               deleteAction: 'Controller?action=delete'
           },
		fields : {
			studentId : {
				title : 'Student Id',
				sort :true,
				width : '30%',
				key : true,
				list : true,
				edit : false,
				create : true
			},
			name : {
				title : 'Name',
				width : '30%',
				edit : true
			},
			department : {
				title : 'Department',
				width : '30%',
				edit : true
			},
			emailId : {
				title : 'Email',
				width : '20%',
				edit : true
			}
		}
	});
	$('#StudentTableContainer').jtable('load');
});
</script>

</head>
<body>
<div style="text-align: center;">
	<h4>Pagination in Java Web Applications jTable</h4>
	<div id="StudentTableContainer"></div>
</div>
</body>
</html>
Changes from the server’s perspective: Servlet
If paging is enabled in jsp then jTable sends two query string parameters to the server on listAction AJAX call:
• jtStartIndex: Start index of records for current page.
• jtPageSize: Count of maximum expected records.
And it expects additional information from server:
• TotalRecordCount: Total count of records.
In our previous example the url specified in the ‘listAction‘ option has business logic to fetch all records from database. Now in order to handle pagination this ‘listAction’ option should return only the part of resultset for each page, So handle this there are two changes that has to be done in the server side .
1. In order to return only a subset of records according to the page offset (jtStartIndex and jtPageSize), sql query used in CRUDDao should be modified with query below,
In case of Oracle database:
“SELECT * from (Select M.*, Rownum R from STUDENT M) where r > ” + < jtStartIndex> +” and r <= "+< jtStartIndex + jtPageSize >;
In case of MySql database:
select * from STUDENT limit <jtStartIndex>,<jtPageSize>
Changes made in CRUDDao at getAllStudents function
public List<Student> getAllStudents(int startPageIndex, int recordsPerPage)
{
	List<Student> students = new ArrayList<Student>();
	int range = startPageIndex+recordsPerPage;
	String query="SELECT * from
        (Select M.*, Rownum R From STUDENT M) where
        r > " + startPageIndex +" and r <= "+range;
	System.out.println(query);
	try
	{
		Statement stmt = dbConnection.createStatement();
		ResultSet rs = stmt.executeQuery(query);
		while (rs.next())
		{
			Student student = new Student();

			student.setStudentId(rs.getInt("STUDENTID"));
			student.setName(rs.getString("NAME"));
			student.setDepartment(rs.getString("DEPARTMENT"));
			student.setEmailId(rs.getString("EMAIL"));
			students.add(student);
		}
	}
	catch (SQLException e)
	{
		System.err.println(e.getMessage());
	}
	return students;
}
2. As mentioned above, jTable need TotalRecordCount to be present in the json response, For which add the following function in CRUDDao which returns total Record Count value present in database.
public int getStudentCount()
{
	int count=0;
	try
	{
	   Statement stmt = dbConnection.createStatement();
	   ResultSet rs = stmt.executeQuery("SELECT COUNT(*) AS COUNT FROM STUDENT");
	   while (rs.next())
	   {
	 	count=rs.getInt("COUNT");
	   }
	}
	catch (SQLException e)
	{
		System.err.println(e.getMessage());
	}
	return count;
}
Changes made in Controller
The following changes where made in the logic inside the if loop -> ‘if(action.equals(“list”))’
HashMap<String, Object> JSONROOT = new HashMap<String, Object>();

if (action.equals("list")) {
	try {
	// Fetch Data from User Table
	int startPageIndex = Integer.parseInt(request.getParameter("jtStartIndex"));
	int recordsPerPage = Integer.parseInt(request.getParameter("jtPageSize"));

	// Fetch Data from Student Table
	studentList = dao.getAllStudents(startPageIndex, recordsPerPage);
	// Get Total Record Count for Pagination
	int userCount = dao.getStudentCount();

	// Return in the format required by jTable plugin
	JSONROOT.put("Result", "OK");
	JSONROOT.put("Records", studentList);
	JSONROOT.put("TotalRecordCount", userCount);

	// Convert Java Object to Json
	String jsonArray = gson.toJson(JSONROOT);

	response.getWriter().print(jsonArray);
	} catch (Exception ex) {
		JSONROOT.put("Result", "ERROR");
		JSONROOT.put("Message", ex.getMessage());
		String error = gson.toJson(JSONROOT);
		response.getWriter().print(error);
	}
}
Now on running the application, with the above changes, the final demo looks as shown below:

Reference
jTable official website
AJAX based CRUD tables using ASP.NET MVC 3 and jTable jQuery plug-in
Wikipedia : JSON
CRUD Operations in Java Web Applications using jTable jQuery plugin via Ajax

In the previous article “Setting up JQuery jTable plugin in Java Web Applications” I have explained how to setup jTable plugin in java web application. This article describes on how to implement “Ajax based curd operation in Java Web Applications using the JQuery jTable plugin and it will not explain how to setup jTable plugin in java web application. So If you have not read the previous articles “Setting up JQuery jTable plugin in Java Web Applications I will recommend that you read that article first because it explains how you can integrate the JTable plug-in with a J2EE application, this article will assume that the code for the integration of the jQuery JTable plug-in is implemented, and only the code required for implementing CRUD operation will be explained here.
Steps done to set up our application for jTable
Libraries required for the setup,
Create a dynamic project in eclipse and setup above required libraries as explained here. The final project structure of this looks as below.

Setup from the browser perspective: jTable
jTable plugin allows you to issue an ajax request via jQuery plugin and expects a JSON object as a response, hence the following configuration needs to be made in Jsp file
JSP
<!DOCTYPE html>
<html>
<head>
<title>CRUD operations using jTable in J2EE</title>
<!-- jTable Metro styles. -->
<link href="css/metro/blue/jtable.css" rel="stylesheet" type="text/css" />
<link href="css/jquery-ui-1.10.3.custom.css" rel="stylesheet"
	type="text/css" />
<!-- jTable script file. -->
<script src="js/jquery-1.8.2.js" type="text/javascript"></script>
<script src="js/jquery-ui-1.10.3.custom.js" type="text/javascript"></script>
<script src="js/jquery.jtable.js" type="text/javascript"></script>
<!-- User Defined Jtable js file -->
<script src="js/userDefieneJTableJs.js" type="text/javascript"></script>

</head>
<body>
<div style="text-align: center;">
	<h4>AJAX based CRUD operations using jTable in J2ee</h4>
	<div id="StudentTableContainer"></div>
</div>
</body>
</html>
JS File
$(document).ready(function() {
	$('#StudentTableContainer').jtable({
		title : 'Students List',
		actions : {
			listAction : 'Controller?action=list',
			createAction : 'Controller?action=create',
			updateAction : 'Controller?action=update',
			deleteAction : 'Controller?action=delete'
		},
		fields : {
			studentId : {
				title : 'Student Id',
				width : '30%',
				key : true,
				list : true,
				edit : false,
				create : true
			},
			name : {
				title : 'Name',
				width : '30%',
				edit : true
			},
			department : {
				title : 'Department',
				width : '30%',
				edit : true
			},
			emailId : {
				title : 'Email',
				width : '20%',
				edit : true
			}
		}
	});
	$('#StudentTableContainer').jtable('load');
});
I have explained the working of above jTable js file in my previous article “Setting up JQuery jTable plugin in Java Web Applications”
Now create a student table in Oracle database using the query below. On this table we are going to perform CRUD operation via ajax
create table Student(studentid int,name varchar(50),department varchar(50),
email varchar(50));
CurdDao
Create a class that performs CRUD operation in database
package com.dao;

import java.sql.Connection;
import java.sql.PreparedStatement;
import java.sql.ResultSet;
import java.sql.SQLException;
import java.sql.Statement;
import java.util.ArrayList;
import java.util.List;

import com.jdbc.DataAccessObject;
import com.model.Student;

public class CrudDao {

private Connection dbConnection;
private PreparedStatement pStmt;

public CrudDao() {
	dbConnection = DataAccessObject.getConnection();
}

public void addStudent(Student student) {
	String insertQuery = "INSERT INTO STUDENT(STUDENTID, NAME, " +
			"DEPARTMENT, EMAIL) VALUES (?,?,?,?)";
	try {
		pStmt = dbConnection.prepareStatement(insertQuery);
		pStmt.setInt(1, student.getStudentId());
		pStmt.setString(2, student.getName());
		pStmt.setString(3, student.getDepartment());
		pStmt.setString(4, student.getEmailId());
		pStmt.executeUpdate();
	} catch (SQLException e) {
		System.err.println(e.getMessage());
	}
}

public void deleteStudent(int userId) {
	String deleteQuery = "DELETE FROM STUDENT WHERE STUDENTID = ?";
	try {
		pStmt = dbConnection.prepareStatement(deleteQuery);
		pStmt.setInt(1, userId);
		pStmt.executeUpdate();
	} catch (SQLException e) {
		System.err.println(e.getMessage());
	}
}

public void updateStudent(Student student)  {
	String updateQuery = "UPDATE STUDENT SET NAME = ?, " +
			"DEPARTMENT = ?, EMAIL = ? WHERE STUDENTID = ?";
	try {
		pStmt = dbConnection.prepareStatement(updateQuery);
		pStmt.setString(1, student.getName());
		pStmt.setString(2, student.getDepartment());
		pStmt.setString(3, student.getEmailId());
		pStmt.setInt(4, student.getStudentId());
		pStmt.executeUpdate();

	} catch (SQLException e) {
		System.err.println(e.getMessage());
	}
}

public List<Student> getAllStudents() {
	List<Student> students = new ArrayList<Student>();

	String query = "SELECT * FROM STUDENT ORDER BY STUDENTID";
	try {
		Statement stmt = dbConnection.createStatement();
		ResultSet rs = stmt.executeQuery(query);
		while (rs.next()) {
			Student student = new Student();

			student.setStudentId(rs.getInt("STUDENTID"));
			student.setName(rs.getString("NAME"));
			student.setDepartment(rs.getString("DEPARTMENT"));
			student.setEmailId(rs.getString("EMAIL"));
			students.add(student);
		}
	} catch (SQLException e) {
		System.err.println(e.getMessage());
	}
	return students;
}
}
I hope the above code is self explanatory
Setup from the server’s perspective: Servlet
jTable uses the POST method by default while making AJAX calls to the server and in server side, we will convert Java objects created under different CRUD operation to JSON strings that will be parsed by jTable pugin in the JSP page and will be rendered on the web page. This conversion of Java Object to Json format is done using Google gson jar. I have used the below method of gson library to convert java object to json object
Gson gson = new GsonBuilder().setPrettyPrinting().create();
String jsonArray = gson.toJson(JSONROOT);
Now let us look into the different response created for CRUD operations
Reading
Method to jTable to get a list of records:
HashMap<String, Object> JSONROOT = new HashMap<String, Object>();

if (action.equals("list")) {
try{
	// Fetch Data from Student Table
	studentList = dao.getAllStudents();

	// Return in the format required by jTable plugin
	JSONROOT.put("Result", "OK");
	JSONROOT.put("Records", studentList);

	// Convert Java Object to Json
	String jsonArray = gson.toJson(JSONROOT);

	response.getWriter().print(jsonArray);
} catch (Exception ex) {
	JSONROOT.put("Result", "ERROR");
	JSONROOT.put("Message", ex.getMessage());
	String error = gson.toJson(JSONROOT);
	response.getWriter().print(error);
}
}
For read operations, Result property must be “OK” if operation is successful. If an error occurs, then Result property must be “ERROR”. If Result is “OK”, the Records property will contain an array of records to show in the MySql table. If it’s ERROR, a Message property will contain an error message to show to the user. A sample return value for listAction is show below
{“Result”:”OK”,”Records”:[
{
“studentId”: 1,
“name”: “Muthu vijay”,
“department”: “CSE”,
“emailId”: “[email protected]”
},
{
“studentId”: 2,
“name”: “Bashit”,
“department”: “EEE”,
“emailId”: “[email protected]”
},
{
“studentId”: 3,
“name”: “Haripriya”,
“department”: “IT”,
“emailId”: “[email protected]”
}
]}
Creating & Updating
Creating and Updating a record is optional. If you allow user to create/update a record, you must supply an action to jTable to create a new record. In case of create you must return the newly created object in JSON format, where as in case of update you must return the updated object via its respective action, which is done via gson library. A sample return value for createAction/UpdateAction is shown below
{“Result”:”OK”,”Record”:{
“studentId”: 9,
“name”: “Lahir nisha”,
“department”: “CSE”,
“emailId”: “[email protected]”
}}
if (action.equals("create") || action.equals("update")) {
try{
	Student student = new Student();
	if (request.getParameter("studentId") != null) {
		int studentId = Integer.parseInt(request.getParameter("studentId"));
		student.setStudentId(studentId);
	}

	if (request.getParameter("name") != null) {
		String name = request.getParameter("name");
		student.setName(name);
	}

	if (request.getParameter("department") != null) {
		String department = request.getParameter("department");
		student.setDepartment(department);
	}

	if (request.getParameter("emailId") != null) {
		String emailId = request.getParameter("emailId");
		student.setEmailId(emailId);
	}

	if (action.equals("create")) {
		// Create new record
		dao.addStudent(student);
	} else if (action.equals("update")) {
		// Update existing record
		dao.updateStudent(student);
	}

	// Return in the format required by jTable plugin
	JSONROOT.put("Result", "OK");
	JSONROOT.put("Record", student);

	// Convert Java Object to Json
	String jsonArray = gson.toJson(JSONROOT);
	response.getWriter().print(jsonArray);
} catch (Exception ex) {
	JSONROOT.put("Result", "ERROR");
	JSONROOT.put("Message", ex.getMessage());
	String error = gson.toJson(JSONROOT);
	response.getWriter().print(error);
}
}
Deleting
Similar to update/create option, delete record is optional. If you allow user to delete a record, you must supply an action to jTable to delete a record, and response of delete operation is similar to update.
if (action.equals("delete")) {
try{
	// Delete record
	if (request.getParameter("studentId") != null) {
		int studentId = Integer.parseInt(request.getParameter("studentId"));
		dao.deleteStudent(studentId);

		// Return in the format required by jTable plugin
		JSONROOT.put("Result", "OK");

		// Convert Java Object to Json
		String jsonArray = gson.toJson(JSONROOT);
		response.getWriter().print(jsonArray);
	}
} catch (Exception ex) {
	JSONROOT.put("Result", "ERROR");
	JSONROOT.put("Message", ex.getMessage());
	String error = gson.toJson(JSONROOT);
	response.getWriter().print(error);
}
}
Model class
Create Model class used in the controller, which will have getters and setters for fields specified in jTable script.
package com.model;

public class Student {

private int studentId;
private String name;
private String department;
private String emailId;

public int getStudentId() {
	return studentId;
}

public String getName() {
	return name;
}

public String getDepartment() {
	return department;
}

public String getEmailId() {
	return emailId;
}

public void setStudentId(int studentId) {
	this.studentId = studentId;
}

public void setName(String name) {
	this.name = name;
}

public void setDepartment(String department) {
	this.department = department;
}

public void setEmailId(String emailId) {
	this.emailId = emailId;
}
}
DAO Class
Create utility class which connect to database Using Oracle JDBC driver
package com.jdbc;

import java.sql.Connection;
import java.sql.DriverManager;

public class DataAccessObject {
	private static Connection connection = null;

	public static Connection getConnection() {
		if (connection != null)
			return connection;
		else {
			// Store the database URL in a string
		String serverName = "127.0.0.1";
		String portNumber = "1521";
		String sid = "XE";
		String dbUrl = "jdbc:oracle:thin:@" + serverName + ":" + portNumber
				+ ":" + sid;
		try {
		Class.forName("oracle.jdbc.driver.OracleDriver");
		// set the url, username and password for the database
		connection = DriverManager.getConnection(dbUrl, "system", "admin");
		} catch (Exception e) {
			e.printStackTrace();
		}
		return connection;
	}
	}
}
web.xml
<welcome-file-list>
  <welcome-file>index.jsp</welcome-file>
</welcome-file-list>
<servlet>
  <servlet-name>Controller</servlet-name>
  <servlet-class>com.servlet.Controller</servlet-class>
</servlet>
<servlet-mapping>
  <servlet-name>Controller</servlet-name>
  <url-pattern>/Controller</url-pattern>
</servlet-mapping>
Demo
On running the application
On clicking ‘Add new record’
Now the new record will be added with fade out animation
On clicking edit button
On clicking delete button
In the next article Pagination in Java Web Applications using jQuery jTable plugin I have implemented paging feature to the CRUD example demonstrated here.
Reference
jTable official website
AJAX based CRUD tables using ASP.NET MVC 3 and jTable jQuery plug-in
Wikipedia : JSON
Ajax File Upload with Progress Bar using jQuery in Java web application
In my previous article we learnt on how to implement AJAX Style file upload in a java web application. In this post we shall learn on how to create AJAX file uploading system with progress bar which shows upload progress in percentage (%) using jQuery in java web application. I have used jQuery Form plugin for this purpose. This plugin is easy to use and supports iframe file transportation.
Libraries required for the setup
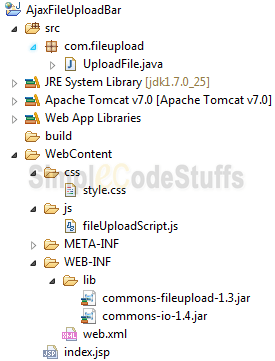
Folder structure
Now Create a dynamic web project in Eclipse with following folder structure
Set up from browser perspective: jQuery
Jsp form which handles file uploads
<!DOCTYPE html>
<html>
<head>
<title>Ajax File Upload with Progress Bar</title>
<!-- Include jQuery form & jQuery script file. -->
<script src="http://ajax.googleapis.com/ajax/libs/jquery/1.11.1/jquery.js" ></script>
<script src="http://malsup.github.com/jquery.form.js" ></script>
<script src="js/fileUploadScript.js" ></script>
<!-- Include css styles here -->
<link href="css/style.css" rel="stylesheet" type="text/css" />
</head>
<body>
<h3>Ajax File Upload with Progress Bar</h3>
 <form id="UploadForm" action="UploadFile" method="post" enctype="multipart/form-data">
    <input type="file" size="60" id="myfile" name="myfile">
     <input type="submit" value="Ajax File Upload">
       <div id="progressbox">
	 <div id="progressbar"></div>
	 <div id="percent">0%</div>
       </div>
 <br />
<div id="message"></div>
</form>
</body>
</html>
The JQuery code written on the head section of the jsp page is responsible for the AJAX call made to the servlet, which in turn uploads file into server.
Js file
Shown below is the jQuery code for upload file and progress bar
$(document).ready(function() {
var options = {
	beforeSend : function() {
		$("#progressbox").show();
		// clear everything
		$("#progressbar").width('0%');
		$("#message").empty();
		$("#percent").html("0%");
	},
	uploadProgress : function(event, position, total, percentComplete) {
		$("#progressbar").width(percentComplete + '%');
		$("#percent").html(percentComplete + '%');

		// change message text to red after 50%
		if (percentComplete > 50) {
		$("#message").html("<font color='red'>File Upload is in progress</font>");
		}
	},
	success : function() {
		$("#progressbar").width('100%');
		$("#percent").html('100%');
	},
	complete : function(response) {
	$("#message").html("<font color='blue'>Your file has been uploaded!</font>");
	},
	error : function() {
	$("#message").html("<font color='red'> ERROR: unable to upload files</font>");
	}
};
$("#UploadForm").ajaxForm(options);
});
beforeSend : this function called before form submission
uploadProgress : this function called when the upload is in progress
success : this function is called when the form upload is successful.
complete: this function is called when the form upload is completed.
Another must read:
jQuery form validation using jQuery Validation plugin
Setup from the server’s perspective: Servlet
package com.fileupload;

import java.io.File;
import java.io.IOException;
import java.util.List;

import javax.servlet.ServletException;
import javax.servlet.http.HttpServlet;
import javax.servlet.http.HttpServletRequest;
import javax.servlet.http.HttpServletResponse;

import org.apache.commons.fileupload.FileItem;
import org.apache.commons.fileupload.FileItemFactory;
import org.apache.commons.fileupload.disk.DiskFileItemFactory;
import org.apache.commons.fileupload.servlet.ServletFileUpload;

public class UploadFile extends HttpServlet {
	private static final long serialVersionUID = 1L;
	private final String UPLOAD_DIRECTORY = "C:/Files/";

	protected void doPost(HttpServletRequest request,
		HttpServletResponse response) throws ServletException, IOException {
	boolean isMultipart = ServletFileUpload.isMultipartContent(request);

	// process only if its multipart content
	if (isMultipart) {
		// Create a factory for disk-based file items
		FileItemFactory factory = new DiskFileItemFactory();

		// Create a new file upload handler
		ServletFileUpload upload = new ServletFileUpload(factory);
		try {
			// Parse the request
			List<FileItem> multiparts = upload.parseRequest(request);

			for (FileItem item : multiparts) {
	    		  if (!item.isFormField()) {
        		     String name = new File(item.getName()).getName();
			     item.write(new File(UPLOAD_DIRECTORY + File.separator + name));
			  }
			}
		}
		catch (Exception e)
		{
		  System.out.println("File upload failed");
		}
	}
}
}
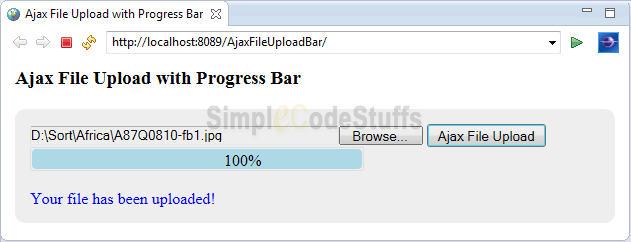
Demo
Tab Style Login and Signup example using jQuery in Java web application

In this post, I am going to describe on how to design tab style login and registration panel using jquery ui tabs in java web applications. Here I’m using oracle database as a back end for registering and authenticating users.
Libraries required for the setup,
Now create a dynamic web project in eclipse and create two folders under WebContent and name it as ‘js’ and ‘css’. And add the downloaded jQuery javascript and css files to it. The final project structure will be as shown below

Now create a user table in Oracle database using the query below.
CREATE TABLE users (name VARCHAR (50), email VARCHAR (50), password VARCHAR (50), gender VARCHAR (50))
Jsp page
<!DOCTYPE html>
<html>
<head>
<title>Login and registration</title>
<link rel="stylesheet" href="css/jquery-ui.css">
<link rel="stylesheet" href="css/style.css">
<script src="js/jquery-1.11.1.js"></script>
<script src="js/jquery-ui.js"></script>
<script>
$(function() {
  $( "#tabs" ).tabs();
});
</script>
</head>
<body>
<div class="wrapper">
<div class="container">
<div id="tabs">
  <ul>
    <li><a href="#login">Login</a></li>
    <li><a href="#register">Sign up</a></li>
  </ul>
  <div id="login">
  	<%
  	if("Invalid Email or password".equals((String)session.getAttribute("error"))){ %>
  		<h6> Invalid Email or password. Please try again.</h6>
  	<%} %>
    <form method="post" action="LoginController">
    	<label for="email">Email:</label>
    	<br/>
    	<input type="text" name="email" id="email"/>
    	<br/>
    	<label for="password">Password:</label>
    	<br/>
    	<input type="password" name="password" id="password"  />
    	<br/>
    	<br/>
    	<input type="submit" value="Login">
    </form>
  </div>
  <div id="register">
  	<form method="post" action="RegistrationController">
  		<label for="fullname">Name:</label><br/>
    	<input type="text" name="fullname" id="fullname" />
    	<br/>
    	<label for="email">Email:</label><br/>
    	<input type="text" name="email" id="email" />
    	<br/>
    	<label for="password">Password:</label><br/>
    	<input type="password" name="password" id="password" />
    	<br/>
    	<label for="gender">Gender:</label><br/>
    	<select name="gender" id="gender">
    		<option value="Male">Male</option>
    		<option value="Female">Female</option>
    	</select>
    	<br/>
    	<br/>
    	<input type="submit" value="Register">
  	</form>
  </div>
</div>
</div>
</div>
</body>
</html>
User defined CSS
body {
	background-color: #e6e6e6;
	font-family: Helvetica;
	font-size: 17px;
	color: #666;
	margin: 0px;
	padding: 0px;
}

.wrapper {
	width: 1024px;
	height: 650px;
	margin: 0 auto;
	background: white;
	margin: 0 auto;
}

.container {
	min-height: 400px;
	border-top: 1px solid gray;
	padding: 50px;
}
Recommended reading :
Controller
File: LoginController.java
LoginController doPost method gets triggered on clicking Login button and its doGet Method gets triggered on clicking logout
package com.controller;

import java.io.IOException;

import javax.servlet.ServletException;
import javax.servlet.http.HttpServlet;
import javax.servlet.http.HttpServletRequest;
import javax.servlet.http.HttpServletResponse;
import javax.servlet.http.HttpSession;

import com.dao.UserDAO;

public class LoginController extends HttpServlet {
	private static final long serialVersionUID = 1L;

	protected void doPost(HttpServletRequest request,
			HttpServletResponse response) throws ServletException, IOException {

		String error;
		String email = request.getParameter("email");
		String password = request.getParameter("password");
		HttpSession session = request.getSession();
		UserDAO userDAO = new UserDAO();

		String userName = userDAO.verifyUser(email, password);

		if (userName == null) {
			error = "Invalid Email or password";
			session.setAttribute("error", error);
			response.sendRedirect("index.jsp");
		} else {
			session.setAttribute("user", userName);
			response.sendRedirect("welcome.jsp");
		}
	}

	@Override
	protected void doGet(HttpServletRequest request,
			HttpServletResponse response) throws ServletException, IOException {
		if ("logout".equalsIgnoreCase(request.getParameter("param"))) {
			HttpSession session = request.getSession();
			session.removeAttribute("user");
			session.invalidate();
			response.sendRedirect("index.jsp");
		}
	}
}
SignupController
This controller gets triggred on clicking Register button under Signup tab
package com.controller;

import java.io.IOException;

import javax.servlet.ServletException;
import javax.servlet.http.HttpServlet;
import javax.servlet.http.HttpServletRequest;
import javax.servlet.http.HttpServletResponse;

import com.dao.UserDAO;

public class SignupController extends HttpServlet {
	private static final long serialVersionUID = 1L;

	protected void doPost(HttpServletRequest request,
			HttpServletResponse response) throws ServletException, IOException {

		String name = request.getParameter("fullname");
		String email = request.getParameter("email");
		String password = request.getParameter("password");
		String gender = request.getParameter("gender");

		UserDAO userDAO = new UserDAO();

		int result = userDAO.createUser(name, email, password, gender);
		if (result == 1) {
			response.sendRedirect("success.jsp");
		}
	}
}
Also read :
UserDAO
Create a class that performs registration and authentication operation in database
package com.dao;

import java.sql.Connection;
import java.sql.PreparedStatement;
import java.sql.ResultSet;

import com.jdbc.DBUtility;

public class UserDAO {

	private Connection dbConnection;
	private PreparedStatement pStmt;

	private String SQL_SELECT = "SELECT name FROM users WHERE email = ? AND password = ?";
	private String SQL_INSERT = "INSERT INTO users (name,email,password,gender) VALUES (?,?,?,?)";

	public UserDAO() {
		dbConnection = DBUtility.getConnection();
	}

	public String verifyUser(String email, String password) {
		String userName = null;
		try {
			pStmt = dbConnection.prepareStatement(SQL_SELECT);
			pStmt.setString(1, email);
			pStmt.setString(2, password);
			ResultSet rs = pStmt.executeQuery();
			while (rs.next()) {
				userName = rs.getString("name");
			}
		} catch (Exception e) {
			System.err.println(e.getMessage());
		}
		return userName;
	}

	public int createUser(String name, String email, String password,
			String gender) {
		int result = 0;
		try {
			pStmt = dbConnection.prepareStatement(SQL_INSERT);
			pStmt.setString(1, name);
			pStmt.setString(2, email);
			pStmt.setString(3, password);
			pStmt.setString(4, gender);
			result = pStmt.executeUpdate();
		} catch (Exception e) {
			System.err.println(e.getMessage());
		}
		return result;
	}
}
DBUtility
Next let us create a utility class to handle connections to database.
package com.jdbc;

import java.sql.Connection;
import java.sql.DriverManager;

public class DBUtility {
private static Connection connection = null;

public static Connection getConnection() {
	if (connection != null)
		return connection;
	else {
		// database URL
		String dbUrl = "jdbc:oracle:thin:@localhost:1521:XE";
		try
		{
		Class.forName("oracle.jdbc.driver.OracleDriver");
		// set the url, username and password for the database
		connection = DriverManager.getConnection(dbUrl, "system", "admin");
		} catch (Exception e) {
			e.printStackTrace();
		}
		return connection;
	}
	}
}
In addition to above files there are 2 other jsp pages,
1. welcome.jsp page which get displayed when the user logged into the application.
2. Success.jsp page which gets displayed once user registration is successful.
I have not showcased up these files here, you may download the files to see complete example.
Note: Since this article is intended to demonstrate the usage of tabs feature in jquery, so I have not included any validation parts in it.
Demo
On running the application

On clicking Signup tab

 |
|
Read More
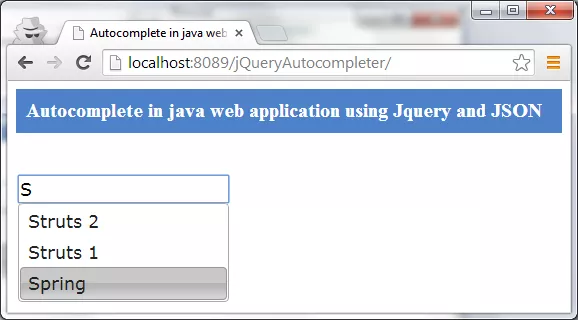
Autocomplete in java web application using Jquery and JSON
This article will describe how to implement jQuery Autocomplete in java web application. jQuery Autcomplete is part of the jQuery UI library which allows converting a normal textbox into an autocompleter textbox by providing a data source for the autocompleter values.
Here when user types a character in text box ,jQuery will fire an ajax request using autocomplete plugin to the controller, this controller(Servlet) in turn call the dao class which connects to the database and returns the required data back as an array list. After getting the data we convert this list to json format and return it back to the success function of our ajax call.
Library
gson-2.2.2.jar
ojdbc14.jar
servlet-api.jar
jquery-1.10.2.js
jquery-ui.js
jquery-ui.css
Project Structure

Jsp page
Now create a jsp page with Autocompleter feature and make sure that you referred the jQuery core and jQueryUI libraries.
<!DOCTYPE html>
<html>
<head>
<meta charset="ISO-8859-1">
<title>Autocomplete in java web application using Jquery and JSON</title>
<script src="//code.jquery.com/jquery-1.10.2.js"></script>
<script src="//code.jquery.com/ui/1.10.4/jquery-ui.js"></script>
<script src="autocompleter.js"></script>
<link rel="stylesheet"
  href="//code.jquery.com/ui/1.10.4/themes/smoothness/jquery-ui.css">
<!-- User defied css -->
<link rel="stylesheet" href="style.css">

</head>
<body>
<div class="header">
	<h3>Autocomplete in java web application using Jquery and JSON</h3>
</div>
<br />
<br />
<div class="search-container">
	<div class="ui-widget">
		<input type="text" id="search" name="search" class="search" />
	</div>
</div>
</body>
</html>
Recommended reading:
Js file
File: autocompleter.js
In this file we get data from database via ajax and apply autocompleter
$(document).ready(function() {
	$(function() {
		$("#search").autocomplete({
		source : function(request, response) {
		$.ajax({
			url : "SearchController",
			type : "GET",
			data : {
				term : request.term
			},
			dataType : "json",
			success : function(data) {
				response(data);
			}
		});
	}
});
});
});
When a user types a character in text box ,jQuery will fire an ajax request to the controller, in this case controller is SearchController as mentioned in the above js file.
Controller
Creating The Controller To Handle Ajax Calls
package com.servlet;

import java.io.IOException;
import java.util.ArrayList;

import javax.servlet.ServletException;
import javax.servlet.http.HttpServlet;
import javax.servlet.http.HttpServletRequest;
import javax.servlet.http.HttpServletResponse;

import com.dao.DataDao;
import com.google.gson.Gson;

public class Controller extends HttpServlet {
	private static final long serialVersionUID = 1L;

	protected void doGet(HttpServletRequest request,
		HttpServletResponse response) throws ServletException, IOException {

		response.setContentType("application/json");
		try {
			String term = request.getParameter("term");
			System.out.println("Data from ajax call " + term);

			DataDao dataDao = new DataDao();
			ArrayList<String> list = dataDao.getFrameWork(term);

			String searchList = new Gson().toJson(list);
			response.getWriter().write(searchList);
		} catch (Exception e) {
                        System.err.println(e.getMessage());
		}
	}
}
This servlet will call the business class which in turn creates the necessary connection and returns the data back as an array list to the controller. After getting the data we convert it to json format and return it back to the success function of our ajax call.
Do read
Business class
Creating Methods To Get Data From Database
package com.dao;

import java.sql.Connection;
import java.sql.PreparedStatement;
import java.sql.ResultSet;
import java.util.ArrayList;

public class DataDao {
	private Connection connection;

	public DataDao() throws Exception {
		connection = DBUtility.getConnection();
	}

	public ArrayList<String> getFrameWork(String frameWork) {
	ArrayList<String> list = new ArrayList<String>();
	PreparedStatement ps = null;
	String data;
	try {
	ps = connection.prepareStatement("SELECT * FROM JAVA_FRAMEWORK  WHERE FRAMEWORK  LIKE ?");
		ps.setString(1, frameWork + "%");
		ResultSet rs = ps.executeQuery();
		while (rs.next()) {
			data = rs.getString("FRAMEWORK");
			list.add(data);
		}
	} catch (Exception e) {
		System.out.println(e.getMessage());
	}
	return list;
}
}
Data Access object
Connecting To Database Using JDBC
package com.dao;

import java.sql.Connection;
import java.sql.DriverManager;

public class DBUtility {
	private static Connection connection = null;

	public static Connection getConnection() throws Exception {
		if (connection != null)
			return connection;
		else {
			// Store the database URL in a string
			String serverName = "127.0.0.1";
			String portNumber = "1521";
			String sid = "XE";
			String dbUrl = "jdbc:oracle:thin:@" + serverName + ":" + portNumber
					+ ":" + sid;
			Class.forName("oracle.jdbc.driver.OracleDriver");

			// set the url, username and password for the databse
			connection = DriverManager.getConnection(dbUrl, "system", "admin");
			return connection;
		}
	}
}
web.xml
Make sure you have done servlet mapping properly in web.xml file. An example of this is given below,
<welcome-file-list>
   <welcome-file>index.jsp</welcome-file>
</welcome-file-list>
<servlet>
  <servlet-name>SearchController</servlet-name>
<servlet-class>com.servlet.Controller</servlet-class>
</servlet>
<servlet-mapping>
  <servlet-name>SearchController</servlet-name>
  <url-pattern>/SearchController</url-pattern>
</servlet-mapping>
Demo