Auto-Refreshing Pie Chart/Bar Chart in Servlet dynamically using JFreeChart
In this post, we’ll learn to create a pie chart using JFreeChart that can be returned as an image from a servlet. Here, I have created the pie chart using the values retrieved from database and display it in JSP. In order to sync the pie chart with values from a database that is frequently updated, I have written auto-refresh script which refresh the page automatically at regular intervals.

Libraries required :
jfreechart-x.x.x.jar
jcommon-x.x.x.jar
Download Jfreechart library from here.
Now let us create a sample table called ‘air_pollution’ in oracle database, that consists of the factors which causes air pollution and its percentage of emission.
create table air_pollution(source varchar(50), percentage int)
Here is the data contained in the above table

Now Create a New Dynamic Web Project in eclipse with following folder structure

Servlet
File : PieChartServlet.java
package com.simplecodestuffs.action;

import java.io.IOException;
import java.io.OutputStream;
import java.sql.Connection;
import java.sql.SQLException;

import javax.servlet.ServletException;
import javax.servlet.http.HttpServlet;
import javax.servlet.http.HttpServletRequest;
import javax.servlet.http.HttpServletResponse;

import org.jfree.chart.ChartFactory;
import org.jfree.chart.ChartUtilities;
import org.jfree.chart.JFreeChart;
import org.jfree.data.jdbc.JDBCPieDataset;

import com.simplecodestuffs.jdbc.DataAccessObject;

public class PieChartServlet extends HttpServlet {
	private static final long serialVersionUID = 1L;
	private Connection dbConnection = null;

	public PieChartServlet() {
		dbConnection = DataAccessObject.getConnection();
	}

	public void doGet(HttpServletRequest request, HttpServletResponse response)
			throws ServletException, IOException {
		JDBCPieDataset dataSet = new JDBCPieDataset(dbConnection);

		try {
		dataSet.executeQuery("SELECT SOURCE,PERCENTAGE FROM AIR_POLLUTION ORDER BY PERCENTAGE");
		JFreeChart chart = ChartFactory.createPieChart(
		 "Source of Air Pollution ", // Title
	         dataSet,                    // Data
	         true,                       // Display the legend
	         true,                       // Display tool tips
	         false                       // No URLs
		 );

		if (chart != null) {
         		chart.setBorderVisible(true);
			int width = 600;
			int height = 400;
			response.setContentType("image/jpeg");
			OutputStream out = response.getOutputStream();
			ChartUtilities.writeChartAsJPEG(out, chart, width, height);
		}
		}
		catch (SQLException e) {
			System.err.println(e.getMessage());
		}
	}
}
Recommended reading:
Here Jfreechart’s JDBCPieDataSet method is used to retrieve data from database and createPieChart() method creates the pie chart with the populated dataset. writeChartAsJPEG() method is responsible for rendering the image in jpeg format.
Note :
If you want the pie chart generated to be in PNG format, then writeChartAsPNG() method can be used.
DAO Class
Create utility class which connect to database Using Oracle JDBC driver
package com.simplecodestuffs.jdbc;

import java.sql.Connection;
import java.sql.DriverManager;

public class DataAccessObject {
	private static Connection connection = null;

	public static Connection getConnection() {
		if (connection != null)
			return connection;
		else {
			// Store the database URL in a string
		String serverName = "127.0.0.1";
		String portNumber = "1521";
		String sid = "XE";
		String dbUrl = "jdbc:oracle:thin:@" + serverName + ":" + portNumber
				+ ":" + sid;
		try {
		Class.forName("oracle.jdbc.driver.OracleDriver");
		// set the url, username and password for the database
		connection = DriverManager.getConnection(dbUrl, "system", "admin");
		} catch (Exception e) {
			e.printStackTrace();
		}
		return connection;
	}
	}
}
Web.xml
Make sure you have done servlet mapping properly in web.xml file as shown below
<servlet>
   <servlet-name>PieChartServlet</servlet-name>
   <servlet-class>com.simplecodestuffs.action.PieChartServlet</servlet-class>
</servlet>
<servlet-mapping>
   <servlet-name>PieChartServlet</servlet-name>
   <url-pattern>/displayChart</url-pattern>
</servlet-mapping>
<welcome-file-list>
   <welcome-file>pieChart.jsp</welcome-file>
</welcome-file-list>
Auto refresh Jsp
<!DOCTYPE html>
<html>
<head>
<title>Pie Chart Demo</title>
<script type="text/javascript">
	function refreshPage()
	{
		document.forms.formId.submit();
	}
</script>
</head>
<body>
	<h3>Create Pie Chart Dynamically using JFreechart</h3>
	<%
		response.setIntHeader("Refresh", 10);
	%>
	<form id="formId">
	   <input type="button" onclick="refreshPage()" value="Refresh Page" />
	   <br /> <img src="displayChart" />
	</form>
</body>
</html>
In Jsp, servlet is called via img tag’s src attribute, this triggers the servlet and render the image on jsp.
To automate the page refreshing process, the following code is used
response.setIntHeader("Refresh",10);
It will reload the current request after the given amount of seconds, as if you’re pressing F5. Here I set the time interval to 10 seconds, So the page will refresh and render updated data from database for every 10 seconds, this value can be set based on your requirement.
Note :
This automatic refreshing can cause a considerable performance impact since it hits database for every 10 second, so it is a good practice to have a ‘Refresh’ button to enable the end-users to decide on when to refresh the page.
Demo
Now right click on the project name and select Run As –> Run on Server.

Similarly to Create bar chart, replace the doGet method in the Servlet with the following code.
public void doGet(HttpServletRequest request, HttpServletResponse response)
		throws ServletException, IOException {
	JDBCCategoryDataset dataset = new JDBCCategoryDataset(dbConnection);

	try {
	dataset.executeQuery("SELECT SOURCE,PERCENTAGE FROM AIR_POLLUTION ORDER BY PERCENTAGE");

	JFreeChart chart = ChartFactory.createBarChart(
               "Source of Air Pollution", "Scource", "Percentage",
               dataset, PlotOrientation.VERTICAL, false, true, false);
               chart.setBorderVisible(true);

	if (chart != null) {
		int width = 600;
		int height = 400;
		response.setContentType("image/jpeg");
		OutputStream out = response.getOutputStream();
		ChartUtilities.writeChartAsJPEG(out, chart, width, height);
	}
	}
	catch (SQLException e) {
		System.err.println(e.getMessage());
	}
}
Demo
Bar chart – demo


Reference
- JFreeChart.org
- Set JFreeChart data from database
- What is the meaning of response.setHeader(“Refresh”, “300”)?
Read More
AJAX File Upload in Java Web Application using jQuery.AjaxFileUpload plugin

In my previous article on File Upload Example in Servlet & Jsp we learnt how to upload a file into sever via Apache Commons FileUpload plugin, In this article we shall add ajax style feature to our previous example using jQuery.AjaxFileUpload.js plugin.
Modifications
Before getting into the tutorial, I will let you know the small modification which I made in jQuery Form Plugin.
1. By default this plugin allows only images, this is specified in jQuery.AjaxFileUpload.js as below.
valid_extensions : ['gif','png','jpg','jpeg']
So inorder to upload file with other extensions, I have modified this to
valid_extensions : ['gif','png','jpg','jpeg','txt','docx','pdf','mkv']
You can include/remove these extensions according to your requirement
2. When file upload fails this plugin sends two parameter in response, they are
status : Just has the status code, it is set to false when file upload fails
message : This holds the error message.
When file upload is successful, no response is sent back to client. So in order to send an upload success message I have modified the code from
settings.onComplete.apply(element, [response, settings.params]);
to
settings.onComplete.apply(element, [ {
	status : true,
	message : 'Your file has been uploaded!'
}, settings.params ]);
Now let’s go ahead implement ajax file upload functionality in java web application
Library
Folder structure
Now Create a dynamic web project in Eclipse with following folder structure
JSP
<!DOCTYPE html>
<html>
<head>
<title>Asynchronous file Upload in Java Web Application</title>
<script src="jquery-1.8.2.js"></script>
<script src="jQuery.AjaxFileUpload.js"></script>
<script lang="Javascript">
$(document).ready(function() {
  $('input[type="file"]').ajaxfileupload({
  'action' : 'UploadFile',
  'onComplete' : function(response) {
      $('#upload').hide();
      $('#message').show();

      var statusVal = JSON.stringify(response.status);

     if(statusVal == "false")
     {
     $("#message").html("<font color='red'>"+JSON.stringify(response.message)+"</font>");
     }
     if(statusVal == "true")
     {
     $("#message").html("<font color='green'>"+JSON.stringify(response.message)+"</font>");
     }
},
'onStart' : function() {
	$('#upload').show();
	$('#message').hide();
}
});
});
</script>
<style type="text/css">
.centered {
	width: 100%;
	margin-left: auto;
	margin-right: auto;
	text-align: center;
}
</style>
</head>
<body>
<form>
<div class="centered">
	<h4>AJAX Style File upload in Java Web Application</h4>
	<input type="file" name="file" /><br />
	<div id="upload" style="display: none;">Uploading..</div>
	<div id="message"></div>
</div>
</form>
</body>
</html>
The required jquery files are referenced in the head section of jsp file. Here whenever a file is selected, the script gets fired and triggers the servlet via action parameter, which holds the servlet url. This servlet in turn handles the file upload logic in the server side.
Another must read:
jQuery form validation using jQuery Validation plugin
Servlet
package com.fileupload;

import java.io.File;
import java.io.IOException;
import java.util.List;

import javax.servlet.ServletException;
import javax.servlet.http.HttpServlet;
import javax.servlet.http.HttpServletRequest;
import javax.servlet.http.HttpServletResponse;

import org.apache.commons.fileupload.FileItem;
import org.apache.commons.fileupload.FileItemFactory;
import org.apache.commons.fileupload.disk.DiskFileItemFactory;
import org.apache.commons.fileupload.servlet.ServletFileUpload;

public class UploadFile extends HttpServlet {
	private static final long serialVersionUID = 1L;
	private final String UPLOAD_DIRECTORY = "C:/Files";

	protected void doPost(HttpServletRequest request,
             HttpServletResponse response) throws ServletException, IOException {
	boolean isMultipart = ServletFileUpload.isMultipartContent(request);

	// process only if it is multipart content
	if (isMultipart) {
		// Create a factory for disk-based file items
		FileItemFactory factory = new DiskFileItemFactory();

		// Create a new file upload handler
		ServletFileUpload upload = new ServletFileUpload(factory);
		try {
		// Parse the request
		List<FileItem> multiparts = upload.parseRequest(request);

		for (FileItem item : multiparts) {
		if (!item.isFormField()) {
		String name = new File(item.getName()).getName();
		item.write(new File(UPLOAD_DIRECTORY + File.separator + name));
		}
		}
		}
		catch (Exception e)
		{
		  e.printStackTrace();
		}
	}
}
}
web.xml
Make sure that the web.xml has following mappings
<servlet>
	<servlet-name>UploadFile</servlet-name>
	<servlet-class>com.fileupload.UploadFile</servlet-class>
</servlet>
<servlet-mapping>
	<servlet-name>UploadFile</servlet-name>
	<url-pattern>/UploadFile</url-pattern>
</servlet-mapping>
<welcome-file-list>
    <welcome-file>index.jsp</welcome-file>
</welcome-file-list>
Demo
On Running this application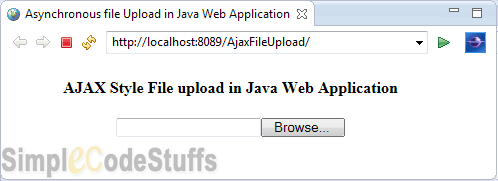
When file upload is successful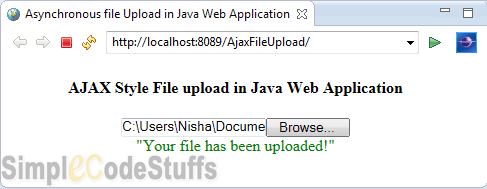
When we try to upload a file whose format is not specified in jQuery.AjaxFileUpload.js file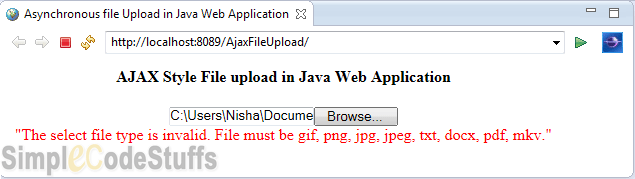
I our next article we shall implement ajax file upload functionality with file upload progress bar.
Reference
Read MoreFile Upload Example in Servlet & Jsp – Java web application

If you want your user to choose files from file system and upload to server then following are the important points to be noted down:
- You need to use <input type=”file”/>.
- Next step is that form method should be POST with enctype as multipart/form-data, which makes file data available in parts inside request body.
- The form action attribute should be set to a servlet file which would handle file uploading at backend server. Following example is using UploadServlet servlet to upload file.
Recommended reading
Final Project Structure
Now create a Dynamic web project in eclipse with following project structure
JSP
Now create index.jsp to handle file upload as below
<html>
<head>
<title>File Upload Example in Java web application</title>
</head>
<body>
	<h3>Choose File to Upload in Server</h3>
	<form action="UploadFile" method="post" enctype="multipart/form-data">
		<input type="file" name="file" />
		<input type="submit" value="upload" />
	</form>
</body>
</html>
Library
Servlet
package com.fileupload;

import java.io.File;
import java.io.IOException;
import java.util.List;

import javax.servlet.ServletException;
import javax.servlet.http.HttpServlet;
import javax.servlet.http.HttpServletRequest;
import javax.servlet.http.HttpServletResponse;

import org.apache.commons.fileupload.FileItem;
import org.apache.commons.fileupload.FileItemFactory;
import org.apache.commons.fileupload.disk.DiskFileItemFactory;
import org.apache.commons.fileupload.servlet.ServletFileUpload;

public class UploadFile extends HttpServlet {
	private static final long serialVersionUID = 1L;
	private final String UPLOAD_DIRECTORY = "C:/Files/";

	protected void doPost(HttpServletRequest request,
		HttpServletResponse response) throws ServletException, IOException {
	boolean isMultipart = ServletFileUpload.isMultipartContent(request);

	// process only if its multipart content
	if (isMultipart) {
		// Create a factory for disk-based file items
		FileItemFactory factory = new DiskFileItemFactory();

		// Create a new file upload handler
		ServletFileUpload upload = new ServletFileUpload(factory);
		try {
	            // Parse the request
		    List<FileItem> multiparts = upload.parseRequest(request);

                   for (FileItem item : multiparts) {
		   if (!item.isFormField()) {
   		   String name = new File(item.getName()).getName();
		   item.write(new File(UPLOAD_DIRECTORY + File.separator + name));
		   }
		}

		// File uploaded successfully
		request.setAttribute("message", "Your file has been uploaded!");
		}
		catch (Exception e)
		{
      	         request.setAttribute("message", "File Upload Failed due to " + e);
		}
	} else
	{
	request.setAttribute("message", "This Servlet only handles file upload request");
	}
	request.getRequestDispatcher("/result.jsp").forward(request, response);
}
}
Here DiskFileItemFactory is default Factory class for FileItem. It provides a method to parse the HttpServletRequest object and return list of FileItem. FileItem provides useful method to get the file name, field name in form, size and content type details of the file that is uploaded. To write file to a directory, all we need to do it create a File object and pass it as argument to FileItem write() method.
Do read
JSP
Create a file result.jsp to render the file upload success or error message
<html>
<head>
<title>File Upload Example in Java web application</title></head>
<body>
	<h4>${requestScope["message"]}</h4>
</body>
</html>
Web.xml
Servlet mapping should be done in web.xml as shown below
<welcome-file-list>
   <welcome-file>index.jsp</welcome-file>
</welcome-file-list>
<servlet>
   <servlet-name>UploadFile</servlet-name>
   <servlet-class>com.fileupload.UploadFile</servlet-class>
</servlet>
<servlet-mapping>
   <servlet-name>UploadFile</servlet-name>
   <url-pattern>/UploadFile</url-pattern>
</servlet-mapping>
Demo
Now on Running the application

In our next article we shall learn to implement AJAX style File Upload in Java Web Application using jQuery plugin