File Download Example in Struts 2
Action Class
package com.simplecode.action;

import java.io.File;
import java.io.FileInputStream;
import java.io.InputStream;

import com.opensymphony.xwork2.Action;

public class DownloadAction implements Action
{
	private InputStream fileInputStream;
	private String fileName;

	public InputStream getFileInputStream()
	{
		return fileInputStream;
	}

	public String execute() throws Exception
	{
		fileName = "MyFile.xls";
		fileInputStream = new FileInputStream(new File("C:\"+fileName));
		return SUCCESS;
	}

	public String getFileName()
	{
		return fileName;
	}

	public void setFileName(String fileName)
	{
		this.fileName = fileName;
	}
}
** UPDATE: Struts 2 Complete tutorial now available here.
Jsp Page
<%@ page language="java" contentType="text/html; charset=ISO-8859-1"
pageEncoding="ISO-8859-1"%>
<%@taglib uri="/struts-tags" prefix="s"%>
<html>
<title>File Download</title>
<body>
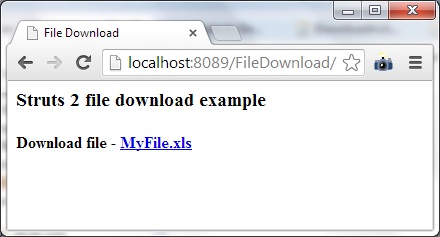
<h3>Struts 2 file download example</h3>
<s:url id="fileDownload" namespace="/jsp" action="download"></s:url>
<h4>
Download file - <s:a href="%{fileDownload}">MyFile.xls</s:a>
</h4>
</body>
</html>
Recommended reading
File Upload Example in Struts 2
struts.xml
Here we can configure, the file name dynamically in struts.xml
<?xml version="1.0" encoding="UTF-8" ?>
<!DOCTYPE struts PUBLIC
"-//Apache Software Foundation//DTD Struts Configuration 2.0//EN"
"http://struts.apache.org/dtds/struts-2.0.dtd">

<struts>
<package name="default" namespace="/jsp" extends="struts-default">

	<action name="download" class="com.simplecode.action.DownloadAction">
	<result name="success" type="stream">
		<param name="contentDisposition">attachment;filename=${fileName}</param>
		<param name="contentType">application/vnd.ms-excel</param>
		<param name="inputName">fileInputStream</param>
		<param name="bufferSize">1024</param>
		</result>
	</action>
</package>
</struts>
Demo
 |
|
Read More

How to override struts 2.x file upload messages?
The file upload interceptor does the validation and adds errors. These error messages are stored in the struts-messsages.properties file. The values of the messages can be overridden by providing the text for the following keys:
struts.messages.error.uploading - error when uploading of file fails
struts.messages.error.file.too.large - error occurs when file size is large
struts.messages.error.content.type.not.allowed - when the content type is not allowed
struts.messages.error.file.extension.not.allowed - when the file extension is not allowed
** UPDATE: Struts 2 Complete tutorial now available here.
In-order to override these message, you need follow the below steps.
1. Create a global.properties file in the src folder and add the following test to your global.properties file:
struts.messages.error.file.too.large = Uploaded File size is too large
struts.messages.error.uploading = File upload failed
struts.messages.error.content.type.not.allowed =File type is not allowed.
struts.messages.error.file.extension.not.allowed =File extension is not allowed.
2. Add the constant In struts.xml:
<constant name="struts.custom.i18n.resources" value="global" />
Now restart the application, and now in case of error in validation you get the custom error message which we have written in the properties file.

Struts 2 Dynamic Method Invocation using Action Wildcards
This tutorial is a continuation of previous example ( DispatchAction functionality ). In this example you will see about avoiding configuration of separate action mapping for each method in Action class by using the wildcard method. Look at the following action mapping to under stand the concept.
** UPDATE: Struts 2 Complete tutorial now available here.
Action mapping From previous example
<struts>

<package name="default" extends="struts-default">

	<action name="Number" class="com.simplecode.action.CalculatorAction">
		<result name="success">/curd.jsp</result>
	</action>
	<action name="addNumber" method="add"
		class="com.simplecode.action.CalculatorAction">
		<result name="success">/curd.jsp</result>
	</action>
	<action name="multiplytNumber" method="multiply"
		class="com.simplecode.action.CalculatorAction">
		<result name="success">/curd.jsp</result>
	</action>
	<action name="subtractNumber" method="subtract"
		class="com.simplecode.action.CalculatorAction">
		<result name="success">/curd.jsp</result>
	</action>
		<action name="divideNumber" method="divide"
		class="com.simplecode.action.CalculatorAction">
		<result name="success">/curd.jsp</result>
	</action>

</package>
</struts>
Action mapping Using Wildcard
<struts>
<package name="default" extends="struts-default">
    <action name="*Number" method="{1}" class="com.simplecode.action.CalculatorAction">
	<result name="success">/curd.jsp</result>
    </action>
</package>
</struts>
As you can see we have replaced all the method names with an asterisk(*) symbol. The word that matches for the first asterisk will be substituted for the method attribute. So when the request URL is “divideNumber” the divide() method in the CalculatorAction class will be invoked.
Do read :
Note :
1. We can also substitute asterisk in the jsp pages.
For example
    <action name="*Number" method="{1}">
	<result name="success">/{1}curd.jsp</result>
    </action>
2. The wild card can be placed in any position in a action name
For example
    <action name="Number*" method="{1}">
	<result name="success">/{1}curd.jsp</result>
    </action>
3. You can have multiple wild card , for example
    <action name="*Number*" method="{1}">
	<result name="success">/{1}curd{2}.jsp</result>
    </action>
To match first wildcard, we have to use {1}, to match second wild card we have to use {2}.
| |
|
Hope you understand about Action Wildcards uses. Thanks for reading :)
Read More
DispatchAction Functionality in Struts 2
In Struts 1 DispatchAction helps us in grouping a set of related functions into a single action. In Struts 2 all the Actions by default provide this functionality. To use this functionality we need to create different methods with the similar signature of the execute() method.
In our example the CalculatorAction class has all the methods related to a Calculator like add(), multiply(), division() and subtract() which are used for performing mathematical operation on two numbers and it displays the result in a single jsp based on the action button clicked in jsp.
** UPDATE: Struts 2 Complete tutorial now available here.
Action Class
package com.simplecode.action;

import com.opensymphony.xwork2.Action;

public class CalculatorAction implements Action
{
private float number1;
private float number2;
private float result;
private String methodName;

	public String execute()
	{
		number1 = 0;
		number2 = 0;
		result = 0;
		setMethodName("execute Method");
		return SUCCESS;
	}

	public String add()
	{
		result=number1+number2;
		setMethodName("add Method");
		return SUCCESS;
	}

	public String subtract()
	{
		result = number1 - number2;
		setMethodName("subtract Method");
		return SUCCESS;
	}

	public String multiply()
	{
		result = number1 * number2;
		setMethodName("multiply Method");
		return SUCCESS;
	}

	public String divide()
	{
		if(number2!=0)
			result = number1/number2;
		else if(number1!=0)
			result = number2/number1;
		else
			result=0;

		setMethodName("divide Method");
		return SUCCESS;
	}

	public float getNumber1() {
		return number1;
	}

	public void setNumber1(float number1) {
		this.number1 = number1;
	}

	public float getNumber2() {
		return number2;
	}

	public void setNumber2(float number2) {
		this.number2 = number2;
	}

	public float getResult() {
		return result;
	}

	public void setResult(float result) {
		this.result = result;
	}

	public String getMethodName() {
		return methodName;
	}

	public void setMethodName(String methodName) {
		this.methodName = methodName;
	}
}
Struts.xml
Here in order to do a DispatchAction functionality we need to create separate action mapping for each method in the action class, which is done in the struts.xml as shown below.
<?xml version="1.0" encoding="UTF-8" ?>
<!DOCTYPE struts PUBLIC
"-//Apache Software Foundation//DTD Struts Configuration 2.0//EN"
"http://struts.apache.org/dtds/struts-2.0.dtd">
<struts>

<package name="default" extends="struts-default">

	<action name="Number" class="com.simplecode.action.CalculatorAction">
		<result name="success">/curd.jsp</result>
	</action>
	<action name="addNumber" method="add"
		class="com.simplecode.action.CalculatorAction">
		<result name="success">/curd.jsp</result>
	</action>
	<action name="multiplytNumber" method="multiply"
		class="com.simplecode.action.CalculatorAction">
		<result name="success">/curd.jsp</result>
	</action>
	<action name="subtractNumber" method="subtract"
		class="com.simplecode.action.CalculatorAction">
		<result name="success">/curd.jsp</result>
	</action>
		<action name="divideNumber" method="divide"
		class="com.simplecode.action.CalculatorAction">
		<result name="success">/curd.jsp</result>
	</action>

</package>
</struts>
Here note that we use the same action class in all the action mappings but only the method name differs. So now When the request URL is “Number” the execute() method in the CalculatorAction class will be executed. When the request URL is “addNumber” the add() method in the CalculatorAction class will be invoked, this is specified using the method attribute of the action tag in struts xml. Similarly for subtract, multiply and divide request the subtract() ,multiply() and divide() methods will be invoked respectively.
This way configuring a separate action mapping for each method of same action class can be avoided by using a feature called Dynamic Method Invocation. We will learn about this in our upcoming tutorial.
Jsp
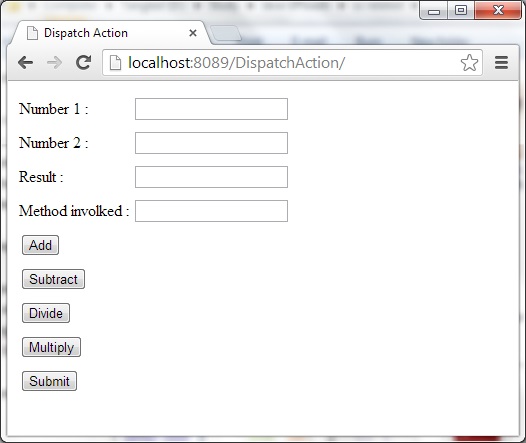
In the curd.jsp page we create five different buttons to invoke the different methods in the CalculatorAction class.
<%@ page language="java" contentType="text/html; charset=ISO-8859-1"
	pageEncoding="ISO-8859-1"%>
<%@taglib uri="/struts-tags" prefix="s"%>
<html>
<head>
<title>Dispatch Action</title>
</head>
<body>
<s:form action="Number">
<table>
	<tr><td><s:textfield name="number1" label="Number 1 " id="number1"/></td></tr>
	<tr><td><s:textfield name="number2" label="Number 2 " id="number2"/></td></tr>
	<tr><td><s:textfield name="result" label="Result " readonly="true" /></td></tr>
	<tr>
        <td><s:textfield name="methodName" label="Method involked " readonly="true" /></td>
        </tr>
	<tr>
	    <td><s:submit action="addNumber" value="Add" align="left"/></td>
       	    <td><s:submit action="subtractNumber" value="Subtract" align="left"/></td>
	    <td><s:submit action="divideNumber" value="Divide" align="left"/></td>
	    <td><s:submit action="multiplytNumber" value="Multiply" align="left"/></td>
	    <td><s:submit align="left"/></td>
	</tr>
</table>
</s:form>
</body>
</html>
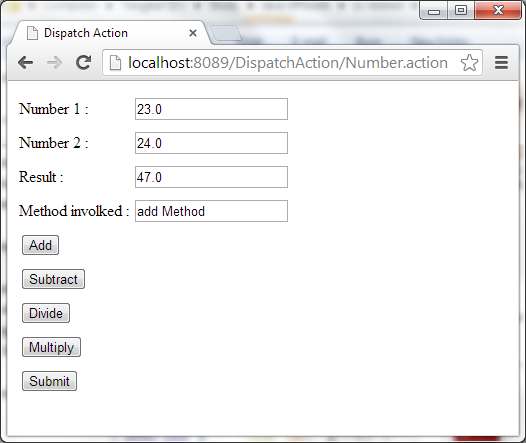
On running the example the following page will be displayed in the browser. Now when the user click a button the appropriate method in the CalculatorAction class gets invoked.
For example When the user clicks the add button the add() method in the CalculatorAction class gets executed and the following page is displayed.
|
|
Read More
Struts 2 Bean Tag
The bean tag is like a hybrid of the set and push tags. The main difference is that you don’t need to work with an existing object. You can create an instance of an object and either push it onto the ValueStack or set a top-level reference to it in the Action-Context. By default, the object will be pushed onto the ValueStack and will remain there for the duration of the tag.
** UPDATE: Struts 2 Complete tutorial now available here.
In this tutorial let us learn how to use the Struts 2 Bean Tag with the help of a DollarConverter bean example. In this example we will convert dollars to rupees.
|
|
1.Bean Class
File name : DollarConverter .java
package com.simplecode.action;

public class DollarConverter  {

	private double rupees;
	private double dollars;

	public double getRupees() {
		return dollars * 55;
	}

	public void setRupees(double rupees) {
		this.rupees = rupees;
	}

	public double getDollars() {
		return rupees / 55;
	}

	public void setDollars(double dollars) {
		this.dollars = dollars;
	}
}
The next step is to create an instance of the DollarConverter bean in the jsp page using the bean tag.
We can use the bean tag in two ways.
- By pushing the value onto the ValueStack.
- By setting a top-level reference to it in the ActionContext.
Let’s implement both the methods one by one.
Method 1
Hear we will see how we can do this by pushing the value onto the ValueStack. We do this using the following code in jsp.
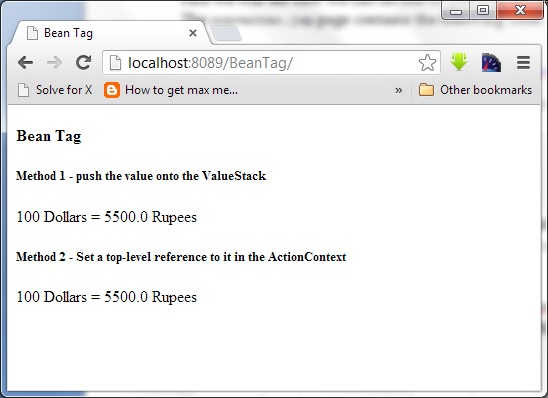
<h5>Method 1 - push the value onto the ValueStack</h5>
<s:bean name="com.simplecode.action.DollarConverter ">
<s:param name="dollars" value="100" />
100 Dollars = <s:property value="rupees" /> Rupees
</s:bean>
<br />
The name attribute of the bean tag hold the fully qualified class name of the JavaBean. The param tag is used to set the dollar value. We now use the property tag to retrive the equivalent value in rupees. The DollarConverter bean will resides on the ValueStack till the duration of the bean tag. So its important that we use the property tag within the bean tag.
Method 2
Now we will see how we can do the same by creating a top-level reference to the bean in the ActionContext. We do this using the following code.
<h5>Method 2 - Set a top-level reference to it in the ActionContext</h5>
<s:bean name="com.simplecode.action.DollarConverter " var="converter">
<s:param name="dollars" value="100"></s:param>
</s:bean>
100 Dollars = <s:property value="#converter.rupees" /> Rupees
To create an instance of the bean in the ActionContext we need to specify the instance name using the var attribute of the bean tag. Here our instance name is converter. Once we do this we can access the bean values outside the bean tag. Since the value is in the ActionContext we use the # operator to refer it.
4. Demo
http://localhost:8089/BeanTag
Output
Reference
- Struts 2 Bean Tag Tutorial – Dzone.com

Struts 2 Push Tag Example
Struts 2 “push” tag is used to push a value into the ValueStack. The value we pushed using push tag will be on top of the ValueStack, so it can be easily referenced using the first-level OGNL expression instead of a deeper reference. The following code show how to do this.
** UPDATE: Struts 2 Complete tutorial now available here.
|
|
1. Action
package com.simplecode.action;

import com.simplecode.util.AuthorBean;

//PushTag Action class
public class BookInfoAction {

	private AuthorBean authorBean;

	public String populate() {
	  authorBean = new AuthorBean
             ("Mohammed masjid", "Akuland Nz","8051 Micro Controller");
		return "populate";
	}

	public String execute() {
		return "success";
	}

	public AuthorBean getAuthorBean() {
		return authorBean;
	}

	public void setAuthorBean(AuthorBean authorBean) {
		this.authorBean = authorBean;
	}

}
2. Bean
A simple AuthorBean class, later will push it into the stack for easy access.
package com.simplecode.util;

public class AuthorBean {

	private String name;
	private String university;
	private String book;

	public AuthorBean(String name, String university, String book) {
		this.name = name;
		this.university = university;
		this.book = book;
	}

	public String getName() {
		return name;
	}

	public void setName(String name) {
		this.name = name;
	}

	public String getUniversity() {
		return university;
	}

	public void setUniversity(String university) {
		this.university = university;
	}

	public String getBook() {
		return book;
	}

	public void setBook(String book) {
		this.book = book;
	}

}
3. Push tag example
It shows the use of “push” tag.
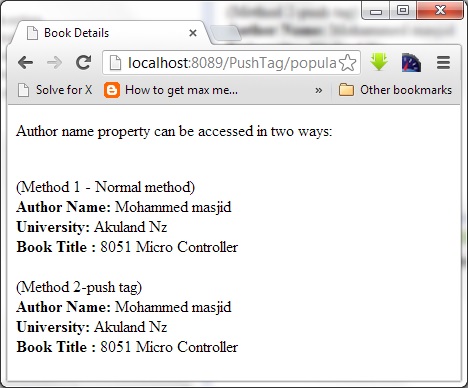
<%@taglib uri="/struts-tags" prefix="s"%>
<html>
<head>
<title>Book Details</title>
</head>
<body>
	<p>Author name property can be accessed in two ways:</p>

	<br /> (Method 1 - Normal method)
	<br /> <b>Author Name:</b>
	<s:property value="authorBean.name" />
	<br /> <b> University: </b>
	<s:property value="authorBean.university" />
	<br/><b>Book Title :</b>
	<s:property value="authorBean.book" />


	<br /> <br /> (Method 2-push tag)

	<s:push value="authorBean">
	   <b>Author Name:</b>
	   <s:property value="name" />
	   <b> University: </b>
	   <s:property value="university" />
	   <b>Book Title :</b>
	   <s:property value="book" />
	</s:push>

</body>
</html>
How it work?
Normally, if you want to get the bean’s property, you may reference it like
<s:property value="authorBean.name" />
With “push” tag, you can push the “authorBean” to the top of the stack, and access the property directly
<s:property value="name" />
Both are returned the same result, but with different access mechanism only.
4. Struts.xml
Link it
<?xml version="1.0" encoding="UTF-8" ?>
<!DOCTYPE struts PUBLIC
"-//Apache Software Foundation//DTD Struts Configuration 2.0//EN"
"http://struts.apache.org/dtds/struts-2.0.dtd">
<struts>
	<package name="default" extends="struts-default">
		<action name="*BookAction" method="{1}"
			class="com.simplecode.action.BookInfoAction">
			<result name="populate">/bookDetails.jsp</result>
		</action>
	</package>
</struts>
5. Demo
http://localhost:8089/PushTag/populateBookAction.action
Run it