
ModelDriven Interceptors in Struts 2
In our last article we have learned how to use a JavaBean class as a property in struts 2 action.
In this tutorial we will learn about Struts 2 support for model objects.
The Model object is a simple JavaBean object, which will be available to action class directly from ValueStack,
i.e we dont need to do deeper referencing to refer its attribute(JavaBeans attribute).
To make a JavaBean object as a model object, our Action class should implement ModelDriven interface which forces the getModel() method to be implemented. This method provides the model object to be pushed into the Value Stack.
Here the getModel() must be invoked earlier for populating its input properties with data from request parameters,
To make sure that the model is available in Value Stack when input parameters are being set, the ModelDrivenInterceptor is configured for the Action in struts.xml.
Most Popular Article for Reference
Since the ModelDriven interceptor is already included in the default stack, we don’t need to inculde modelDriven interceptor explicitly.
** UPDATE: Struts 2 Complete tutorial now available here.
Let’s see a sample example of POJO form, which can be injected in the action as its model.
Bean Class(Model Class)
File : User.java
package com.simplecode.bo;

public class User
{
	private String userName;

	public String getUserName()
	{
		return userName;
	}

	public void setUserName(String userName)
	{
		this.userName = userName;
	}
}
Action Class
Action class implements the ModelDriven interface, declared the getModel() method to return the user’s object. When the form data is submitted to this action, it will transfers the form data into the user properties automatically.
File : HelloAction.java
package com.simplecode.action;

import com.opensymphony.xwork2.Action;
import com.opensymphony.xwork2.ModelDriven;
import com.simplecode.bo.User;

public class HelloAction implements Action,ModelDriven<User>
{
	// Need to initialize model object
	private User user = new User();

	public String execute()
	{
		if (user.getUserName().isEmpty())
			return ERROR;
		else
			return SUCCESS;
	}

	public User getModel() {
		return user;
	}
}
Note:
1. Since the model object to be pushed into ValueStack must not be null hence model must be initialized before returned by getModel() method.
2. We can use only one model object per action class
Do read :
JSP page
JSP pages for the ModelDriven demonstration.
login.jsp
<%@taglib uri="/struts-tags" prefix="s"%>
<html>
<head>
<title>Login</title>
</head>
<body>
	<h3>Struts 2 ModelDriven Example</h3>

	<s:form action="hello">
		<s:textfield name="userName"  label="User name"/>
		<s:submit name="submit" />
	</s:form>
</body>
</html>
success.jsp
<%@ taglib prefix="s" uri="/struts-tags"%>
<html>
<head>
<title>Welcome Page</title>
</head>
<body>
	Welcome, <s:property value="userName" />
</body>
</html>
error.jsp
<%@ taglib prefix="s" uri="/struts-tags"%>
<html>
<head>
<title>Error Page</title>
</head>
<body>
Login failed! Please enter a valid user name
</body>
</html>
struts.xml
<?xml version="1.0" encoding="UTF-8" ?>
<!DOCTYPE struts PUBLIC
"-//Apache Software Foundation//DTD Struts Configuration 2.0//EN"
"http://struts.apache.org/dtds/struts-2.0.dtd">
<struts>
	<package name="default" extends="struts-default">
		<action name="hello" class="com.simplecode.action.HelloAction">
			<result name="success">/jsp/success.jsp</result>
			<result name="error">/jsp/error.jsp</result>
		</action>
	</package>
</struts>
Demo
http://localhost:8089/ModelDriven/
When I enter a non empty value in the textbox and press submit button, then the application redirects to success page as shown.
On Clicking submit button without any value in textbox, then the application redirects to error page as shown.
Remove .action extension in struts2 and to give user defined extension
In Struts 2, all action class by default has .action as extension.
For example, by default to access an action say LoginAction class, we will use the following URL
** UPDATE: Struts 2 Complete tutorial now available here.
Action URL: http://localhost:8089/Struts2/jsp/Login.action
So in order to remove or to give any user defined extension, just declare a constant “struts.action.extension” in struts.xml and set the value to the extension you wish.
For example to change the extension from .action to .jsp, the following code is used.
<constant name="struts.action.extension" value="jsp"/>
Output URL will be shown like this:-
Action URL: http://localhost:8089/Struts2/jsp/Login.jsp
Suppose If you want to shown empty extension URL try this:-
<constant name="struts.action.extension" value=""/>
Output URL will be shown like this:-
Action URL: http://localhost:8089/Struts2/jsp/Login
Hope This Help You :)
Struts 2 Namespace Configuration
Struts 2 Namespace is a new concept to handle the multiple modules by giving a namespace to each module
- The namespace attribute of element in struts.xml is an optional attribute. The default namespace is “” . i.e. an empty string.
- The value of your namespace must always begin with a “/”.
- Namespaces are used to group together a set of actions.
- An action with the same name can exist in several namespaces. The action that will be invoked depends upon the namespace in which it is called.
** UPDATE: Struts 2 Complete tutorial now available here.
See this picture to understand how an URL matches to Struts 2 action namespace.
1. Final project structure
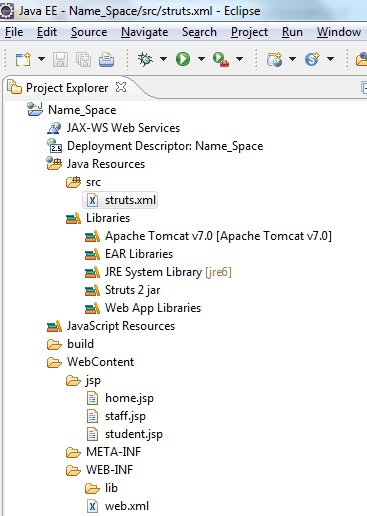
2. Namespace configuration
Let us go through a Struts 2 namespace configuration example to know how it matches with URL and folder.
The package “name” will not affect the result, just give a meaningful name.
File:struts.xml
<?xml version="1.0" encoding="UTF-8" ?>
<!DOCTYPE struts PUBLIC
	"-//Apache Software Foundation//DTD Struts Configuration 2.3//EN"
	"http://struts.apache.org/dtds/struts-2.3.dtd">

<struts>

	<package name="default" namespace="/" extends="struts-default">
		<action name="default">
			<result>jsp/home.jsp</result>
		</action>
	</package>

	<package name="staff" namespace="/staff" extends="struts-default">
		<action name="Staff">
			<result>/jsp/staff.jsp</result>
		</action>
	</package>

	<package name="student" namespace="/student" extends="struts-default">
		<action name="Student">
			<result>/jsp/student.jsp</result>
		</action>
	</package>

</struts>
3. JSP Pages
File:home.jsp
<%@ page language="java" contentType="text/html; charset=ISO-8859-1"
    pageEncoding="ISO-8859-1"%>
<html>
<head>
<title>Home</title>
</head>
<body>
<h2> Welcome user</h2>
</body>
</html>
File:Staff.jsp
<%@ page language="java" contentType="text/html; charset=ISO-8859-1"
	pageEncoding="ISO-8859-1"%>
<%@taglib uri="/struts-tags" prefix="s"%>
<html>
<head>
<meta http-equiv="Content-Type" content="text/html; charset=ISO-8859-1">
<title>Staff home page</title>
</head>
<body>
<h2>Welcome staff</h2>
</body>
</html>
File:Student.jsp
<%@ page language="java" contentType="text/html; charset=ISO-8859-1"
	pageEncoding="ISO-8859-1"%>
<%@taglib uri="/struts-tags" prefix="s"%>
<html>

<head>
<title>Student home page</title>
</head>
<body>
<h2>Welcome Student</h2>
</body>

</html>
4. Mapping - How it works?
Example 1
The URL : http://localhost:8089/Name_Space/student/Student.action
.
Will match the root namespace, and display the content of WebContent/jsp/student.jsp.
<package name="student" namespace="/student" extends="struts-default">
<action name="Student">
	<result>/jsp/student.jsp</result>
</action>
</package>
Example 2
URL : http://localhost:8089/Name_Space/staff/Staff.action
Will match the common namespace, and display the content of WebContent/jsp/staff.jsp
<package name="staff" namespace="/staff" extends="struts-default">
<action name="Staff">
	<result>/jsp/staff.jsp</result>
</action>
</package>
Example 3
URL : http://localhost:8089/Name_Space/default
Will match the common namespace, and display the content of WebContent/jsp/home.jsp.
<package name="default" namespace="/" extends="struts-default">
	<action name="default">
		<result>jsp/home.jsp</result>
	</action>
</package>
** UPDATE: Struts 2 Complete tutorial now available here.
Given below is the genaralised url
Http://<server>:<port>/<webapp>/<namespace>/<action>.action
 |
|
Read More
Struts 2- Include multiple Struts configuration files
Struts 2 comes with include file- feature to include multiple Struts configuration files into a single unit.
Single Struts configuration file
Bad way of Struts 2 configuration example (From Previous Example).
File:struts.xml
<?xml version="1.0" encoding="UTF-8" ?>
<!DOCTYPE struts PUBLIC
	"-//Apache Software Foundation//DTD Struts Configuration 2.3//EN"
	"http://struts.apache.org/dtds/struts-2.3.dtd">

<struts>

	<package name="default" namespace="/" extends="struts-default">
		<action name="default">
			<result>jsp/home.jsp</result>
		</action>
	</package>

	<package name="staff" namespace="/staff" extends="struts-default">
		<action name="Staff">
			<result>/jsp/staff.jsp</result>
		</action>
	</package>

	<package name="student" namespace="/student" extends="struts-default">
		<action name="Student">
			<result>/jsp/student.jsp</result>
		</action>
	</package>

</struts>
** UPDATE: Struts 2 Complete tutorial now available here.
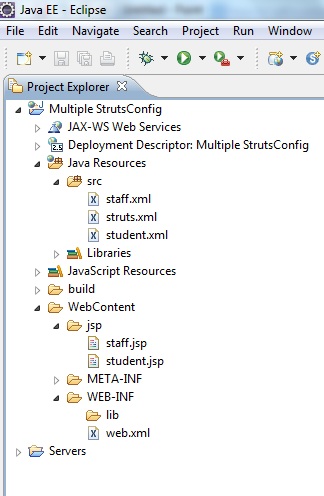
In the above Struts configuration file, it groups all the -student and staff- settings in a single file, which is not recommended and MUST BE AVOID. You should break this struts.xml file into smaller module related pieces. Multiple Struts configuration files In Struts 2, you should always assign each module a struts configuration file. In this case, you can create three files :
- student.xml - Put all student module settings here.
- staff.xml - Put all staff modules settings here.
- struts.xml - Put default settings and include the staff.xml and student.xml.
File:student.xml - Put all student module settings here.
<?xml version="1.0" encoding="UTF-8" ?>
<!DOCTYPE struts PUBLIC
	"-//Apache Software Foundation//DTD Struts Configuration 2.3//EN"
	"http://struts.apache.org/dtds/struts-2.3.dtd">

<struts>
	<package name="student" extends="struts-default">
		<action name="Student">
			<result>/jsp/student.jsp</result>
		</action>
	</package>
</struts>
File: Staff.xml – Put all staff modules settings here.
<?xml version="1.0" encoding="UTF-8" ?>
<!DOCTYPE struts PUBLIC
	"-//Apache Software Foundation//DTD Struts Configuration 2.3//EN"
	"http://struts.apache.org/dtds/struts-2.3.dtd">

<struts>
	<package name="staff" extends="struts-default">
		<action name="Staff">
			<result>/jsp/staff.jsp</result>
		</action>
	</package>
</struts>
File: Struts.xml – Put default settings and include the staff.xml and student.xml
<?xml version="1.0" encoding="UTF-8" ?>
<!DOCTYPE struts PUBLIC
	"-//Apache Software Foundation//DTD Struts Configuration 2.3//EN"
	"http://struts.apache.org/dtds/struts-2.3.dtd">

<struts>
<constant name="struts.enable.DynamicMethodInvocation" value="true" />

	<package name="default" namespace="/" extends="struts-default">
		<action name="default">
			<result>jsp/home.jsp</result>
		</action>
	</package>

	<include file="student.xml"/>
	<include file="staff.xml"/>

</struts>
Final project structure
Read More
Struts 2 FieldError Example
In this section, we are going to describe the fielderror tags. The fielderror tag is a UI tag that renders field errors if they exist.
** UPDATE: Struts 2 Complete tutorial now available here.
1. Folder Structure
2. Properties file
Properties files to store the messages.
LoginAction.properties
password.required = UserName Cannot be blank

username.required = Password Cannot be blank

details.display = Enter user name as simplecode and password as struts2 to Login

login_failed = Login failed
3. Action Class
Develop an action class using addFieldError(String fieldName, String errorMessage)method. This method adds an error message for a given field to the corresponding jsp page.
Here the error messages is added to each field individually using the addFieldError() method. The error messages can either be specified in a separate property file or can be added directly in the Action class itself.
package com.simplecode.action;
import com.opensymphony.xwork2.ActionSupport;

public class LoginAction extends ActionSupport
{
	private static final long serialVersionUID = 6677091252031583948L;
	private String userName;
	private String password;

	public String execute() {

		if (getUserName().equals("simplecode") && getPassword().equals("struts2")) {
			return SUCCESS;
		}
                else
                {
			if ("".equals(getUserName()) && "".equals(getPassword()))
                        {
				addFieldError("userName", getText("username.required"));
				addFieldError("password", getText("password.required"));
				return "fielderror";
			}
			if ("".equals(getPassword()))
                        {
				addFieldError("password", getText("password.required"));
				return "fielderror";
			}
			if ("".equals((getUserName())))
                        {
				addFieldError("userName", getText("username.required"));
				return "fielderror";
			}
			addFieldError("loginfailed", getText("login_failed"));
			addFieldError("logindetails", getText("details.display"));
		return ERROR;
		}
	}

	public String getUserName()
        {
		return userName;
	}

	public void setUserName(String userName)
        {
		this.userName = userName;
	}

	public String getPassword()
        {
		return password;
	}

	public void setPassword(String password)
        {
		this.password = password;
	}
}
4. JSP View Page
Create a Login jsp page as shown:
File: Login.jsp
Create a jsp page that will display your field error messages (when fails to logged-in) using the empty<s:fielderror/> tag as shown:
<%@taglib uri="/struts-tags" prefix="s"%>
<html>
<head>
<title>Login</title>
</head>
<body>
<s:form action="Login">
	<s:textfield name="userName" label="User Name" />
	<s:password name="password" label="Password" />
	<s:submit value="Submit" />
</s:form>
</body>
</html>
File : Error.jsp
<%@ taglib prefix="s" uri="/struts-tags"%>
<html>
<head>
<title>Un Authorised</title>
</head>
<body>
 <s:fielderror />
 </body>
</html>
File : Success.jsp
<%@taglib uri="/struts-tags" prefix="s"%>
<html>
<head>
<title>Login</title>
<s:head />
</head>
<body>
<h1>
Welcome	<s:property value="userName" />	, you are logged in successfully
</h1>
</body>
</html>
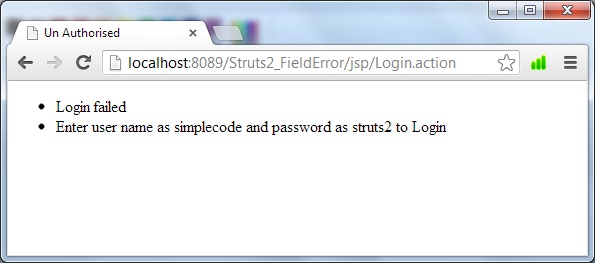
1. We have done the coding such that If the username and password are empty , then the user will be forwarded to login.jsp where the field error added using addFieldError will get displayed.
2.When the enter username and password is not equal to simplecode & struts2 , then it will be redirected to error.jsp where the tag <s:fielderror/> is used to display the FieldError
5. struts.xml
<!DOCTYPE struts PUBLIC
"-//Apache Software Foundation//DTD Struts Configuration 2.0//EN"
"http://struts.apache.org/dtds/struts-2.0.dtd">

<struts>
<package name="default" extends="struts-default" namespace="/jsp">
	<action name="Loginuser">
			<result>/jsp/login.jsp</result>
	</action>
	<action name="Login" class="com.simplecode.action.LoginAction">
		<result name="success">/jsp/success.jsp</result>
		<result name="error">/jsp/error.jsp</result>
		<result name="fielderror">/jsp/login.jsp</result>
		<result name="input">/jsp/login.jsp</result>
	</action>
</package>
</struts>
6. Run it
http://localhost:8089/Struts2_ActionError_&_ActionMessage/
When Username and password is empty, display error message with <s:actionerror/>
2
When Username and password is invalid, display error message set by <s:fielderror/>
|
|
Read More
Different ways to write struts 2 action class
The functionality of the action class is to retrieve resource bundle, hold the data, provide validation, perform business logic and select the view result page that should be sent back to the user.
There are four different ways to write struts 2 action class , which are as follows
1. Action
For Struts 2 actions, it is not mandatory to implement any interface or extend any class. It is only required to implement execute() method that returns a string which is to be used in struts.xml, to indicate the result page that has to be rendered(return)
** UPDATE: Struts 2 Complete tutorial now available here.
package com.simplecode.action;
public class LoginAction
{
     public String execute()
     {
     return "success";
     }
}
In the struts.xml, configure the action class with action tag and class attribute. Define which result page should be returned to the user with result tag and the name of the action you can use to access this action class with name attribute.
<package name="default" namespace="/jsp" extends="struts-default">
  <action name="Login" class="com.simplecode.LoginAction">
      <result name="success">jsp/welcome.jsp</result>
  </action>
<package>
Now you can access the action via
http://localhost:8089/StrutsLogin/jsp/Login
2. Action interface
The second way of creating Action class on Struts 2 is to implement an optional action interface (com.opensymphony.xwork2.Action).
This interface , comes with 5 common used constant values : success, error, none, input and logic. By implements this interface, the action class can use the constant value directly.
The Source code for Action interface :
package com.opensymphony.xwork2;
public interface Action
{
    public static final String SUCCESS = "success";
    public static final String NONE = "none";
    public static final String ERROR = "error";
    public static final String INPUT = "input";
    public static final String LOGIN = "login";
    public String execute() throws Exception;
}
Example: Struts 2 Action class implementing Action interface
package com.simplecode.user.action;
import com.opensymphony.xwork2.Action;
public class LoginAction implements Action
{
    public String execute()
    {
	return SUCCESS;
    }
}
3. ActionSupport
The third way of creating Action class on Struts 2 is to extend the ActionSupport class (com.opensymphony.xwork2.ActionSupport). The ActionSupport class is a very powerful and convenient class that provides default implementation of few of the important interfaces :
public class ActionSupport implements Action, Validateable,
   ValidationAware, TextProvider, LocaleProvider, Serializable
{
 ...
}
Instead of implementing Action interface, it is better to extend the ActionSupport, Since the ActionSupport class implements Action interface along with other useful interfaces.
The ActionSupport class give you the ability to do :
1. Validation Declare a validate() method and put the validation code inside.
2. Text localization Use GetText() method to get the message from resource bundle.
LoginAction.properties, (The resource bundle name must be same as Action class name with the extension .properties), and should be in the same folder where the action class lies
We will get to know about what is property file and the use of addFiendError , and use of other functionality like addActionError and addActionMessage in our upcoming tutorials.
Example: Struts 2 Action class extending ActionSupport class
package com.simplecode.action;
import com.opensymphony.xwork2.ActionSupport;

public class LoginAction extends ActionSupport
{
private static final long serialVersionUID = 6677091252031583948L;
private String userName;
private String password;

public String execute()
{
	if (userName.equalsIgnoreCase("simplecode")&& password.equals("java"))
        {
	return SUCCESS;
	}
        else
	return ERROR;
	}

	public String getUserName()
        {
		return userName;
	}

	public void setUserName(String userName)
        {
		this.userName = userName;
	}

	public String getPassword()
        {
		return password;
	}

	public void setPassword(String password)
        {
		this.password = password;
	}

	public void validate()
        {
	   if("".equals(getUserName()))
           {
	   addFieldError("userName", getText("username.required"));
	   }
           if("".equals(getPassword()))
           {
	   addFieldError("password", getText("password.required"));
	   }
	}
}
** UPDATE: Android Complete tutorial now available here.
4. Action annotation
Struts 2 has very good support for annotations, you can get rid of the XML file and replace with @action in your action class.
package com.simplecode.action;
import org.apache.struts2.convention.annotation.Action;
import org.apache.struts2.convention.annotation.Namespace;
import org.apache.struts2.convention.annotation.Result;
import org.apache.struts2.convention.annotation.ResultPath;
import com.opensymphony.xwork2.ActionSupport;
@Namespace("/jsp")
@ResultPath(value="/")
public class LoginAction extends ActionSupport
{
@Action(value="Login", results={@Result(name="success", location="jsp/welcome.jsp")})
	public String execute()
        {
 	return SUCCESS;
 	}
}
Read More