- Check user exist in session or not.
- Runs before every action to check .If someone try to access direct URL of welcome page and if he is not present in session then it will redirect towards login page.
- If user already in session then call the action called by user.
- If session time expired and if user clicks on any link, then redirect towards login page.
Login Interceptor in Struts 2
In our previous tutorial we have learned about concepts of interceptor and how interceptors gets execute before and after action class by creating a custom interceptor. In this article we shall create a custom LoginInterceptor which could be used in real time struts 2 application

This LoginInterceptor will perform these tasks:-
File : LoginInterceptor.java
package com.interceptor;

import java.util.Map;

import com.opensymphony.xwork2.Action;
import com.opensymphony.xwork2.ActionInvocation;
import com.opensymphony.xwork2.interceptor.AbstractInterceptor;

public class LoginInterceptor  extends AbstractInterceptor {

        @Override
	public String intercept(ActionInvocation invocation) throws Exception {
		Map<String, Object> session = invocation.getInvocationContext().getSession();

		String loginId = (String) session.get("loginId");

		if (loginId == null)
		{
			return Action.LOGIN;
		}
		else
		{
			return invocation.invoke();
		}
	}
}
Here LoginInterceptor class extended the “AbstractInterceptor” and in its intercept method we have written business which checks weather the user present in session or not.
In the intercept method, we can make use of com.opensymphony.xwork2.ActionInvocation i.e. Action Invocation object to get the action name trigger and decide on the further flow of application associated with it. On the similar lines we can also make use of the org.apache.struts2.ServletActionContext to get the request, response, session object etc. which can be used further to decide on flow of the application.
LoginAction.java
package com.action;

import java.util.Map;
import org.apache.struts2.interceptor.SessionAware;
import com.opensymphony.xwork2.ActionSupport;

public class LoginAction extends ActionSupport implements SessionAware {

	private static final long serialVersionUID = 1L;
	private String userName;
	private Map<String, Object> session;

	public String home() {
		return SUCCESS;
	}

	// Log Out user
	public String logOut() {
		session.remove("loginId");
		addActionMessage("You have been Successfully Logged Out");
		return SUCCESS;
	}

	// Login user
	public String login() {
		if (userName.isEmpty()) {
			addActionError("Username can't be blanked");
			return LOGIN;
		} else {
			session.put("loginId", userName);
			return SUCCESS;
		}
	}

	public String getUserName() {
		return userName;
	}

	public Map<String, Object> getSession() {
		return session;
	}

	public void setUserName(String userName) {
		this.userName = userName;
	}

	public void setSession(Map<String, Object> map) {
		this.session = map;
	}
}
LoginAction class with simple business logic, such as you can login with any username but cannot leave blank the mandatory fields.
Configuring the custom interceptors in struts.xml
Here we configure our custom interceptor named LoginInterceptor defining loginStack as default stack.
<struts>
<package name="default" extends="struts-default">
	<interceptors>
		<interceptor class="com.interceptor.LoginInterceptor" name="loginInterceptor">
		</interceptor>
		<interceptor-stack name="loginStack">
			<interceptor-ref name="loginInterceptor" />
			<interceptor-ref name="defaultStack" />
		</interceptor-stack>
	</interceptors>

	<!-- login action -->
	<action name="loginUser" class="com.action.LoginAction" method="login">
		<result name="success" type="redirect">homeAction</result>
		<result name="login">login.jsp</result>
	</action>

	<!-- home link action -->
	<action name="homeAction" class="com.action.LoginAction" method="home">
		<interceptor-ref name="loginStack" />
		<result name="login">login.jsp</result>
		<result name="success">home.jsp</result>
	</action>

	<!-- logout action -->
	<action name="logOut" class="com.action.LoginAction" method="logOut">
		<result>login.jsp</result>
	</action>
</package>
</struts>
web.xml:
In web.xml define session time out to 1 min, for demonstrating point 4
  <filter>
    <filter-name>struts2</filter-name>
    <filter-class>
	org.apache.struts2.dispatcher.ng.filter.StrutsPrepareAndExecuteFilter
    </filter-class>
  </filter>
  <filter-mapping>
    <filter-name>struts2</filter-name>
    <url-pattern>/*</url-pattern>
  </filter-mapping>
  <session-config>
    <session-timeout>1</session-timeout>
  </session-config>
  <welcome-file-list>
    <welcome-file>login.jsp</welcome-file>
  </welcome-file-list>
Demo
Now on running this application

Now on entering a valid User name and hitting Submit button, the following page get appeared.
Now once I hit logout link or if the session gets expired, then if the try to access the localhost:8089/LoginInterceptor/homeAction url, then the application redirects to Login page as shown below.

Interceptors in Struts 2
- Interceptors are introduced as part of the Struts2 framework, power mechanism for controlling request and are responsible for the most of request processing.
- Interceptors are invoked by controller before and after invoking action and sits between the controller and action.
- An interceptor allows common, cross-cutting tasks to be defined into a clean, reusable component, which is different than the “action” code.
- Tasks like data validation, type conversion, and file upload are done using interceptors in Struts2.0.
- The built-in interceptors, declared in the “defaultStack” of the “struts-default package”, handle most of the fundamental tasks.
Functioning of Interceptors
- From architectural point of view, interceptors improve separation of concerns in web applications.
- An example of a pre-processing task is the data transfer achieved with the “params” interceptor.
- Instead of having a simple controller that directly invokes an action, we now have a component that sits between the “controller” and the “action”.
- In Struts 2, no action is invoked in isolation, the invocation of an action is a layered process. It always includes the execution of a stack of interceptors prior to and after the actual execution of the action itself.
- Rather than directly invoking the action’s execute ( ) method, the framework creates an object called an “ActionInvocation”. This object encapsulates the action. Subsequently, all the interceptors that have been configured to fire before and after that “action” start their execution.
Interceptor Order
Diagrammatic Representation

- The figure above represents the normal workflow; here none of the interceptors have diverted the invocation. This “action” will ultimately execute and return a “control string” that selects the appropriate “result”.
- After the “result” execution, each of the interceptors, in reverse order, gets a chance to do some post-processing work.
- As we will see, the interceptors have access to the “action” and other contextual values. This allows them to be aware of what is happening during the processing.
- One of the powerful functional aspects of “interceptors” is their “ability to alter the workflow of the invocation”.
- As we noted, the figure shown in the above depicts an instance where none of the interceptors has intervened in the workflow. It thus allows the “action” to execute, and determine the result that should render the view.
- Sometimes, one of the interceptors will determine that the “action should not execute”. In such cases, the interceptor can halt the workflow by itself by returning a “control string”.
In our next article we shall learn to implement a custom interceptor in struts 2
GridView in Struts2 using jQuery DataTable via Ajax
In this post, I am going to explain on how to use DataTable plugin to display data in Gridview format with pagination feature in Struts 2 web application.
DataTable is a jQuery plugin which adds a lot of functionality to plain HTML tables, such as filtering, paging sorting, changing page length, server side processing etc.
Library
- struts2-json-plugin-x.x.x.jar
- DataTable Plugin
- OpenCSV(Optional – I am using this to deal with a csv file as data source instead of database to keep it simple)
- jQuery UI themes
In this example, I am going to retrieve values from a csv file and display it in html table. For this, I am going to use OpenCSV library which simplifies the work of parsing CSV files. Here the Data table will load the data by making an Ajax call.
Note:
• Refer the article on how to Read / Write CSV file in Java using Opencsv library/ .
Since the response to be generated from the action class is of type JSON, So to handle it you need struts2-json-plugin-2.x.x.jar. This plugin allows you to serialize the Action class attribute (which has getter and setter) into a JSON object. Refer this article here for more detail.
Now create a dynamic web project in eclipse and create two folders named ‘js’ and ‘css’ under WebContent, and add the following javascript files from DataTable to the ‘js’ folder
• jquery.dataTables.js
• jquery.js
Add the following css files from DataTable & jQuery ui to ‘css’ folder.
• demo_page.css
• demo_table_jui.css
• jquery-ui-x.x.x.css
** UPDATE: Struts 2 Complete tutorial now available here.
Download the csv file from which the data is to be read from here and place it under src folder, This files contains four columns – company, country, revenue, and year.
Project Structure

Model class
Create a model class that gets and sets the data from the four columns (company, country, revenue, and year) of the csv file.
package com.model;

public class RevenueReport {

	public RevenueReport(String company, String country, String year,
			String revenue) {
		this.company = company;
		this.country = country;
		this.year = year;
		this.revenue = revenue;
	}

	private String company;
	private String country;
	private String year;
	private String revenue;

	public String getCountry() {
		return country;
	}

	public String getRevenue() {
		return revenue;
	}

	public String getCompany() {
		return company;
	}

	public String getYear() {
		return year;
	}

	public void setCountry(String country) {
		this.country = country;
	}

	public void setRevenue(String revenue) {
		this.revenue = revenue;
	}

	public void setCompany(String company) {
		this.company = company;
	}

	public void setYear(String year) {
		this.year = year;
	}
}
Business class
Create a Business Service class that would fetch data from the csv file using model class.
package com.service;

import java.io.*;
import java.io.InputStreamReader;
import java.util.LinkedList;
import java.util.List;

import au.com.bytecode.opencsv.CSVReader;

import com.model.RevenueReport;

public class BusinessService {

public static List<RevenueReport> getCompanyList() {

	List<RevenueReport> listOfCompany = new LinkedList<RevenueReport>();
	String fileName = "Company_Revenue.csv";

	InputStream is = Thread.currentThread().getContextClassLoader()
			.getResourceAsStream(fileName);
	BufferedReader br = new BufferedReader(new InputStreamReader(is));

	try {
		CSVReader reader = new CSVReader(br);
		String[] row = null;
		while ((row = reader.readNext()) != null)
		{
		listOfCompany.add(new RevenueReport(row[0], row[1], row[2],	row[3]));
		}
		reader.close();
	} catch (IOException e) {
		System.err.println(e.getMessage());
	}
	return listOfCompany;
}
}
Jsp
Now create the jsp file to display the data fetched from csv file in html table and enhance the table features using DataTable plugin.
<!DOCTYPE html PUBLIC "-//W3C//DTD HTML 4.01 Transitional//EN" "http://www.w3.org/TR/html4/loose.dtd">
<html>
<head>
<title>Gridview in Struts2 using jQuery DataTable plugin</title>

<link href="css/demo_table_jui.css" rel="stylesheet" />
<link href="css/jquery-ui.css" rel="stylesheet" />
<link href="css/demo_page.css" rel="stylesheet" />

<script src="js/jquery.js"></script>
<script src="js/jquery.dataTables.js"></script>
<script>
$(document).ready(function() {
	$(".jqueryDataTable").dataTable({
		"sPaginationType" : "full_numbers",
		"bProcessing" : false,
		"bServerSide" : false,
		"sAjaxSource" : "dataTablesAction",
		"bJQueryUI" : true,
		"aoColumns" : [
            { "mData": "company" },
            { "mData": "country" },
            { "mData": "year" },
            { "mData": "revenue" }
        ]
    } );
} );
</script>

</head>

<body id="dt_example">
<div id="container">
<h1>Ajax based Gridview in Struts2 using jQuery DataTable plugin</h1>
<div id="demo_jui">
	<table class="display jqueryDataTable">
	<thead>
	<tr>
		<th>Company</th>
		<th>Country</th>
		<th>Year</th>
		<th>Revenue</th>
	</tr>
	</thead>
	<tbody>
	</tbody>
	</table>
</div>
</div>
</body>
</html>
Do read :
Action class
In reply to each request for information that DataTables makes to the server, it expects to get a well formed JSON object with the parameter below.
1. aaData- The data in a 2D array.
package com.action;

import java.util.List;

import com.model.RevenueReport;
import com.opensymphony.xwork2.Action;
import com.service.BusinessService;

public class GridViewAction implements Action {

	private List<RevenueReport> aaData;

	public List<RevenueReport> getAaData() {
		return aaData;
	}

	public void setAaData(List<RevenueReport> aaData) {
		this.aaData = aaData;
	}

	public String execute() {
		aaData = BusinessService.getCompanyList();
		return SUCCESS;
	}
}
struts.xml
<struts>
  	<package name="default" extends="json-default">
		<action name="dataTablesAction" class="com.action.GridViewAction">
                        <result type="json">
                           <param name="excludeNullProperties">true</param>
                          <param name="noCache">true</param>
                       </result>
		</action>
	</package>

</struts>
Note that I have extended “json-default” package instead of struts-default package and I have set the result type to json, I have explained about the reason for extending “json-default” package in the article AJAX implementation in Struts 2 using JQuery and JSON, please refer the mentioned link if you are not aware of the same.
Recommended reading:
web.xml
Make sure you have done servlet mapping properly in web.xml file as shown below
<web-app>
<display-name>Struts2</display-name>
<filter>
	<filter-name>struts2</filter-name>
	<filter-class>
	 org.apache.struts2.dispatcher.ng.filter.StrutsPrepareAndExecuteFilter
        </filter-class>
</filter>
<filter-mapping>
	<filter-name>struts2</filter-name>
	<url-pattern>/*</url-pattern>
</filter-mapping>
<welcome-file-list>
	<welcome-file>index.jsp</welcome-file>
</welcome-file-list>
</web-app>
Demo


Struts 2 and Tiles Framework Integration
Apache Tiles is a templating framework used to simplify the development of web application user interfaces. Tiles allow defining page fragments which can be combined into a complete page at runtime. These fragments, or tiles, can be used as reusable templates in order to reduce the duplication of common page elements or even embedded within other tiles. See the snapshot below.
** UPDATE: Struts 2 Complete tutorial now available here.
Advantage of tiles framework
- Code reusability
- Easy to modify
- Easy to remove
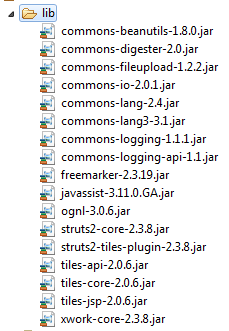
Jar Required
Folder structure

web.xml
Provide entry of listener class Struts2TilesListener in the web.xml file.
  <listener>
    <listener-class>org.apache.struts2.tiles.StrutsTilesListener</listener-class>
  </listener>
Recommended Article
Jsp Pages
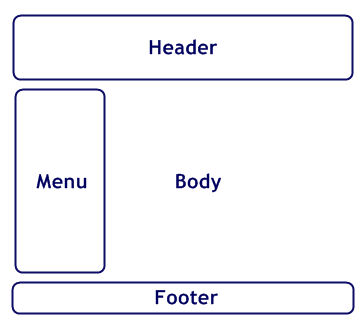
Now We will define the template for our web application in baseLayout.jsp file. This template will contain different segments of web page (Header, Footer, Menu, Body).
File : baseLayout.jsp
<%@ taglib uri="http://tiles.apache.org/tags-tiles" prefix="tiles"%>
<!DOCTYPE HTML PUBLIC "-//W3C//DTD HTML 4.01 Transitional//EN"
   "http://www.w3.org/TR/html4/loose.dtd">
<html>
<head>
<meta http-equiv="Content-Type" content="text/html; charset=UTF-8">
<title><tiles:insertAttribute name="title" ignore="true" /></title>
<style>
.one {
	border-style: solid;
	border-color: #0000ff;
	border-collapse: collapse;
}
</style>
</head>
<body>
<table border="1" align="center" class="one" width="80%">
	<tr>
		<td height="30" colspan="2" class="one" width="20%">
			<tiles:insertAttribute name="header" />
		</td>
	</tr>
	<tr>
		<td height="250" class="one">
			<tiles:insertAttribute name="menu" />
		</td>
		<td width="350" class="one">
	    	<tiles:insertAttribute name="body" />
		</td>
	</tr>
	<tr>
		<td height="30" colspan="2" class="one">
	        <tiles:insertAttribute name="footer" />
		</td>
	</tr>
</table>
</body>
</html>
File : header.jsp
<html>
<body>
<div align="center" style="color: gray; font-weight: bold;">
Struts 2 - Tiles Demo - Header page
</div>
</body>
</html>
File : footer.jsp
<html>
<body>
<div align="center" style="color: gray; font-weight: bold;">
Footer	page © SimpleCodeStuffs.com
</div>
</body>
</html>
File : body.jsp
<html>
<body>
	<p align="center" style="color: gray;font-weight: bold;">Home Page</p>
</body>
</html>
File : menu.jsp
<%@taglib prefix="s" uri="/struts-tags"%>
<html>
<body>
	<s:url action="strutsAction" var="strutsAction" />
	<s:url action="springAction" var="springAction" />
	<div align="center">
		Menu <br /> <br /> <br /> <br />

		<s:a href="%{strutsAction}">Struts Tutorial</s:a>
		<br /> <br />
		<s:a href="%{springAction}">Spring Tutorial</s:a>
	</div>
	<br>
</body>
</html>
File : springTutorial.jsp
<html>
<body>
<p align="center" style="color: gray;font-weight: bold;">Spring Tutorial !!!</p>
</body>
</html>
File : strutsTutorial.jsp
<html>
<body>
	<p align="center" style="color: gray;font-weight: bold;">Struts Tutorial !!!</p>
</body>
</html>
File : index.jsp
It triggers homeAction during application start up
<META HTTP-EQUIV="Refresh" CONTENT="0;URL=homeAction">
Action Class
package com.simplecodestuffs.action;

public class TilesAction {

	public String home() {
		return "home";
	}

	public String struts() {
		return "struts";
	}

	public String spring() {
		return "spring";
	}
}
struts.xml
In struts.xml, inherit the tiles-default package and define all the result type as tiles
<!DOCTYPE struts PUBLIC
"-//Apache Software Foundation//DTD Struts Configuration 2.0//EN"
"http://struts.apache.org/dtds/struts-2.0.dtd">

<struts>
<package name="default" extends="tiles-default">
	<action name="*Action" method="{1}" class="com.simplecodestuffs.action.TilesAction">
		<result name="home" type="tiles">home</result>
		<result name="struts" type="tiles">struts</result>
		<result name="spring" type="tiles">spring</result>
	</action>
</package>
</struts>
Do read :
tiles.xml
The tiles.xml file must be located inside the WEB-INF directory, in which define all the tiles definitions
<?xml version="1.0" encoding="UTF-8" ?>

<!DOCTYPE tiles-definitions PUBLIC
"-//Apache Software Foundation//DTD Tiles Configuration 2.0//EN"
"http://tiles.apache.org/dtds/tiles-config_2_0.dtd">

<tiles-definitions>

<definition name="baseLayout" template="/baseLayout.jsp">
	<put-attribute name="title" value="Template" />
	<put-attribute name="header" value="/header.jsp" />
	<put-attribute name="menu" value="/menu.jsp" />
	<put-attribute name="body" value="/body.jsp" />
	<put-attribute name="footer" value="/footer.jsp" />
</definition>

<definition name="home" extends="baseLayout">
	<put-attribute name="title" value="Home" />
	<put-attribute name="body" value="/home.jsp" />
</definition>

<definition name="struts" extends="baseLayout">
	<put-attribute name="title" value="Struts Tutorial" />
	<put-attribute name="body" value="/strutsTutorial.jsp" />
</definition>

<definition name="spring" extends="baseLayout">
	<put-attribute name="title" value="Spring Tutorial" />
	<put-attribute name="body" value="/springTutorial.jsp" />
</definition>

</tiles-definitions>
Demo
Home Page with Tiles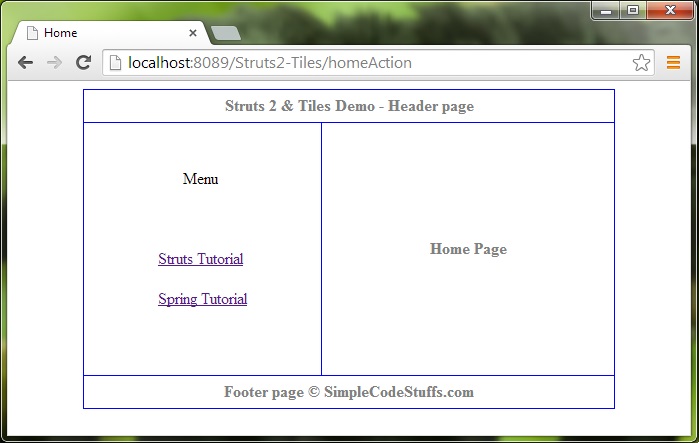
Struts Page with Tiles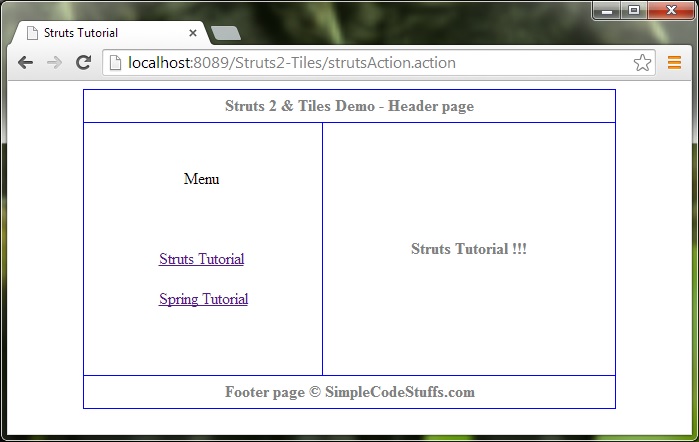
Spring Page with Tiles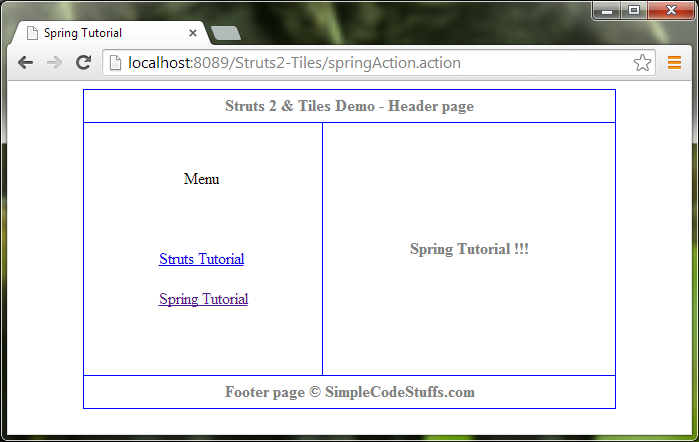
How to define multiple tiles files in struts 2 application?
To define multiple tiles, you need to add following entry in your web.xml file.
<context-param id="struts_tiles">
<param-name>org.apache.tiles.impl.BasicTilesContainer.DEFINITIONS_CONFIG
</param-name>
<param-value>
/WEB-INF/tiles1.xml,/WEB-INF/tiles2.xml</param-value>
</context-param>
 |
|
Read More

Struts2-Jfreechart integration
In this article we will learn to integrate Struts 2 with JFreeChart using struts2-jfreechart-plugin-x.x.x.jar for creating a pie chart in web application using JFreeChart library.
The JFreeChart is easiest and the most widely used library for creating a wide variety of good looking charts.
The Struts-JFreeChart plugin allows Struts 2 Actions to easily return generated charts and graphs.
Instead of streaming a generated chart directly to the HTTP response, this plugin provides a ChartResult, which handles the generation for you. This allows you to generate the chart in one class, and render it out in another class, effectively decoupling the view from the Actions.
** UPDATE: Struts 2 Complete tutorial now available here.
Libraries required :
- struts2-jfreechart-plugin-x.x.x.jar
- Commonly required Struts 2 jars
- jfreechart-x.x.x.jar
- jcommon-x.x.x.jar
Jfreechart library can be downloaded here.
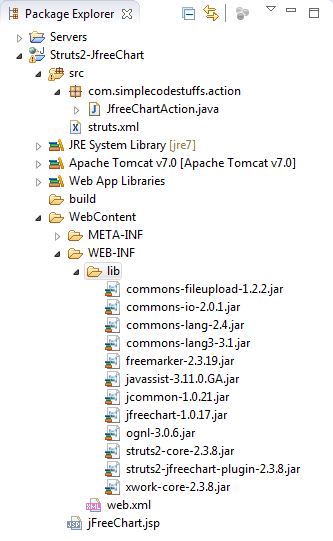
Now Create a New Dynamic Web Project in eclipse with following folder structure
Struts 2 Action
File : JfreeChartAction.java
package com.simplecodestuffs.action;
import org.jfree.chart.ChartFactory;
import org.jfree.chart.JFreeChart;
import org.jfree.data.general.DefaultPieDataset;
import com.opensymphony.xwork2.Action;
public class JfreeChartAction implements Action {
private JFreeChart chart;
public String execute() throws Exception {
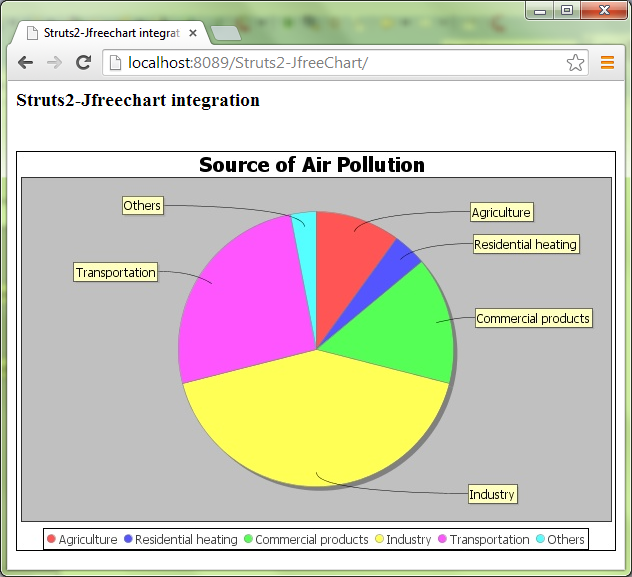
DefaultPieDataset dataSet = new DefaultPieDataset();
dataSet.setValue("Agriculture", 10);
dataSet.setValue("Residential heating", 4);
dataSet.setValue("Commercial products", 15);
dataSet.setValue("Industry", 42);
dataSet.setValue("Transportation", 26);
dataSet.setValue("Others", 3);
chart = ChartFactory.createPieChart(
"Source of Air Pollution ", // Title
dataSet, // Data
true, // Display the legend
true, // Display tool tips
false // No URLs
);
chart.setBorderVisible(true);
return SUCCESS;
}
// This method will get called if we specify <param name="value">chart</param>
public JFreeChart getChart() {
return chart;
}
}
Recommended reading:
Here Jfreechart provides DefaultPieDataset method to set static data and createPieChart() method creates the pie chart using the dataset.
struts.xml
To use the plugin, have your Struts configuration package extend the jfreechart-default package, which provides the chart result type.
<?xml version="1.0" encoding="UTF-8" ?>
<!DOCTYPE struts PUBLIC
"-//Apache Software Foundation//DTD Struts Configuration 2.0//EN"
"http://struts.apache.org/dtds/struts-2.0.dtd">
<struts>
   <!-- package should extend jfreechart-default package -->
   <package name="default" namespace="/" extends="jfreechart-default">
       <action name="displayChart" class="com.simplecodestuffs.action.JfreeChartAction">
            <result name="success" type="chart">
		<param name="value">chart</param>
		<param name="type">jpeg</param>
		<param name="width">600</param>
		<param name="height">400</param>
	    </result>
	</action>
   </package>
</struts>
Jsp page
<html>
<head>
<title>Struts2-Jfreechart integration</title>
</head>
<body>
     <h3>Struts2-Jfreechart integration</h3>
     <br />
     <img src="displayChart"/>
</body>
</html>
In Jsp, servlet is called via img tag’s src attribute. This triggers the Action and render the image on the page.
** UPDATE: To Create Auto-Refreshing Pie Chart dynamically the following tutorial will help here.
Demo
Now right click on the project name and select Run As –> Run on Server.
Introduction to Struts 2 Framework
In our last article we have learned about the difference between Model 1 and Model 2 (MVC) Architecture. In this article we will learn about Struts 2 framework and about the Architecture which it follows.
In general if you are about to build a standard application using JSP and Servlets, then you will end up in a following MVC pattern.

** UPDATE: Struts 2 Complete tutorial now available here.
Why web Framework ?
Web framework is a basic ready made underlying of MVC structure, where you have to just add components related to your business. It forces the team to implement their code in a standard way. (helps debugging, fewer bugs etc).
Step involved in building a framework.
Step 1: Router to route the request to the correct MODEL and correct View layer
Step 2: Handle the request parameters
Step 3: Create a interface class(Model) for business service class
Step 4: View part(Jsp) to render the result
The above steps are depicted photographically below.
Struts 2 developers have identified all these modules and had builded the same. Below is how a struts 2 design will look like.
Here Interceptor is the gate way through which a request is passed. It takes care of getting user request parameters,
Struts 2 framework get all the request parameters from interceptor and makes it available for Action class and we don’t need to fetch it in the action class via any request or session objects like we do in Servlets, because struts 2 makes it available.
Here Struts.xml acts as controller which Controls the execution flow of the request, Action class represents Model and JSP represent View layer.
Note:
In struts 2 the data can be displayed in jsp with tab library,
In our next tutorial, we will learn to set up struts 2 environment in eclipse.