Posted by Mohaideen Jamil in jQuery, jTable, Struts 2 Tutorial, Struts-2 | 25 comments
In this article we will learn to setup jTable and dependent libraries in Struts 2 web application. jTable is a jQuery plugin which is used to create AJAX based CRUD tables without coding HTML or Javascript, to know more about jTable please refer the article here
Steps done to set up our application for jTable
Libraries required for the setup,
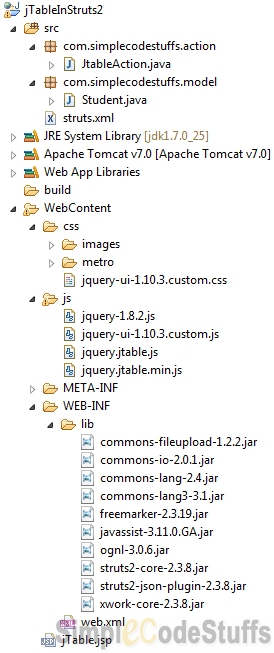
Now to start with demonstration of above topic, let us Create a Dynamic Web Project in Eclipse, with following project structure.
As show in the image download the required library mentioned and place it in js and css folder of eclipse work-space, and refer these files in the head section in the jsp as shown below.
Setup done from the browser perspective: jTable
jTable plugin allows you to issue an ajax request via jQuery plugin and expects a JSON object as a response, hence the following configuration needs to be made in Jsp file
Jsp Page
File : jTable.jsp
<html>
<head>
<title>jTable in Struts 2</title>
<!-- jTable Metro theme -->
<link href="css/metro/blue/jtable.css" rel="stylesheet" type="text/css" />
<link href="css/jquery-ui-1.10.3.custom.css" rel="stylesheet"
	type="text/css" />

<!-- jTable script file. -->
<script src="js/jquery-1.8.2.js" type="text/javascript"></script>
<script src="js/jquery-ui-1.10.3.custom.js" type="text/javascript"></script>
<script src="js/jquery.jtable.js" type="text/javascript"></script>
<script type="text/javascript">
	$(document).ready(function() {
		$('#StudentTableContainer').jtable({
			title : 'Students List',
			actions : {
				listAction : 'listAction'
			},
			fields : {
				studentId : {
					title : 'Student Id',
					width : '30%',
					key : true,
					list : true,
					create : true
				},
				name : {
					title : 'Name',
					width : '30%',
					edit : false
				},
				department : {
					title : 'Department',
					width : '30%',
					edit : true
				},
				emailId : {
					title : 'Email',
					width : '20%',
					edit : true
				}
			}
		});
		$('#StudentTableContainer').jtable('load');
	});
</script>

</head>
<body>
<div>
	<h3>Integrating jTable jQuery plugin and Struts 2 framework</h3>
	    <div id="StudentTableContainer"></div>
</div>
</body>
</html>
As you can see, jTable just needs a div container as the only HTML tag. It fields options are explained below:
title: Title of the table.
actions: URLs of actions that are used to create/delete/update/list records.
fields: It defines the field names that represent columns of the record. Note that the field name should exactly match the instance variable defined in the model class.
Setup done from the server’s perspective: Struts 2 Action class
In the Action class, we are populating a list of type “Student”(Model). Since jTable accepts data only in Json format, so we are converting this List (Java Object) to Json(Javascript object Notation) format using struts2-json-plugin.jar.
**Update:: In the article AJAX implementation in Struts 2 using JQuery and JSON I have explained about usage of struts2-json-plugin.jar clearly, So if you are not aware of how struts2-json-plugin works, then please go thorough the above mentiioned link.
Action Class
package com.simplecodestuffs.action;

import java.util.ArrayList;
import java.util.List;

import com.opensymphony.xwork2.Action;
import com.simplecodestuffs.model.Student;

public class JtableAction {

	private List<Student> records = new ArrayList<Student>();
	private String result;

	public String list() {
		// Add data to Student list
		records.add(new Student(1, "Haripriya", "IT", "[email protected]"));
		records.add(new Student(2, "Dinesh", "ECE", "[email protected]"));
		records.add(new Student(3, "Prabhu", "MECH", "[email protected]"));
		records.add(new Student(4, "Badru", "ECE", "[email protected]"));
		records.add(new Student(5, "Lahir nisha", "CSC", "[email protected]"));
		records.add(new Student(6, "Nilafar nisha", "CSC", "[email protected]"));
		records.add(new Student(7, "Jamil", "ECE", "[email protected]"));
		records.add(new Student(8, "Mahes", "ECE", "[email protected]"));
		records.add(new Student(9, "Lourde", "IT", "[email protected]"));
		result = "OK";

		return Action.SUCCESS;
	}

	public List<Student> getRecords() {
		return records;
	}

	public void setRecords(List<Student> records) {
		this.records = records;
	}

	public String getResult() {
		return result;
	}

	public void setResult(String result) {
		this.result = result;
	}
}
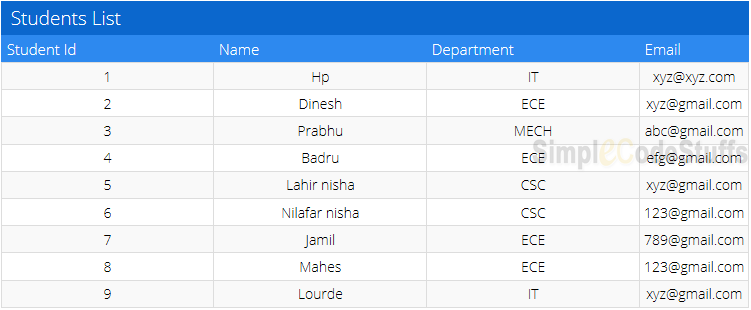
In case of read operations in jTable, Result property must be “OK” if operation is successful. If an error occurs, then Result property must be “ERROR”. If Result is “OK”, the Records property will contain an array of records defined in the action class. If it’s ERROR, a Message property will contain an error message to show to the user. A sample return value for listAction is show below
{
"Result":"OK",
"Records":
[{
"studentId":1,
"name":"Haripriya",
"department":"IT",
"emailId":"[email protected]"
}]
}
Model Class
Create the Model class which will have getters and setters for fields specified in jTable script.
package com.simplecodestuffs.model;

public class Student {

	public Student() {
	}

	public Student(int studentId, String name, String department, String emailId) {
		super();
		this.studentId = studentId;
		this.name = name;
		this.department = department;
		this.emailId = emailId;
	}

	private int studentId;
	private String name;
	private String department;
	private String emailId;

	public int getStudentId() {
		return studentId;
	}

	public String getName() {
		return name;
	}

	public String getDepartment() {
		return department;
	}

	public String getEmailId() {
		return emailId;
	}

	public void setStudentId(int studentId) {
		this.studentId = studentId;
	}

	public void setName(String name) {
		this.name = name;
	}

	public void setDepartment(String department) {
		this.department = department;
	}

	public void setEmailId(String emailId) {
		this.emailId = emailId;
	}
}
Struts.xml
<?xml version="1.0" encoding="UTF-8" ?>
<!DOCTYPE struts PUBLIC
"-//Apache Software Foundation//DTD Struts Configuration 2.0//EN"
"http://struts.apache.org/dtds/struts-2.0.dtd">
<struts>
<package name="default" extends="json-default">
   <action name="listAction" class="com.simplecodestuffs.action.JtableAction"
	method="list">
	<result type="json">/jTable.jsp</result>
  </action>
  <action name="getJSONResult" class="com.simplecodestuffs.action.JtableAction" method="list">
	<result type="json" />
  </action>
</package>
</struts>
Since jTable accepts data only in Json format, So in order to convert java object to json object I have extended json-default package instead of struts-default package, please refer article here for more detail on json-default package.
Demo
On running the application i got the following response
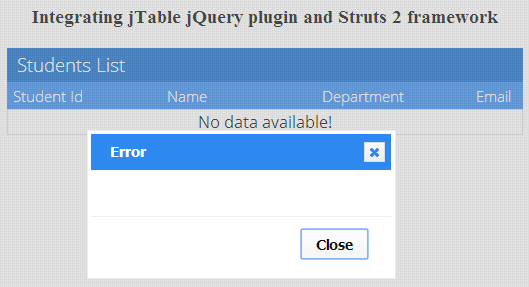
Since I have not handled any exception, so the message displayed in error box is empty.
While debugging the error I found that the json response formed in struts application as below.

Hear the property names of jTable plugin are case sensitive. Only “Result”, “Records” and “Message” will work. In struts 2 the “json response” generated is in lower case["result", "records" and "message"], hence I edited the jtable.js to replace Result to result, Records to records and Message to message then it worked.
**Note: Along with the above keyword replace TotalRecordCount to totalRecordCount respectively, since this parameter will be used to display pagination count(Which I will implement in upcoming tutorial)
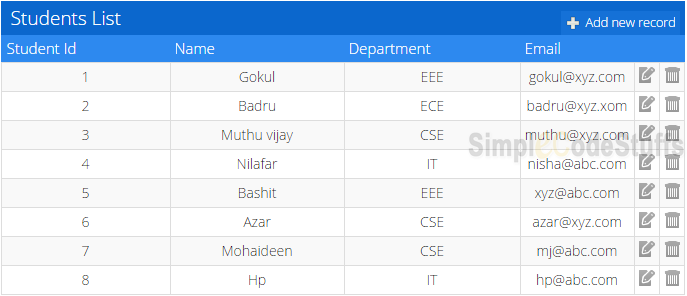
Now on including action for create, update and delete in jsp page as below
actions : {
	listAction : 'list',
	createAction : 'create',
	updateAction : 'update',
	deleteAction : 'delete'
}
On running the application
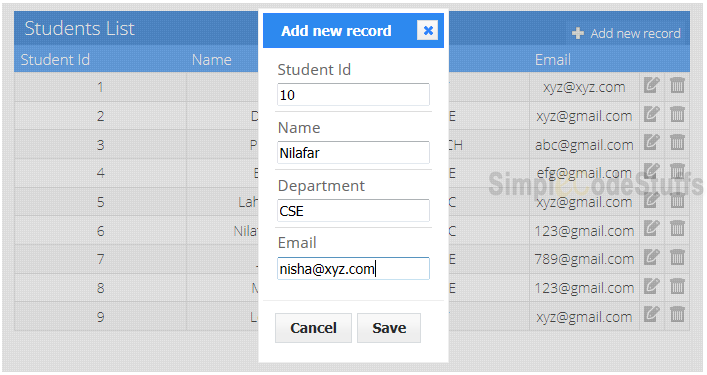
On clicking ‘Add new record’
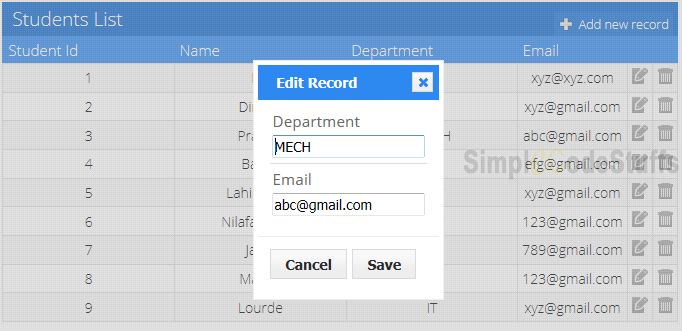
On clicking edit button
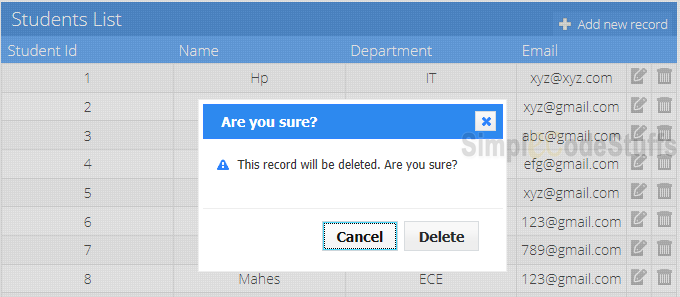
On clicking delete button
Note :
In the above program I have not included the logic for create, delete and update functions. In the article CRUD Operations in Struts 2 using jTable jQuery plugin via Ajax I have implemented CRUD operation using jTable jQuery plugin in Struts 2, and in the article Pagination in Struts 2 using jQuery jTable plugin I have implemented paging feature using the same plugin.

Reference
jTable official website
AJAX based CRUD tables using ASP.NET MVC 3 and jTable jQuery plug-in
Read MorePosted by Mohaideen Jamil in Struts 2 Tutorial, Struts-2
In our last article we have learned how to use a JavaBean class as a property in struts 2 action.
In this tutorial we will learn about Struts 2 support for model objects.
The Model object is a simple JavaBean object, which will be available to action class directly from ValueStack,
i.e we dont need to do deeper referencing to refer its attribute(JavaBeans attribute).
To make a JavaBean object as a model object, our Action class should implement ModelDriven interface which forces the getModel() method to be implemented. This method provides the model object to be pushed into the Value Stack.
Here the getModel() must be invoked earlier for populating its input properties with data from request parameters,
To make sure that the model is available in Value Stack when input parameters are being set, the ModelDrivenInterceptor is configured for the Action in struts.xml.
Most Popular Article for Reference
Since the ModelDriven interceptor is already included in the default stack, we don’t need to inculde modelDriven interceptor explicitly.
** UPDATE: Struts 2 Complete tutorial now available here.
Let’s see a sample example of POJO form, which can be injected in the action as its model.
Bean Class(Model Class)
File : User.java
package com.simplecode.bo;

public class User
{
	private String userName;

	public String getUserName()
	{
		return userName;
	}

	public void setUserName(String userName)
	{
		this.userName = userName;
	}
}
Action Class
Action class implements the ModelDriven interface, declared the getModel() method to return the user’s object. When the form data is submitted to this action, it will transfers the form data into the user properties automatically.
File : HelloAction.java
package com.simplecode.action;

import com.opensymphony.xwork2.Action;
import com.opensymphony.xwork2.ModelDriven;
import com.simplecode.bo.User;

public class HelloAction implements Action,ModelDriven<User>
{
	// Need to initialize model object
	private User user = new User();

	public String execute()
	{
		if (user.getUserName().isEmpty())
			return ERROR;
		else
			return SUCCESS;
	}

	public User getModel() {
		return user;
	}
}
Note:
1. Since the model object to be pushed into ValueStack must not be null hence model must be initialized before returned by getModel() method.
2. We can use only one model object per action class
Do read :
Difference between Action Chaining & Action redirect in Struts 2 GridView in struts 2 using jQuery DataTable pluginAutocomplete in Struts 2 using Jquery via Ajax
JSP page
JSP pages for the ModelDriven demonstration.
login.jsp
<%@taglib uri="/struts-tags" prefix="s"%>
<html>
<head>
<title>Login</title>
</head>
<body>
	<h3>Struts 2 ModelDriven Example</h3>

	<s:form action="hello">
		<s:textfield name="userName"  label="User name"/>
		<s:submit name="submit" />
	</s:form>
</body>
</html>
success.jsp
<%@ taglib prefix="s" uri="/struts-tags"%>
<html>
<head>
<title>Welcome Page</title>
</head>
<body>
	Welcome, <s:property value="userName" />
</body>
</html>
error.jsp
<%@ taglib prefix="s" uri="/struts-tags"%>
<html>
<head>
<title>Error Page</title>
</head>
<body>
Login failed! Please enter a valid user name
</body>
</html>
struts.xml
<?xml version="1.0" encoding="UTF-8" ?>
<!DOCTYPE struts PUBLIC
"-//Apache Software Foundation//DTD Struts Configuration 2.0//EN"
"http://struts.apache.org/dtds/struts-2.0.dtd">
<struts>
	<package name="default" extends="struts-default">
		<action name="hello" class="com.simplecode.action.HelloAction">
			<result name="success">/jsp/success.jsp</result>
			<result name="error">/jsp/error.jsp</result>
		</action>
	</package>
</struts>
Demo
http://localhost:8089/ModelDriven/
When I enter a non empty value in the textbox and press submit button, then the application redirects to success page as shown.
On Clicking submit button without any value in textbox, then the application redirects to error page as shown.
Read MorePosted by Mohaideen Jamil in Struts 2 Tutorial, Struts-2
The functionality of the action class is to retrieve resource bundle, hold the data, provide validation, perform business logic and select the view result page that should be sent back to the user.

There are four different ways to write struts 2 action class , which are as follows
1. Action
For Struts 2 actions, it is not mandatory to implement any interface or extend any class. It is only required to implement execute() method that returns a string which is to be used in struts.xml, to indicate the result page that has to be rendered(return)
** UPDATE: Struts 2 Complete tutorial now available here.
package com.action;
public class LoginAction
{
     public String execute()
     {
     return "success";
     }
}
In the struts.xml, configure the action class with action tag and class attribute. Define which result page should be returned to the user with result tag and the name of the action you can use to access this action class with name attribute.
<package name="default" extends="struts-default">
  <action name="login" class="com.action.LoginAction">
      <result name="success">success.jsp</result>
  </action>
<package>
Now you can access the action via
http://localhost:8089/StrutsLogin/login
2. Action interface
The second way of creating Action class on Struts 2 is to implement an optional action interface (com.opensymphony.xwork2.Action).
This interface , comes with 5 common used constant values : success, error, none, input and logic. By implements this interface, the action class can use the constant value directly.
The Source code for Action interface :
package com.opensymphony.xwork2;
public interface Action
{
    public static final String SUCCESS = "success";
    public static final String NONE = "none";
    public static final String ERROR = "error";
    public static final String INPUT = "input";
    public static final String LOGIN = "login";
    public String execute() throws Exception;
}
Example: Struts 2 Action class implementing Action interface
package com.action;
import com.opensymphony.xwork2.Action;
public class LoginAction implements Action
{
    public String execute()
    {
	return SUCCESS;
    }
}
3. ActionSupport
The third way of creating Action class on Struts 2 is to extend the ActionSupport class (com.opensymphony.xwork2.ActionSupport). The ActionSupport class is a very powerful and convenient class that provides default implementation of few of the important interfaces :
public class ActionSupport implements Action, Validateable,
   ValidationAware, TextProvider, LocaleProvider, Serializable
{
 ...
}
Note:Instead of implementing Action interface, it is better to extend the ActionSupport, Since the ActionSupport class implements Action interface along with other useful interfaces.
The
ActionSupport class give you the ability to do :
1. Validation Declare a validate() method and put the validation code inside.
2. Text localization Use GetText() method to get the message from resource bundle.
LoginAction.properties, (The resource bundle name must be same as Action class name with the extension .properties), and should be in the same folder where the action class lies
Example: Struts 2 Action class extending ActionSupport class
package com.action;
import com.opensymphony.xwork2.ActionSupport;

public class LoginAction extends ActionSupport
{
private static final long serialVersionUID = 6677091252031583948L;
private String userName;

public String execute()
       {
	return SUCCESS;
       }

	public String getUserName()
        {
		return userName;
	}

	public void setUserName(String userName)
        {
		this.userName = userName;
	}

	public void validate()
        {
	   if (!userName.isEmpty())
           {
	   addFieldError("userName", getText("username.required"));
	   }
       }
}
** UPDATE: Android Complete tutorial now available here.
4. Action annotation
Struts 2 has very good support for annotations, you can get rid of the XML file and replace with @action in your action class.
package com.simplecode.action;
import org.apache.struts2.convention.annotation.Action;
import org.apache.struts2.convention.annotation.Namespace;
import org.apache.struts2.convention.annotation.Result;
import org.apache.struts2.convention.annotation.ResultPath;
import com.opensymphony.xwork2.ActionSupport;
@ResultPath(value="/")
public class LoginAction extends ActionSupport
{
@Action(value="login", results={@Result(name="success", location="success.jsp")})
	public String execute()
        {
 	return SUCCESS;
 	}
}
Read MorePosted by Mohaideen Jamil in Struts 1, Struts 2 Tutorial, Struts-2 | 1 comment
In this tutorial we will learn about ActionError & ActionMessage class and its usage.
a) ActionError class is used to send error feedback message to user and it get rendered in jsp by using <s:actionerror/> tag.
b) ActionMessage class – is used to send information feedback message to user, and it get rendered in jsp using <s:actionmessage/> tag.
** UPDATE: Struts 2 Complete tutorial now available here.
In this tutorial we will use the previous tutorials example to implement the functionality of ActionError and ActionMessage class.
Here’s a simple login form, display the error message (actionerror) if the username is empty, Otherwise redirect to another page and display the a welcome message (actionmessage).
1. Folder Structure
Action Class
The action class, do a simple checking to make sure that the username is not empty, if the userName is not valid then the action class set the error message with addActionError() , if its valid then it set the successful message with addActionMessage().
package com.action;

import com.opensymphony.xwork2.ActionSupport;

public class LoginAction extends ActionSupport {

	private static final long serialVersionUID = 6677091252031583948L;

	private String userName;

	public String execute() {

		return SUCCESS;
	}

	public String getUserName() {
		return userName;
	}

	public void setUserName(String userName) {
		this.userName = userName;
	}

	public void validate() {
		if (userName.isEmpty()) {
		addActionError("Username can't be blanked");
		} else {
		addActionMessage("Welcome " + userName + ", You have been Successfully Logged in");
		}
	}
}
You might be interested to read:
JSP
Two simple JSP pages with css style to customize the error message.
login.jsp
<%@taglib uri="/struts-tags" prefix="s"%>
<html>
<head>
<title>Login</title>
</head>
<body>
<h3>ActionError & ActionMessage Example</h3>
	<s:actionerror />
	<s:form action="loginUser">
		<s:textfield name="userName" placeholder="Username" label="Username" />
		<s:submit value="Submit" />
	</s:form>
</body>
</html>
success.jsp
<%@ taglib prefix="s" uri="/struts-tags"%>
<html>
<head>
<title>Welcome Page</title>
</head>
<body>
<h3>ActionError & ActionMessage Example</h3>
	<s:actionmessage />
</body>
</html>
struts.xml
The mapping in struts.xml should be as below
<struts>
	<package name="default" extends="struts-default">
		<action name="loginUser" class="com.action.LoginAction">
			<result name="success">success.jsp</result>
			<result name="input">login.jsp</result>
		</action>
	</package>
</struts>
Run it
http://localhost:8089/ActionErrorMessage/
When Username is invalid, display error message with <s:actionerror/>
When Username is valid, display welcome message <s:actionmessage/>
Note:
In struts 2 when you use <s:actionerror /> tag, it displays the errors with bullets, read the article on Change default style of s:actionerror / s:actionmessage tag in order to remove this
Read MorePosted by Mohaideen Jamil in Struts 2 Tutorial, Struts-2 | 27 comments
Introduction to Struts 2 Framework
In this course we will learn how to use Struts 2 to create an MVC based Java web application.
Struts 2 is a framework for developing MVC based web applications in Java. When building a complex web application it is often difficult to keep business and view logic separate from each other. In this course we will learn how to create a Java based web application using the Struts 2 MVC framework to cleanly separate our views from business logic.
We will cover important features of Struts 2 like creating Actions and mapping them to Results. We will also learn how to use OGNL to access data from Java objects inside of our Views and even see how to create AJAX style views. If you are interesting in learning Struts 2, this course is a great start point to get you started by building your first Struts 2 application.
Struts 2 Complete Tutorial
Struts 2 Quick Start
Non – Form UI Tags
Struts 2 Configurations
Struts 2 Model driven
Struts 2 File Manipulation Tutorial
Struts 2 UI Tags
Struts 2 Control Tags
Struts 2 Data Tags
Interceptors in Struts 2
Struts 2 + Display tag
Struts 2 Theme
Ajax implementation in Struts 2
Struts 2 + jTable Plugin
Struts 2 Integrate with Other Frameworks
Struts 2 FAQ
Struts 2 Errors
Struts 2 Reference
Read MorePosted by Mohaideen Jamil in Struts-2 | 3 comments
Double form submissions(either by refreshing or by hitting the browser back button) can be irritating and in some cases leads to big problem .Luckly struts2 has a build in functionality that prevents such scenarios :<s:token/> tag and token interceptor. As an example, let’s say that we have a form that looks like this:
<s:form action="someAction">
<s:textfield key="key"/>
<s:textfield key="otherKey"/>
<s:textfield key="someOtherKey"/>
<s:submit/>
</s:form>
** UPDATE: Struts 2 Complete tutorial now available here.
In order to prevent double submissions all we have to do is to add tag in the above form. This tag will add a unique identifier in the form that will be used later from the token interceptor in order to check if the form is submitted for the first time or not. In case the form is not submitted for the first time, interceptor’s result will be “invalid.token”.
<action name="actionClass" class="com.simplecode.actionClass">
<interceptor-ref name="token"/>
<interceptor-ref name="defaultStack"/>
<result name="input">/inputPage.jsp</result>
<result name="invalid.token">/invalidToken.jsp</result>
<result name="success">/successPage.jsp</result>
</action>
Note that “invalid.token” result in the above action declaration actually means that in the case of invalid token the user should be redirected in invalidToken.jsp
Recommended Article
Read MorePage 8 of 10«First«...678910»